10 Summer Crafts For Adults

Summer creates ideal conditions for hands-on creative activities. Longer daylight hours, relaxed schedules, and natural inspiration make this season a popular time for DIY projects. Many adults look for Pinterest ideas that combine creativity, relaxation, and practical outcomes. Summer crafts allow individuals to produce handmade decorations, useful home decor items, and thoughtful seasonal gifts while learning new techniques. These projects also provide an opportunity to explore materials that reflect the summer atmosphere, such as natural textures, bright colors, and lightweight fabrics.
This article presents ten beginner friendly summer craft ideas designed specifically for adults. Each idea explains the concept, materials, and step-by-step process needed to complete the project successfully. The goal is to provide practical tutorials that are easy to follow while still producing attractive results. These creative ideas focus on handmade decorations, aesthetic organization tools, and seasonal home decor pieces that can be completed with accessible materials.
Readers will learn how to prepare for craft projects, select appropriate materials, and execute each project step by step. The ideas also encourage creative thinking and personal customization, making them ideal for anyone seeking inspiration for a relaxing and productive summer DIY experience.
Why This Idea Is Trending or Useful
Summer craft projects have gained strong popularity on Pinterest because they combine relaxation with practical creativity. Many adults use creative projects as a way to reduce stress while producing useful items for their homes. The popularity of DIY crafts also reflects a growing interest in handmade decor and personalized design. Rather than purchasing generic decorations, people prefer creating unique items that reflect their own style and seasonal inspiration.
Summer crafts are particularly appealing because they use lightweight materials, bright colors, and natural textures that align with warm weather aesthetics. Common materials such as dried flowers, cotton rope, glass jars, and painted wood are widely available and affordable. This accessibility makes these projects beginner friendly and suitable for people who are new to crafting.
Pinterest users also appreciate projects that serve practical purposes. Handmade organizers, decorative wall art, and table decorations combine aesthetic appeal with functional value. These crafts can be used for home decor, outdoor gatherings, or seasonal interior styling.
Another reason for the popularity of summer crafts is their adaptability. Most projects allow for customization in color, size, and design. This flexibility encourages creativity and experimentation while still providing a clear tutorial structure. As a result, summer craft projects remain one of the most searched categories among trending Pinterest ideas.
Materials and Preparation
Successful DIY projects require proper preparation before the crafting process begins. Organizing materials and planning the project steps helps avoid mistakes and ensures smoother execution. Most summer crafts rely on simple tools and affordable materials that can be easily sourced from craft stores, household supplies, or recycled items.
Common materials used in summer craft projects include acrylic paints, cotton rope, wooden boards, glass jars, decorative paper, natural fibers, and dried flowers. Additional items such as scissors, craft glue, paintbrushes, and measuring tools are also useful for most tutorials. Preparing a clean workspace is important to prevent damage to materials and maintain organization during the project.
Before starting a creative project, it is helpful to review the entire step-by-step process. This allows the crafter to estimate the time required and gather all necessary materials in advance. Planning the design is another useful step. Sketching a simple layout or choosing a color palette helps maintain a cohesive aesthetic.
Proper preparation also includes testing techniques on small material samples. For example, practicing paint patterns or rope knots on scrap pieces can prevent errors during the final design. With thoughtful planning and organized materials, DIY summer crafts become easier to complete and produce more professional results.
Main Ideas
Idea 1: Painted Terracotta Pot Decor
How to Create
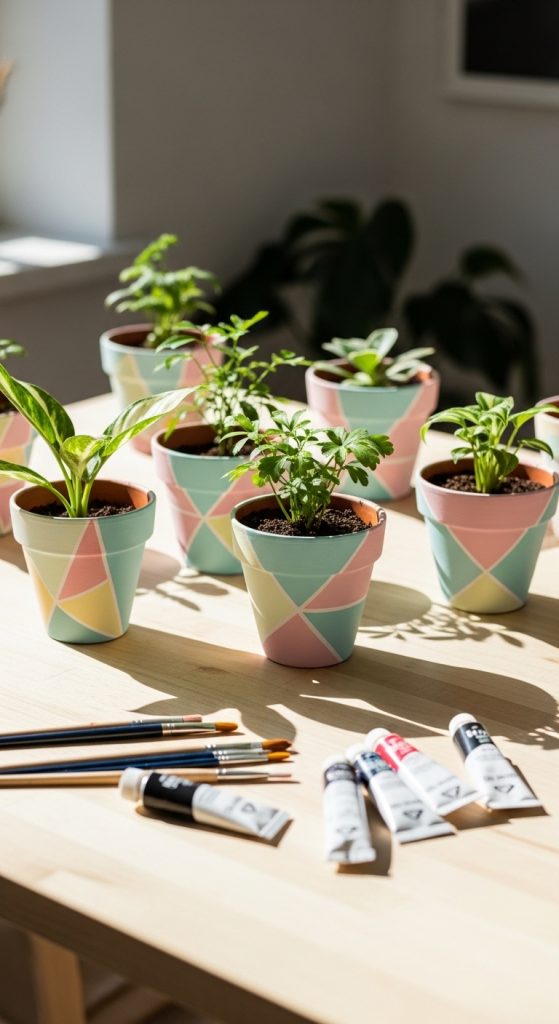
Painted terracotta pots are simple DIY projects that combine practical gardening with decorative design. Terracotta is a porous clay material commonly used for plant containers. Its natural texture makes it ideal for painting and creative customization. Transforming plain terracotta pots into decorative home decor items is a popular Pinterest craft because it requires minimal materials and produces visible results quickly.
The design concept focuses on using acrylic paint to create patterns that reflect summer aesthetics. Bright colors, geometric shapes, or minimalist patterns can all work well depending on the intended style. For example, pastel stripes create a soft modern design, while bold color blocks produce a vibrant decorative effect. Adding simple patterns such as dots, leaf shapes, or abstract lines can further enhance the aesthetic.
This craft also allows for personalization through color combinations and pattern variations. Multiple pots can be designed in coordinating styles to create a cohesive plant display. The finished pots can be used indoors or outdoors, making them both decorative and functional. As a creative project, painted terracotta pots provide an accessible introduction to DIY craft techniques while producing attractive handmade decoration pieces.
Step-by-Step Creation Process
Begin by cleaning the terracotta pots thoroughly. Terracotta surfaces often contain dust or clay residue that may interfere with paint adhesion. Wipe the pot with a slightly damp cloth and allow it to dry completely before applying any paint. If desired, apply a thin layer of primer to create a smoother painting surface and improve color brightness.
Next, plan the design layout. Lightly sketch guidelines with a pencil or use masking tape to create clean geometric shapes. Acrylic paint works well for this project because it dries quickly and provides strong color coverage. Apply thin layers of paint using small brushes for detail work and larger brushes for broader areas.
Allow each layer of paint to dry before adding additional colors or patterns. This prevents smudging and ensures clean edges. Once the design is complete, apply a clear sealant to protect the paint from moisture and sunlight.
After sealing, allow the pot to cure for several hours before planting. The finished decorative pots can be used for herbs, flowers, or small indoor plants. This easy project combines practical gardening with creative decoration and produces stylish summer home decor.
Idea 2: Handmade Rope Coasters
How to Make
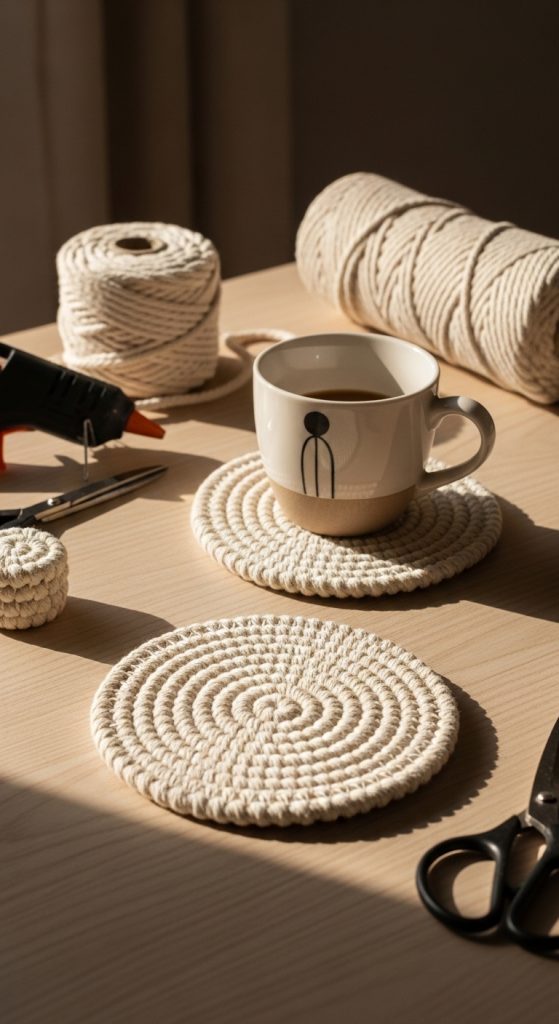
Handmade rope coasters are functional DIY crafts that also serve as decorative table accessories. Coasters protect surfaces from moisture and heat while adding aesthetic detail to dining or coffee tables. Rope coasters are particularly popular in summer decor because natural cotton rope provides a soft texture that complements minimalist and coastal design styles.
The concept of rope coasters is based on forming tightly coiled circular shapes using cotton rope. The coils are secured with craft glue or stitching to maintain the shape. Because the design relies on simple repetition, it is beginner friendly and easy to complete without specialized skills.
These coasters can be customized using colored rope, painted patterns, or decorative stitching. For example, alternating rope colors creates a striped effect, while painted edges produce a modern geometric appearance. Natural rope also pairs well with neutral interior palettes, making it suitable for many home decor themes.
In addition to their decorative value, rope coasters are durable and washable. This makes them practical for everyday use. As a creative project, they offer an opportunity to explore texture and form while producing handmade items that combine aesthetic design with functional purpose.
Step-by-Step Guide
Start by cutting a length of cotton rope approximately one meter long for each coaster. The rope thickness determines the final size of the coaster, so medium-thickness rope works best for balanced proportions. Apply a small amount of craft glue to the rope end and begin coiling it tightly into a spiral shape.
Continue wrapping the rope around the spiral while applying glue along the edges to secure each layer. Maintain even tension to keep the coil flat and uniform. If the rope begins to loosen, gently press the layers together while the glue is still wet.
Once the coaster reaches the desired diameter, trim the rope and secure the end with additional glue. Allow the coaster to dry completely before using it. If desired, apply decorative touches such as painted patterns, fabric dye, or stitched accents.
Repeat the process to create a matching set. Handmade rope coasters provide an attractive table decoration while protecting surfaces from spills. This simple tutorial demonstrates how everyday materials can be transformed into functional summer decor.
Idea 3: Pressed Flower Wall Art
How to Create
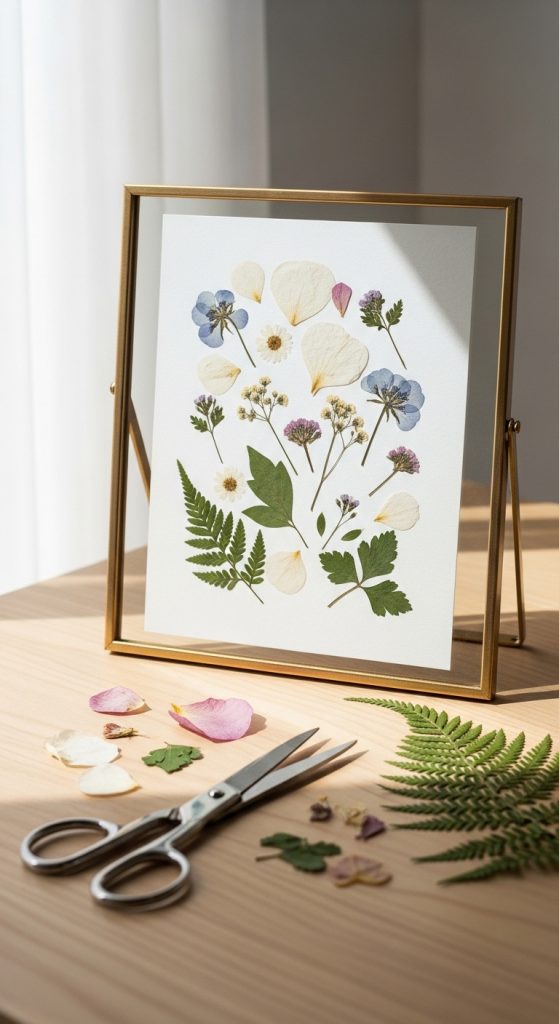
Pressed flower wall art is a decorative craft that preserves natural plant materials and transforms them into framed artwork. Flower pressing is a traditional method that removes moisture from plants while maintaining their shape and color. Once dried, the flowers can be arranged into artistic compositions that reflect the natural beauty of summer.
This craft is widely shared on Pinterest because it combines natural inspiration with minimalist design. Pressed flowers are typically arranged on neutral paper backgrounds to highlight their delicate structure. The resulting artwork creates a calm aesthetic suitable for modern interior decor.
Different types of flowers produce varied visual effects. Small wildflowers create intricate patterns, while larger petals produce bold focal points. Leaves and grasses can also be incorporated to add texture and contrast.
The overall concept of pressed flower wall art focuses on composition and balance. Arranging flowers in symmetrical patterns, botanical illustrations, or abstract layouts allows the crafter to experiment with artistic design. This handmade decoration project brings elements of nature into indoor spaces while offering a relaxing and creative crafting experience.
Step-by-Step Process
Begin by collecting fresh flowers and leaves. Choose specimens that are relatively flat and free from damage. Place the flowers between sheets of absorbent paper and press them inside a heavy book. Leave the flowers to dry for one to two weeks until all moisture is removed.
Once the flowers are fully dried, prepare the artwork background using thick paper or cardstock. Arrange the pressed flowers on the surface without glue to test the composition. Adjust the layout until the design appears balanced and visually appealing.
After finalizing the arrangement, apply small amounts of craft glue to the back of each flower and gently press it onto the paper. Allow the glue to dry completely before handling the artwork.
Place the finished design inside a glass frame to protect the delicate flowers. The framed pressed flower art can be displayed on walls, shelves, or desks. This creative project preserves seasonal beauty while producing elegant handmade home decor.
Idea 4: DIY Candle Jar Decorations
How to Create
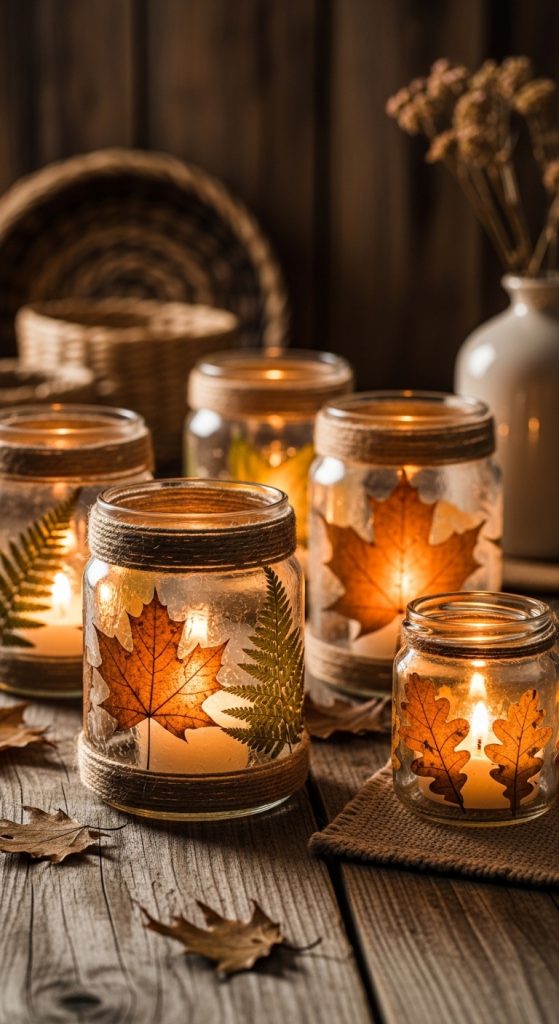
Decorated candle jars are simple crafts that transform ordinary glass containers into aesthetic decorative pieces. Glass jars are widely used in DIY projects because they are durable, reusable, and easy to customize. Adding decorative elements such as paint, twine, or pressed leaves creates unique candle holders suitable for summer home decor.
The concept behind this project focuses on enhancing the appearance of the jar while maintaining its function as a candle container. Decorative layers can be applied to the outer surface without interfering with the interior candle flame. Frosted paint, textured wraps, or layered natural materials all create visually appealing results.
Candle jar decorations are especially popular during summer because they complement outdoor gatherings and evening relaxation spaces. Soft candlelight combined with handmade decoration produces a warm atmosphere suitable for patios, balconies, or indoor tables.
This project also supports creative experimentation. Multiple jars can be decorated using different techniques, creating a coordinated set with varied textures and patterns. The final result is a practical decoration that combines lighting and design.
Step-by-Step Creation
Begin by thoroughly cleaning the glass jar to remove labels, adhesive residue, and dust. A clean surface ensures that paint or glue adheres properly during the decoration process. Dry the jar completely before applying any materials.
Choose a decorative method based on the desired aesthetic. For a minimalist style, apply frosted glass paint using a sponge or brush. For a textured design, wrap natural twine or cotton string around the jar while securing it with craft glue. Dried leaves or pressed flowers can also be attached to create botanical decoration.
Allow the decorative materials to dry fully before inserting a candle. If paint is used, applying a protective sealant can improve durability.
Place a small candle inside the jar and test the lighting effect. The decorated jar will produce soft glowing patterns when illuminated. These handmade candle holders create a calm decorative atmosphere and serve as functional lighting for summer evenings.
Idea 5: Fabric Wall Hanging
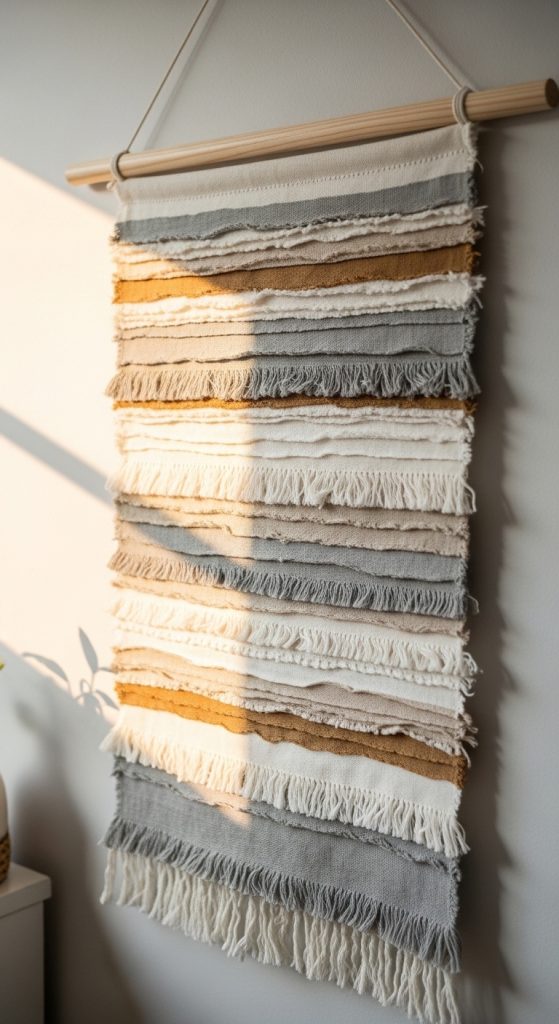
How to Create
Fabric wall hangings are textile crafts that add color and texture to interior spaces. Unlike framed artwork, fabric hangings introduce softness and movement to wall decor. This makes them particularly suitable for summer interiors, where lightweight materials and airy aesthetics are often preferred.
The concept of fabric wall hanging focuses on arranging strips of fabric on a horizontal rod or wooden stick. Different fabrics can be combined to create layered patterns, color gradients, or geometric designs. Natural materials such as cotton, linen, and canvas are commonly used because they maintain structure while remaining lightweight.
Fabric wall hangings can reflect many design styles. Neutral tones create a minimalist style suitable for modern decor, while colorful fabrics produce vibrant decorative effects. Fringe edges, braided sections, and woven patterns can also be added to enhance visual interest.
This creative project allows for extensive customization while remaining beginner friendly. It requires minimal tools and can be completed in a short amount of time. The finished hanging becomes a unique handmade decoration that adds personality to walls and interior spaces.
Step-by-Step Creation
Begin by selecting a wooden dowel or stick that will act as the support structure. Cut fabric pieces into strips of varying lengths. The variation in length helps create a layered and dynamic appearance once the fabric is attached.
Attach the fabric strips to the rod using simple knots. Loop each strip over the rod and pull the ends through the loop to secure it. Continue attaching strips until the rod is fully covered. Mixing colors and textures during this process creates a visually balanced design.
Once all strips are attached, trim the lower edges into a desired shape. Straight edges produce a clean modern look, while angled cuts create a more dynamic pattern.
Finally, attach a piece of string or cord to both ends of the rod to create a hanging loop. Mount the finished fabric wall hanging on a wall hook or nail. This DIY project transforms simple textiles into attractive wall decoration that enhances summer home decor aesthetics.
Idea 6: Painted Wooden Tray
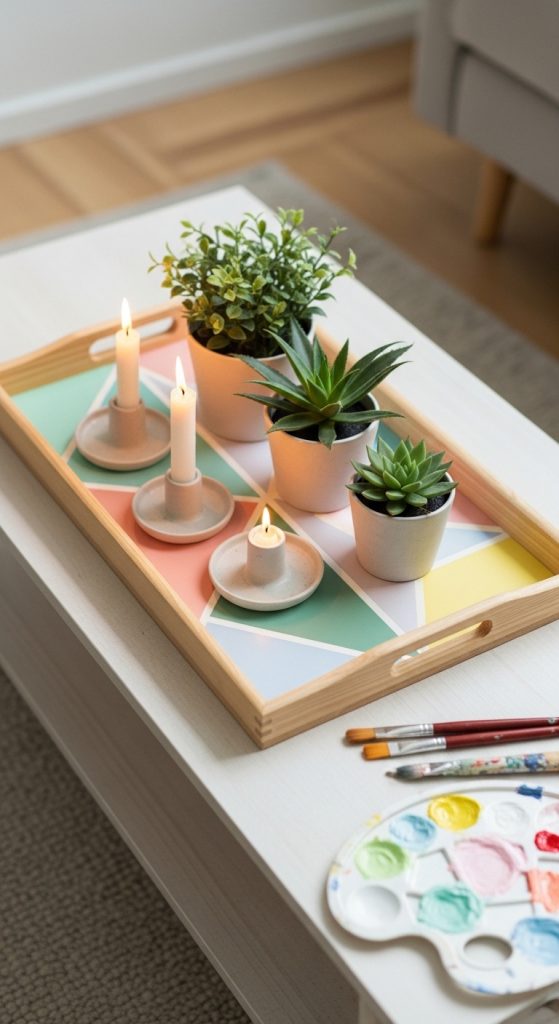
How to Create
A painted wooden tray is a practical DIY craft that combines decorative design with everyday functionality. Wooden trays are useful for organizing small items, serving drinks, or displaying decorative objects. By adding painted patterns or color accents, a simple tray can become an attractive home decor piece that reflects summer aesthetics. This project is commonly shared among Pinterest ideas because it is beginner friendly and requires only basic materials.
The design concept focuses on enhancing the natural surface of wood with color, pattern, and protective finishing. A tray can feature geometric shapes, minimalist color blocking, or subtle decorative lines. Neutral color palettes often create a clean modern design, while brighter tones reflect a more vibrant summer decoration style. Adding painted borders or layered shapes can also create a visually balanced composition.
Wood is a versatile material that accepts many types of paint and finishes. Acrylic paint is commonly used because it dries quickly and provides strong color coverage. After painting, a clear sealant protects the surface from scratches and moisture. The final tray can be used for serving beverages, organizing accessories, or displaying decorative items. This creative project transforms a simple wooden object into a personalized handmade decor element that is both useful and aesthetically pleasing.
Step-by-Step Guide
Begin by preparing the wooden tray surface. Lightly sand the wood using fine sandpaper to remove rough areas and create a smooth painting surface. Wipe away dust using a dry cloth to ensure the paint adheres properly. If the wood is unfinished, applying a thin primer layer can improve paint coverage and color brightness.
Next, plan the tray design. Use painter’s tape to outline shapes or borders if geometric patterns are desired. Acrylic paint can then be applied using flat brushes or foam applicators. Apply thin layers of paint to prevent uneven texture and allow each layer to dry before adding additional colors or details.
Once the painting is complete, remove any tape carefully to reveal clean edges. Allow the tray to dry completely before applying a protective clear sealant. This coating helps protect the paint from scratches and moisture during regular use.
After the sealant has cured, the tray is ready to use. The finished decorative tray can serve drinks, organize small objects, or act as a display base for candles and plants. This DIY tutorial demonstrates how simple painting techniques can elevate everyday wooden items into stylish summer decor pieces.
Idea 7: Decorative Shell Frame
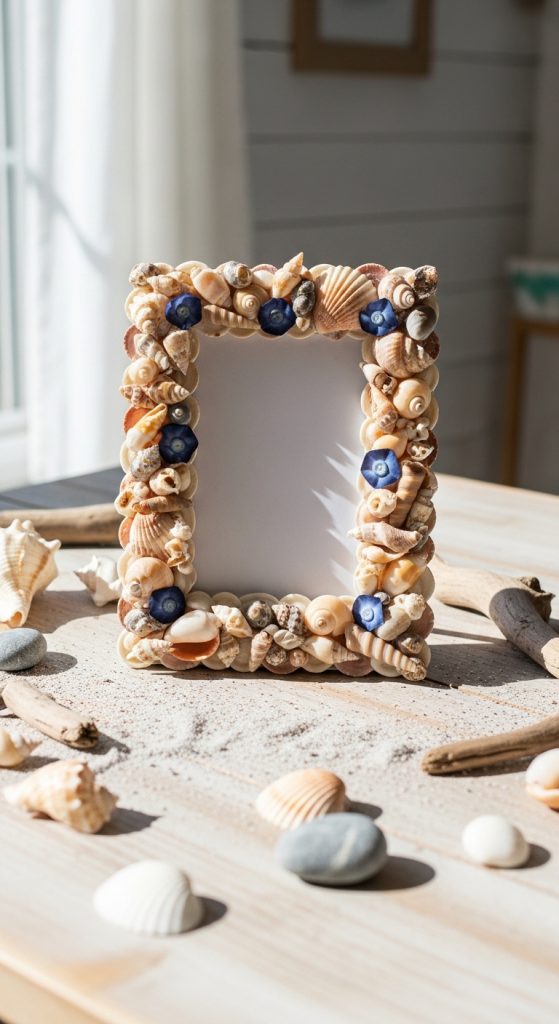
How to Create
Decorative shell frames are popular summer crafts because they incorporate natural coastal elements into home decor. Seashells are widely associated with beach environments, making them ideal materials for seasonal decoration projects. By attaching shells to a picture frame, a simple object can be transformed into a textured decorative piece that reflects coastal inspiration.
The concept behind this craft involves arranging shells around the edges of a basic frame to create a layered border. Shells vary in size, shape, and color, which allows for many creative combinations. Some designs use uniform shell types for a clean appearance, while others mix different shells to create a more organic composition. The natural patterns and textures of shells add visual depth to the frame without requiring complex techniques.
This project is especially appealing because it allows the use of collected shells from beach trips or craft store materials. The finished frame can hold photographs, artwork, or printed designs, making it both decorative and meaningful. Shell frames also complement coastal interiors, minimalist summer decor, or nature inspired decoration styles. As a creative project, this craft combines simple assembly methods with natural materials to produce an elegant seasonal decoration.
Step-by-Step Guide
Begin with a plain wooden or plastic photo frame. Clean the surface to remove dust and ensure that glue adheres properly. If desired, the frame can be painted in a neutral color such as white or light beige to create a coastal background for the shells.
Next, arrange the shells around the frame without glue to experiment with placement. Position larger shells first to establish the main structure of the border. Smaller shells can then fill empty spaces and create a balanced design. Taking time to plan the layout helps prevent uneven spacing.
Once the arrangement is finalized, apply small amounts of strong craft glue to the back of each shell and attach them to the frame. Press gently to ensure secure adhesion. Continue adding shells until the border is complete.
Allow the glue to dry completely before inserting a photograph or artwork. The finished shell frame can be displayed on shelves, desks, or walls. This handmade decoration captures summer inspiration and brings natural textures into interior design.
Idea 8: Mason Jar Herb Planter
How to Create
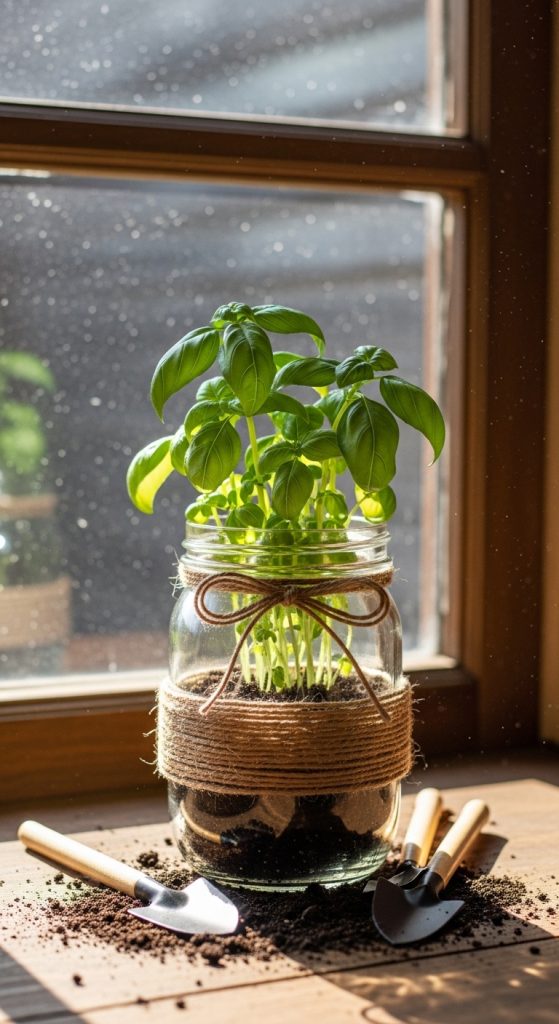
A mason jar herb planter is a practical DIY project that combines home decor with small-scale gardening. Glass jars are widely used in craft projects because they are durable, reusable, and visually appealing. Transforming a jar into a herb planter creates a functional decoration that supports indoor plant growth while adding natural elements to interior spaces.
The concept of this craft focuses on creating a small planting environment inside the jar. Herbs such as basil, mint, parsley, and thyme grow well in compact containers when provided with proper soil and sunlight. The transparent glass jar also allows the soil layers and plant roots to be visible, adding an interesting visual element to the design.
Decorative touches can further enhance the jar planter. Wrapping twine around the neck of the jar, attaching labels, or painting simple patterns can personalize the design. These additions help integrate the planter into different interior styles, including rustic decor, minimalist design, or modern kitchen organization.
This creative project provides both decorative and practical benefits. Fresh herbs can be harvested for cooking while the planter adds greenery to indoor spaces. As a beginner friendly tutorial, the mason jar herb planter demonstrates how simple materials can support sustainable and aesthetic DIY gardening.
Step-by-Step Guide
Start by selecting a clean mason jar with a wide opening. Wash the jar thoroughly and allow it to dry completely. The jar should be transparent so the soil layers and plant roots remain visible for decorative effect.
Create a drainage layer by placing small pebbles or stones at the bottom of the jar. This helps prevent excess moisture from damaging the plant roots. Next, add a layer of potting soil suitable for herb growth. Leave enough space at the top of the jar to insert the herb plant.
Carefully place the herb plant into the soil and gently press the surrounding soil to stabilize the roots. Add additional soil if necessary to support the plant structure. Water the plant lightly after planting.
For decoration, wrap twine around the jar neck or attach a small label identifying the herb type. Place the planter near a window where it will receive adequate sunlight. This DIY herb planter serves as both a kitchen decoration and a functional source of fresh herbs.
Idea 9: DIY Summer Wreath
How to Create
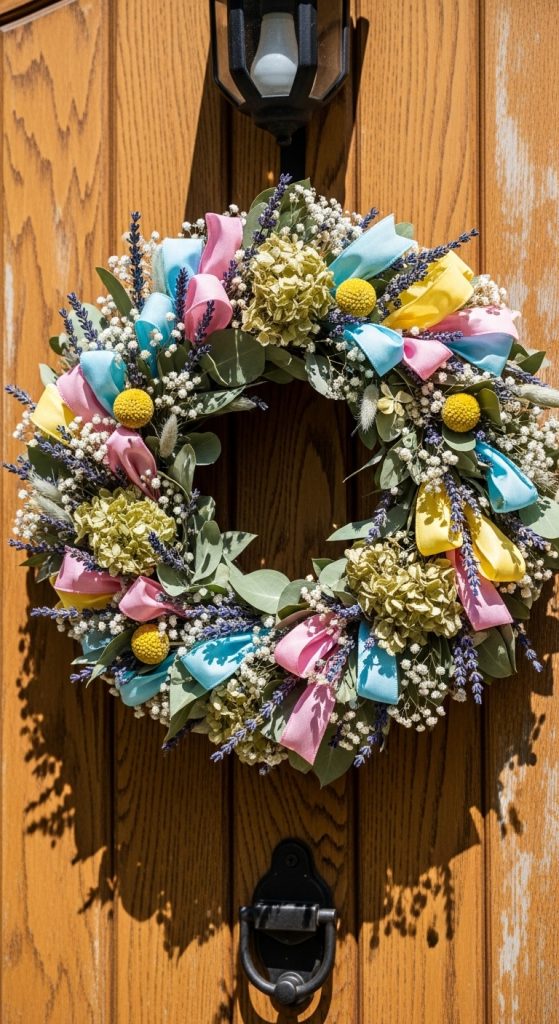
A summer wreath is a decorative arrangement designed to hang on doors or walls as seasonal decoration. Wreaths are circular by design, symbolizing continuity and balance. While wreaths are often associated with holidays, summer versions focus on light materials, bright colors, and natural textures.
The design concept for a summer wreath typically involves attaching decorative elements to a circular base. Materials such as dried flowers, leaves, ribbons, and lightweight fabric pieces are commonly used. These materials create texture and color while maintaining a fresh seasonal appearance. Neutral base rings made of wood, metal, or woven branches provide structural support for the decoration.
Summer wreaths are popular Pinterest ideas because they allow creative flexibility while remaining beginner friendly. Each wreath can be customized according to color schemes or available materials. For example, pastel tones produce a soft aesthetic, while vibrant flowers create bold seasonal decoration.
The finished wreath acts as a welcoming decorative feature for entryways, living spaces, or garden areas. It introduces natural elements into the home while highlighting seasonal creativity. As a handmade craft project, wreath making encourages experimentation with arrangement, balance, and texture.
Step-by-Step Guide
Begin with a circular wreath base made of wire, wood, or woven branches. This structure will support the decorative elements. Lay out all materials before starting to visualize how the design will appear once assembled.
Attach larger decorative pieces first. Dried flowers, leaves, or fabric bundles can be secured to the base using floral wire or craft glue. Position these elements evenly around the wreath to maintain visual balance.
Next, add smaller decorations to fill gaps between the larger elements. Ribbons, small artificial flowers, or greenery can create additional texture and depth. Adjust the placement until the wreath appears evenly decorated from all sides.
Once the arrangement is complete, secure all elements firmly to prevent movement. Attach a ribbon or loop at the top of the wreath for hanging. The finished wreath can be placed on a door, wall, or window to introduce seasonal decoration into the home.
Idea 10: Hand-Painted Stone Garden Markers
How to Create
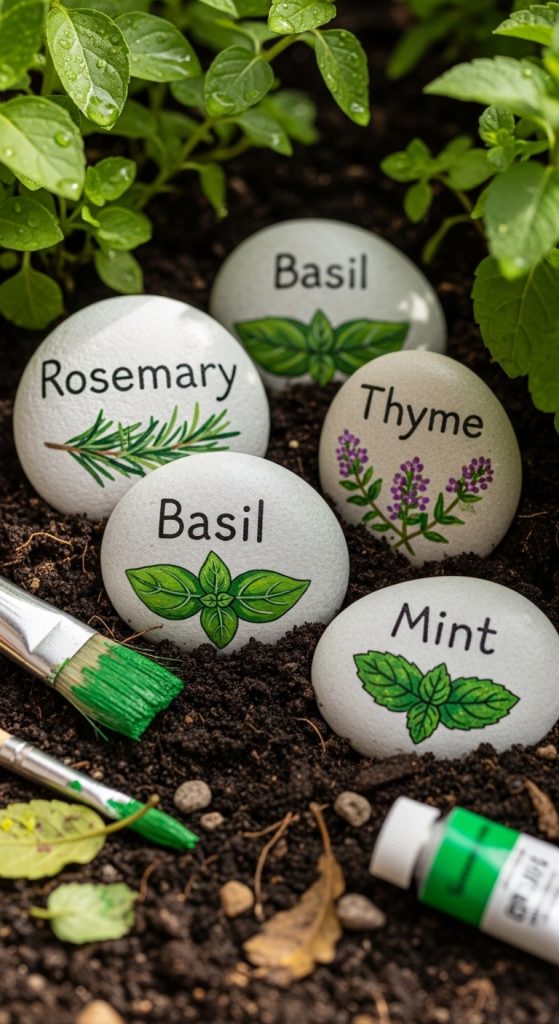
Hand-painted stone garden markers are simple craft projects that help organize garden spaces while adding decorative detail. Garden markers are small signs used to identify plant types in flower beds, herb gardens, or vegetable plots. Painting these markers on stones creates durable labels that can withstand outdoor conditions.
The concept of this craft involves selecting smooth stones and painting plant names or small illustrations on their surfaces. The natural shape and texture of stones make each marker unique. Painted stones can display herb names, vegetable symbols, or decorative patterns that enhance garden organization.
This project is especially useful for beginner gardeners who want a practical labeling system. It also allows for creative expression through color, lettering, and illustration. Bright paint colors make the markers easy to read, while decorative borders or leaf patterns enhance the visual appearance.
Stone garden markers combine functionality with creative design. They improve garden organization while serving as small decorative elements within planting areas. As a summer craft project, this idea connects artistic creativity with outdoor gardening activities.
Step-by-Step Guide
Begin by collecting smooth stones with flat surfaces suitable for painting. Wash the stones with water to remove dirt and allow them to dry completely before starting the design process.
Apply a base layer of acrylic paint to the stone surface if a solid background color is desired. Light colors such as white or pastel shades help make lettering more visible. Allow the base layer to dry fully before adding details.
Next, use a fine brush or paint marker to write the name of the plant on the stone. Simple lettering styles work best for readability. Small illustrations such as leaves, flowers, or herb shapes can be added around the text to enhance decoration.
Once the design is complete, apply a waterproof sealant to protect the paint from rain and sunlight. After drying, place the markers near the corresponding plants in the garden. These handmade markers help maintain garden organization while adding creative decoration to outdoor spaces.
Common Beginner Mistakes and How to Avoid Them
Many beginners encounter challenges when starting DIY craft projects, especially when they skip preparation steps or rush the process. One common mistake is beginning a project without organizing materials in advance. When tools or supplies are missing, the workflow becomes interrupted and the final results may appear incomplete. Preparing all materials before starting helps maintain efficiency and reduces frustration during the crafting process.
Another frequent issue involves applying paint, glue, or decorative elements too quickly. Many craft materials require proper drying time between steps. If additional layers are applied before the previous layer has dried, surfaces may smudge or lose definition. Allowing adequate drying time ensures cleaner results and improves the durability of the finished project.
Poor planning of design layout is another challenge. Without testing arrangements beforehand, decorative elements may appear uneven or unbalanced. Temporarily placing materials before attaching them allows adjustments to be made easily.
Using excessive glue is also a common mistake. Large amounts of adhesive can create visible residue or weaken the final structure. Applying small, controlled amounts produces stronger and cleaner results.
By preparing materials, planning designs carefully, and working patiently, beginners can complete DIY summer crafts with more consistent and professional outcomes.
Practical Tips for Better Results
Achieving strong results in DIY craft projects often depends on small improvements in technique and preparation. One useful tip is to test materials before applying them to the final project. For example, testing paint colors on scrap surfaces helps confirm how the color appears once dry. This step prevents unexpected changes in tone or coverage.
Maintaining a clean workspace is another important practice. Craft projects often involve multiple materials such as paint, glue, fabric, and natural elements. Organizing these items during the project helps prevent spills, lost tools, or accidental damage to the design.
Using proper tools can also improve the quality of results. Fine brushes allow precise detailing, while larger brushes provide smooth paint coverage on wider surfaces. Choosing the correct tool for each step helps create more controlled and professional finishes.
Another effective strategy is working in layers. Applying thin layers of paint or decoration creates smoother textures and stronger adhesion. Thick layers may crack or peel over time.
Finally, patience plays an important role in successful crafting. Allowing sufficient drying time, checking alignment of materials, and carefully following the tutorial steps help ensure that the finished project remains durable and visually appealing.
Styling, Presentation, or Organization Ideas
After completing DIY craft projects, thoughtful presentation can significantly enhance their visual impact. Proper styling allows handmade items to become integrated elements of home decor rather than standalone objects. For example, painted terracotta pots can be arranged in groups of three or five to create balanced plant displays on shelves or windowsills.
Decorative trays can be used as central elements on coffee tables. Placing candles, small plants, or books on the tray creates an organized arrangement that highlights the handmade object while maintaining a clean aesthetic. Similarly, rope coasters can be paired with neutral tableware to create coordinated tabletop decoration.
Wall crafts such as pressed flower art or fabric hangings benefit from strategic placement. Hanging them at eye level ensures that the details remain visible. Grouping several framed pieces together can create a gallery style arrangement that adds visual interest to blank walls.
Outdoor styling can also incorporate summer crafts. Candle jars and wreaths work well in patios, balconies, or garden seating areas. Natural materials used in these crafts complement outdoor environments and enhance seasonal atmosphere.
By integrating handmade items into organized displays, these creative projects contribute to cohesive home decor and elevate the overall presentation of interior spaces.
Budget or Time Planning
Effective planning helps ensure that DIY projects remain affordable and manageable within available time. Many summer crafts rely on materials that are inexpensive or easily sourced from household supplies. Reusing glass jars, leftover fabric, or collected natural elements can significantly reduce project costs while still producing attractive results.
Creating a material list before starting a project prevents unnecessary purchases. Reviewing the tutorial steps allows crafters to identify exactly which supplies are required. Buying only the necessary materials helps maintain a controlled budget.
Time planning is also useful, especially when projects involve drying periods for paint or glue. Scheduling projects over several short sessions allows materials to cure properly while keeping the crafting process relaxed. For example, painting and decoration can be completed one day, while sealing and finishing steps can occur the following day.
Working on multiple small projects simultaneously can also improve efficiency. While one item dries, another can be assembled or painted. This approach maximizes productivity without increasing stress.
Through thoughtful budgeting and realistic scheduling, DIY summer crafts remain enjoyable creative projects rather than time-consuming tasks.
Creative Expansion and Advanced Inspiration
Once basic summer craft techniques become familiar, many opportunities exist for expanding creative projects into more advanced designs. One approach involves combining multiple craft techniques within a single project. For example, painted trays can incorporate rope handles or pressed flower decorations to create more complex designs.
Experimenting with mixed materials is another way to expand creativity. Combining wood, glass, fabric, and natural fibers introduces new textures and visual contrasts. These material combinations allow crafts to become more visually dynamic while maintaining handmade character.
Advanced inspiration can also include larger projects such as decorative wall panels, customized furniture accents, or coordinated seasonal decor collections. Creating sets of matching items helps maintain consistency across interior spaces.
Another creative direction involves incorporating lighting elements. Decorative jars, lanterns, and framed designs can integrate small LED lights to enhance evening ambiance. This approach transforms simple decoration into atmospheric design elements.
Seasonal adaptation is also possible. Techniques used in summer crafts can be applied to autumn, winter, or spring decor by adjusting materials and color palettes. Through experimentation and practice, simple beginner friendly projects can evolve into more sophisticated creative works that reflect personal style and design inspiration.