20 basement entertainment wall ideas
Designing a basement entertainment wall is one of the most impactful ways to transform an underutilized lower level into a vibrant, functional gathering space. Whether your basement serves as a cozy family movie lounge, a lively game-day headquarters, or a stylish adult hangout, the entertainment wall becomes the focal point that anchors the entire room. It’s where technology meets design—where TVs, sound systems, storage, lighting, and décor blend together into one cohesive statement feature.

Basements offer a unique advantage compared to main living rooms: they typically have fewer windows and controlled lighting conditions. That makes them ideal for immersive media experiences, from cinematic movie nights to intense gaming sessions. But without thoughtful planning, an entertainment wall can easily become cluttered with cords, mismatched furniture, and awkward proportions.
A well-designed basement entertainment wall should accomplish several goals. First, it must optimize viewing comfort by considering wall size, seating distance, and screen placement. Second, it should integrate storage for devices, media accessories, and decorative accents without overwhelming the space. Third, it needs to balance aesthetics and functionality, ensuring that the wall enhances the basement’s style—whether modern, rustic, industrial, or minimalist.
In this guide, you’ll discover 20 detailed basement entertainment wall ideas designed to inspire and guide you step by step. Each concept includes a clear explanation, practical instructions, and a materials list so beginners can confidently bring their vision to life. From sleek built-ins and LED-lit panels to budget-friendly shiplap features and bold accent walls, these ideas are designed to be Pinterest-worthy, saveable, and realistic to execute.
Let’s begin with the first 10 transformative entertainment wall ideas that can completely elevate your basement space.
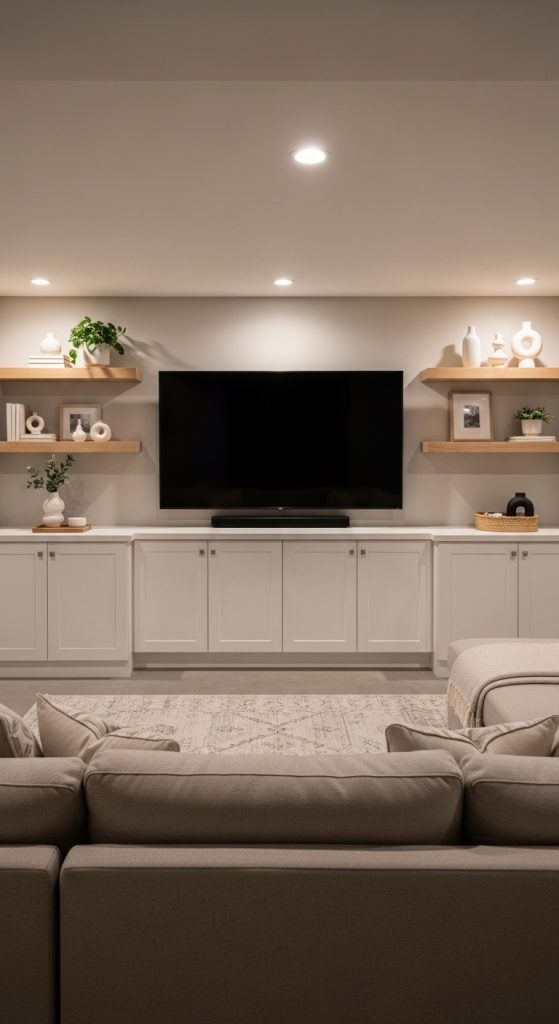
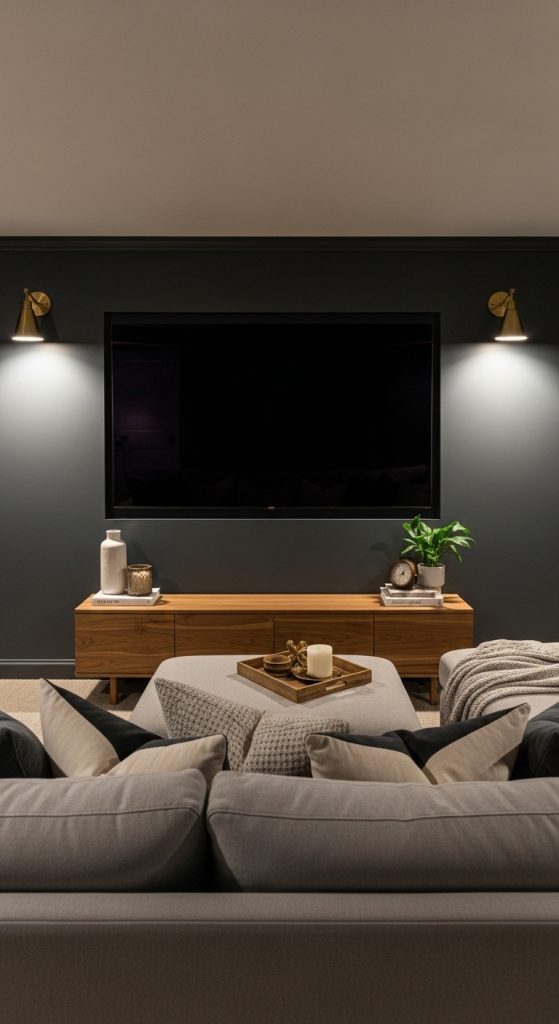
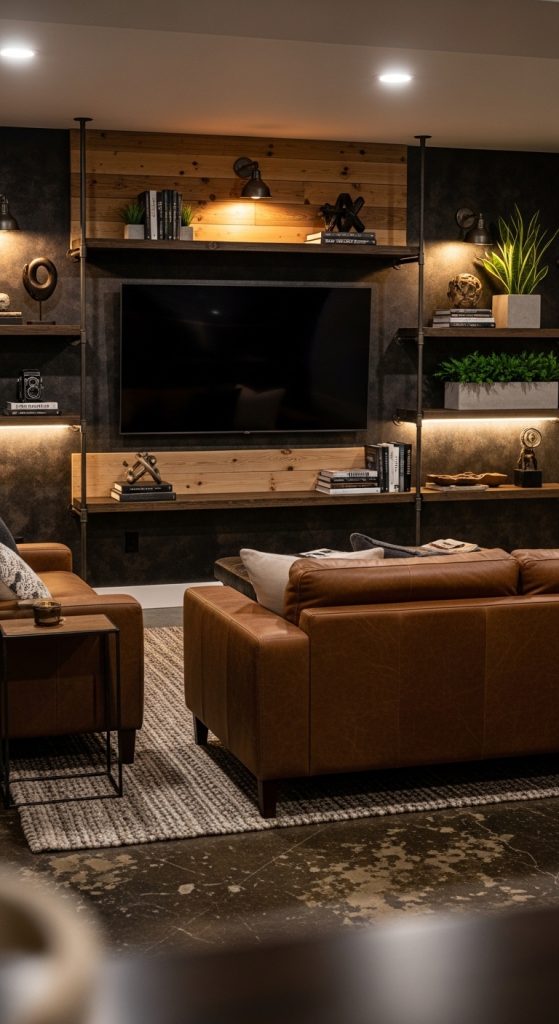
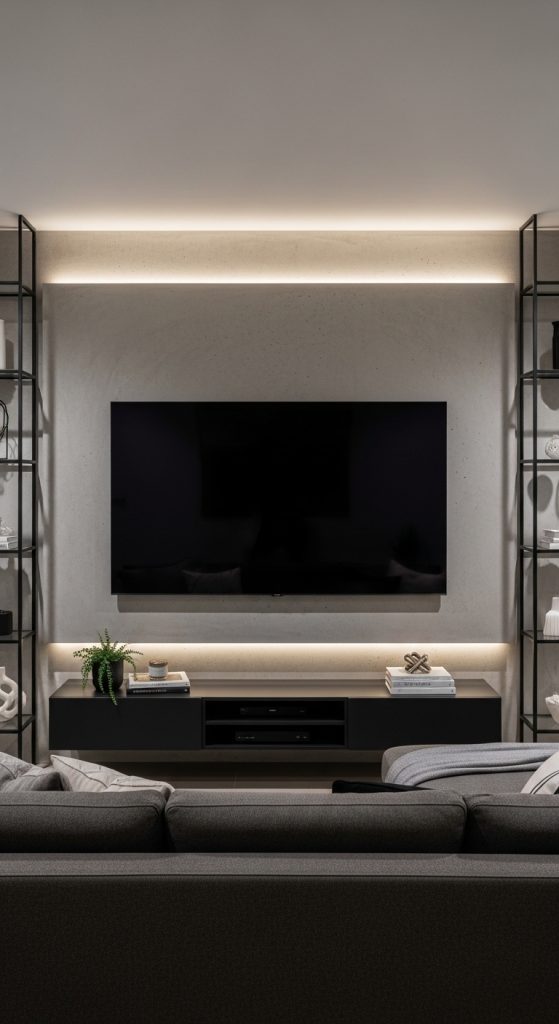
1. Built-In Entertainment Wall with Floating Shelves
Introduction
A built-in entertainment wall with floating shelves is one of the most timeless and functional designs for a basement media space. It instantly makes the room feel custom, intentional, and high-end. Unlike freestanding TV stands, built-ins maximize vertical space, create seamless storage, and eliminate clutter from visible cords and devices. This design works beautifully in both large open basements and compact entertainment corners.
What It Is
This idea centers around a wall-mounted TV framed by symmetrical built-in cabinets and floating shelves. The lower section typically includes closed cabinetry for hiding electronics, gaming consoles, remotes, and board games. Above or beside the television, floating shelves display decorative items, books, framed art, or subtle lighting accents.
Step-by-Step How-To
- Measure the wall and determine the ideal TV height (center at eye level when seated).
- Sketch a symmetrical layout for cabinets and shelves.
- Install a mounting bracket for the TV.
- Build or purchase base cabinets and secure them to studs.
- Install floating shelf brackets and mount shelves evenly spaced.
- Conceal wiring behind drywall or use cable management kits.
- Paint or stain all components to match your basement aesthetic.
- Style shelves with balanced décor (avoid overcrowding).
Materials Needed
- Wall-mounted TV bracket
- Base cabinets (custom or pre-made)
- Floating shelves
- Stud finder
- Level
- Drill and screws
- Paint or stain
- Cable management kit
This setup creates a polished, Pinterest-worthy entertainment wall that looks professionally designed yet is achievable for DIY beginners.
2. Shiplap Accent Wall with Mounted TV
Introduction
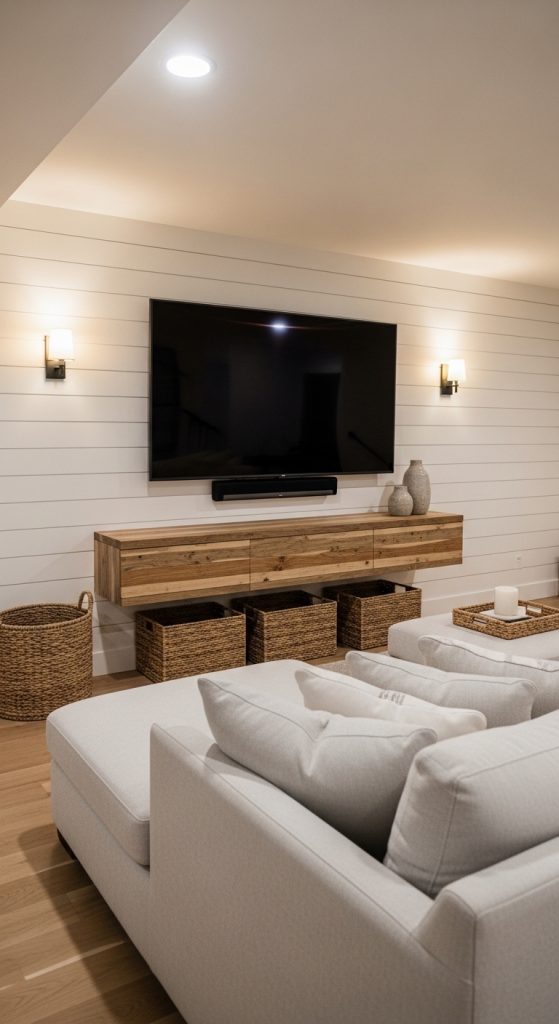
A shiplap entertainment wall adds warmth and character to a basement that might otherwise feel cold or unfinished. It’s a popular Pinterest favorite because it blends farmhouse charm with modern simplicity. Shiplap brings subtle texture without overwhelming the room, making it perfect for basements with low ceilings or limited natural light.
What It Is
This design features horizontal shiplap panels installed across the entertainment wall, with a TV mounted directly onto the textured surface. The clean lines of the boards create a visually cohesive backdrop that enhances the television instead of competing with it.
Step-by-Step How-To
- Prepare the wall by cleaning and filling holes.
- Locate studs for secure panel installation.
- Start installing shiplap boards from the bottom upward.
- Use a level to maintain straight lines.
- Cut openings for outlets and cable access.
- Paint or whitewash the shiplap for a brighter look.
- Mount the TV securely into studs.
- Add a simple floating console below for storage.
Materials Needed
- Shiplap boards
- Nail gun or screws
- Level
- Stud finder
- Paint and primer
- TV wall mount
- Floating media console
The result is a cozy yet stylish focal point that transforms your basement into a warm entertainment retreat.
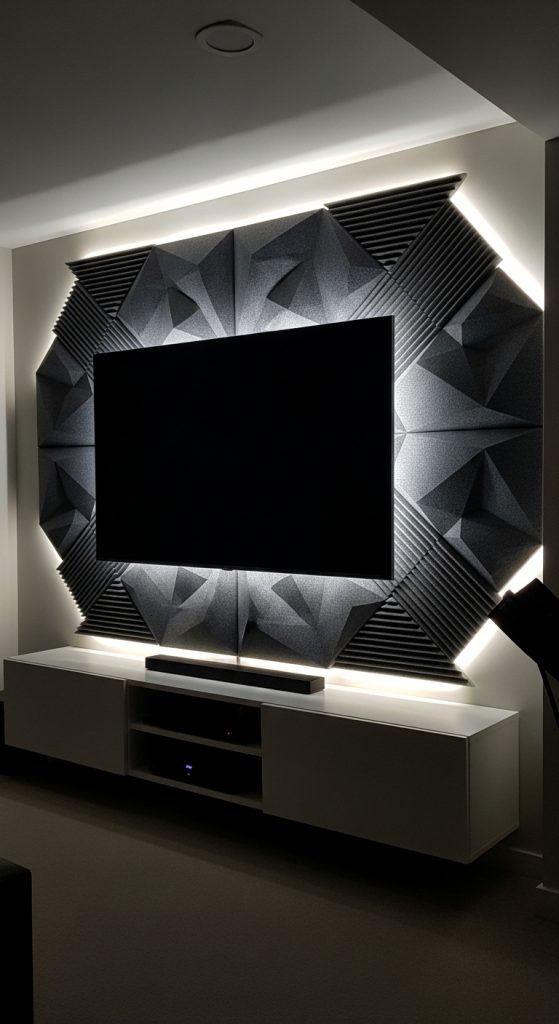
3. LED Backlit Media Wall
Introduction

If you want your basement to feel like a luxury home theater, an LED backlit entertainment wall is a game-changer. This idea enhances mood, reduces eye strain during movie nights, and adds a high-tech glow that instantly elevates the space. It’s especially effective in darker basements where lighting can be fully controlled.
What It Is
This concept incorporates LED strip lighting behind the TV, along shelving edges, or inside recessed panels. The glow creates a floating effect around the television, making it appear larger and more immersive.
Step-by-Step How-To
- Mount the TV to the wall.
- Attach LED strips to the back edges of the TV or wall panel.
- Connect strips to a power source and remote controller.
- Conceal wires behind drywall or cable covers.
- Test different lighting colors and brightness levels.
- Optionally add dimmable wall sconces for layered lighting.
Materials Needed
- LED strip lights (color-changing preferred)
- Adhesive mounting clips
- Extension cord
- TV wall mount
- Remote or smart controller
- Cable covers
This sleek and modern design creates a cinematic experience perfect for movie lovers and gamers alike.
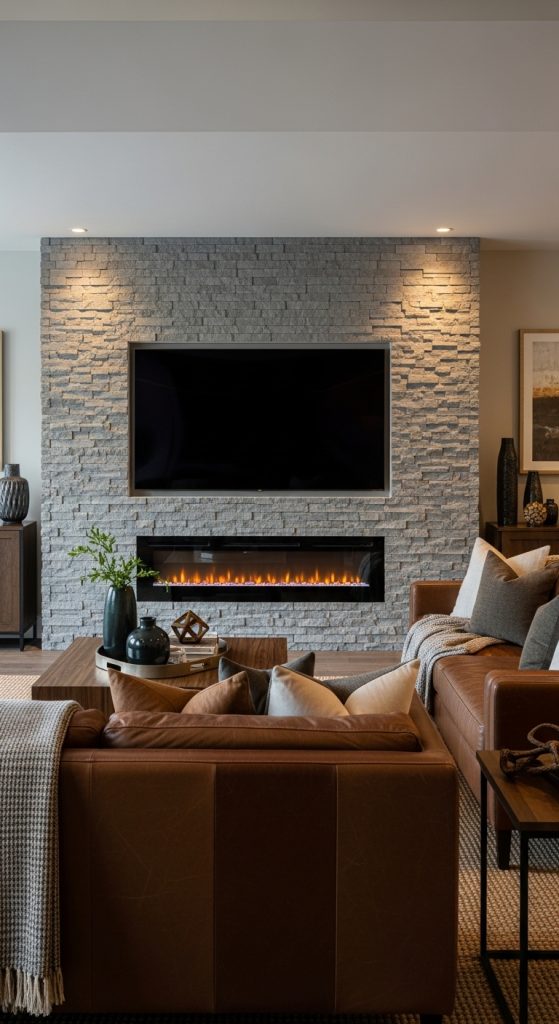
4. Stone Veneer Feature Wall
Introduction
For a bold and dramatic basement entertainment wall, stone veneer offers texture and depth that immediately draws attention. This design works beautifully in rustic, industrial, or modern farmhouse basements. It adds natural character while maintaining a polished look.
What It Is
A stone veneer wall uses lightweight faux or real stone panels applied directly to the wall behind the TV. The texture contrasts beautifully with sleek electronics.
Step-by-Step How-To
- Clean and prep the wall surface.
- Apply adhesive mortar to stone panels.
- Press panels firmly into place, starting at the bottom.
- Stagger seams for a natural appearance.
- Allow adhesive to cure fully.
- Mount TV into studs.
- Add subtle lighting to highlight the stone texture.
Materials Needed
- Stone veneer panels
- Adhesive mortar
- Trowel
- Level
- TV mount
- Accent lighting
The result is a striking entertainment wall that feels high-end and timeless.
5. Dark Painted Moody Media Wall
Introduction
Painting your entertainment wall a deep, moody color instantly creates a cozy, theater-like atmosphere. Dark walls minimize screen glare and make the TV blend seamlessly into the background.
What It Is
This design uses rich tones like charcoal, navy, forest green, or matte black to create depth and sophistication.
Step-by-Step How-To
- Clean and prime the wall.
- Apply two coats of dark paint.
- Mount the TV once paint dries.
- Add contrasting décor like brass sconces or wood shelving.
- Incorporate warm lighting to balance darkness.
Materials Needed
- Primer
- Dark interior paint
- Rollers and brushes
- Painter’s tape
- TV wall mount
- Accent décor
This is one of the easiest yet most impactful basement entertainment wall upgrades.
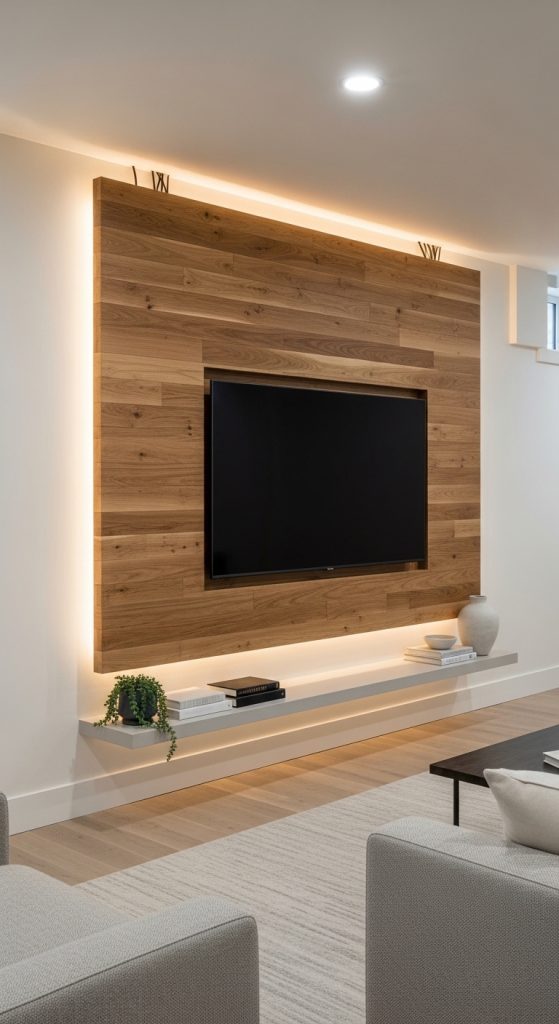
6. Minimalist Floating Panel Wall
Introduction
A minimalist floating panel wall offers clean lines and contemporary elegance, perfect for modern basement designs.
What It Is
This concept uses a large wood or MDF panel mounted slightly off the wall, creating a layered floating effect behind the TV.
Step-by-Step How-To
- Measure and cut panel to desired size.
- Paint or stain panel.
- Mount spacers behind panel.
- Secure panel to wall studs.
- Mount TV directly onto panel.
- Hide cables within the cavity space.
Materials Needed
- MDF or plywood panel
- Paint or stain
- Spacers
- Screws
- Drill
- TV mount
This idea keeps the basement sleek, organized, and visually balanced.
7. Industrial Brick Entertainment Wall
Introduction
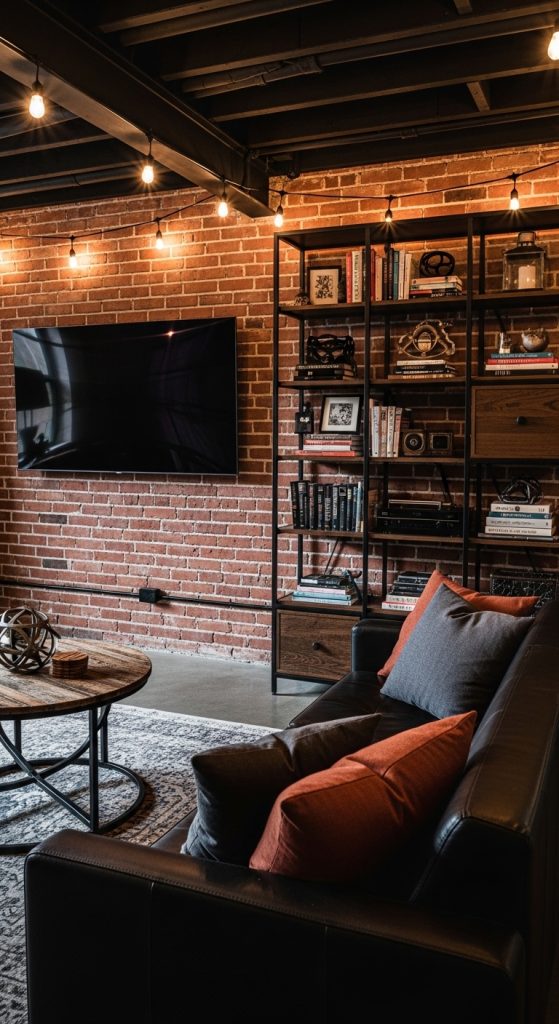
An exposed brick wall adds urban character and edgy style to a basement entertainment space.
What It Is
Using faux brick panels or real brick, this wall becomes a textured backdrop that contrasts beautifully with a sleek flat-screen.
Step-by-Step How-To
- Install brick veneer panels.
- Seal for durability.
- Mount TV securely.
- Add industrial-style shelving.
- Incorporate metal lighting fixtures.
Materials Needed
- Faux brick panels
- Adhesive
- Sealant
- TV mount
- Industrial décor
The aesthetic is bold, masculine, and stylish.
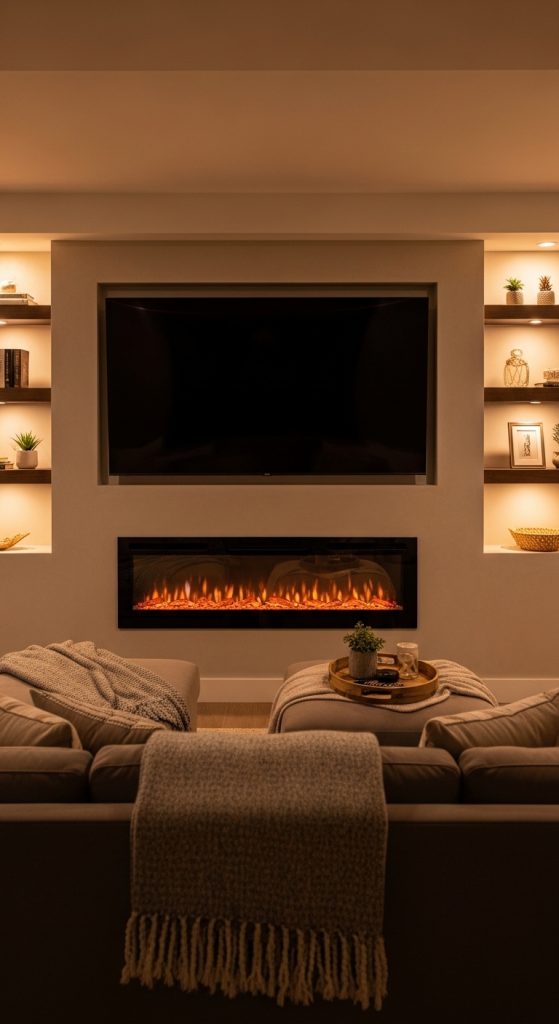
8. Entertainment Wall with Electric Fireplace
Introduction
Combining an electric fireplace with your TV wall creates warmth and luxury in one cohesive focal point.
What It Is
The TV is mounted above or beside a built-in electric fireplace, often framed by a feature wall.
Step-by-Step How-To
- Install electric fireplace insert.
- Frame opening if needed.
- Mount TV at safe height.
- Add built-in shelving around both.
- Style with décor and lighting.
Materials Needed
- Electric fireplace insert
- Framing materials
- TV mount
- Shelving
- Decorative accents
This design adds both ambiance and functionality.
9. Entertainment Wall with Hidden Storage
Introduction
Clutter can ruin even the most beautiful basement. Hidden storage entertainment walls solve this problem effortlessly.
What It Is
Cabinetry and concealed compartments hide cables, consoles, and accessories behind sleek panels.
Step-by-Step How-To
- Install base cabinets.
- Add push-to-open doors.
- Conceal wires internally.
- Mount TV above cabinetry.
- Maintain clean styling.
Materials Needed
- Cabinets
- Hinges
- Cable organizers
- TV mount
This keeps your entertainment area clean and organized.
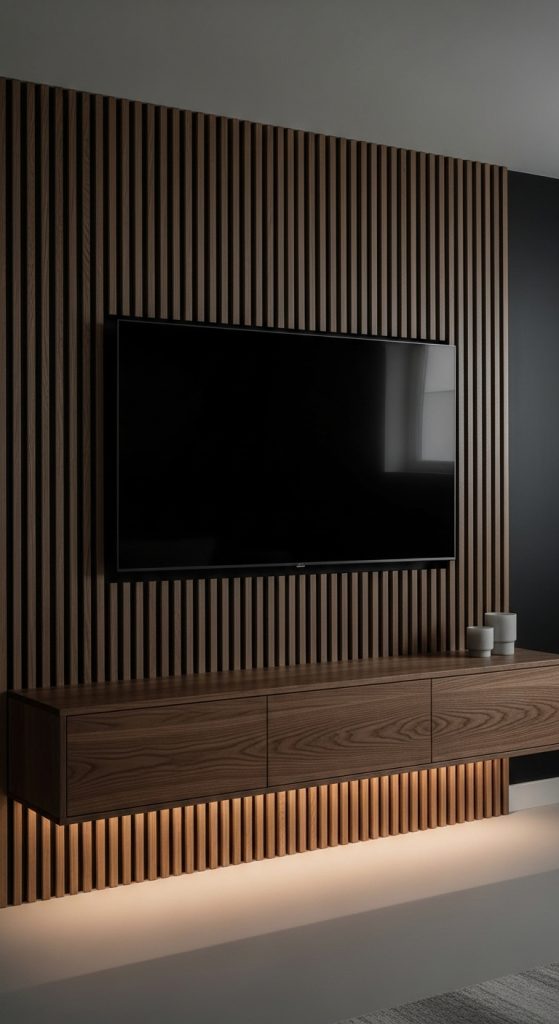
10. Geometric Wood Slat Accent Wall
Introduction
Wood slat walls are trending on Pinterest for their modern texture and dimension. They create visual interest without overwhelming the basement.
What It Is
Vertical or geometric wood slats installed behind the TV create architectural detail.
Step-by-Step How-To
- Paint base wall dark.
- Measure equal spacing for slats.
- Secure slats into studs.
- Mount TV centered.
- Add soft lighting.
Materials Needed
- Wood slats
- Level
- Nail gun
- Paint
- TV mount
This design delivers a stylish, contemporary basement entertainment wall.
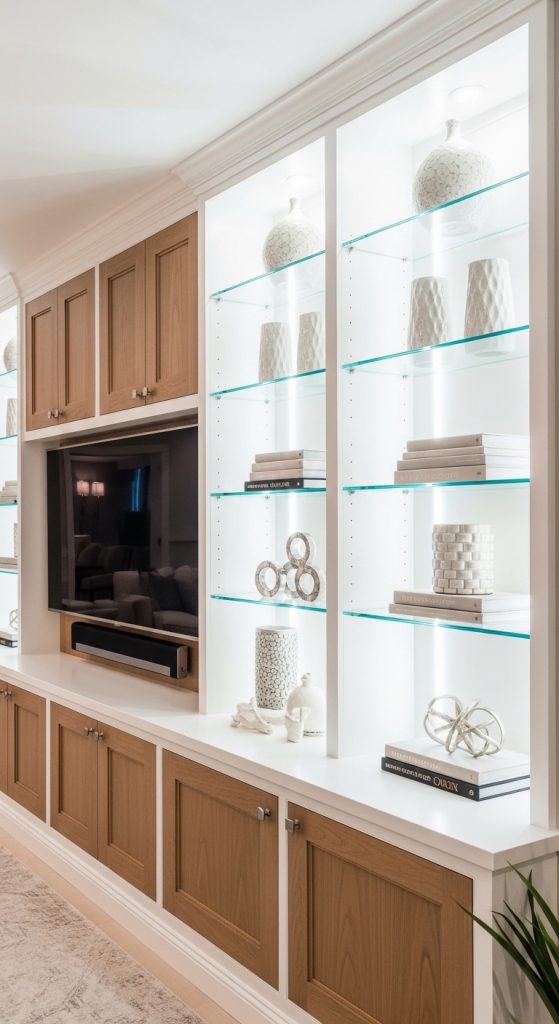
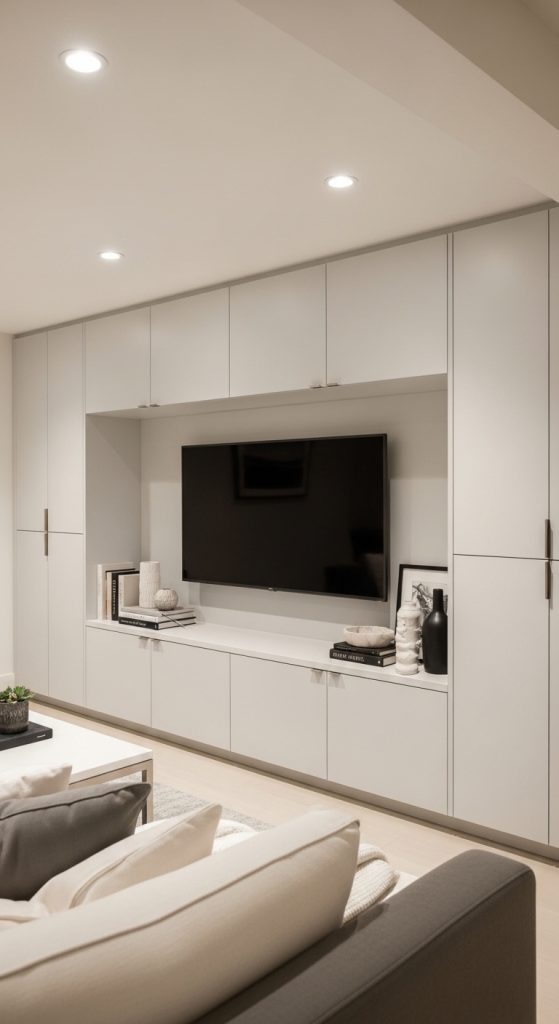
11. Full Wall Custom Cabinet Entertainment System
Introduction
A full wall custom cabinet entertainment system transforms your basement into a polished, high-end media retreat that feels thoughtfully designed from floor to ceiling. Unlike small TV consoles or partial shelving, this concept utilizes the entire wall to create a cohesive, built-in appearance that maximizes storage and visual impact. For larger basements especially, leaving a wide wall under-designed can make the room feel unfinished or unbalanced. A full wall cabinet system solves that by becoming a commanding focal point that anchors seating, lighting, and décor around it.
This idea is perfect for homeowners who want a clean, organized environment where everything has its place. From gaming consoles and streaming devices to books, board games, and decorative pieces, every item can be integrated seamlessly. It also helps conceal wiring, speakers, and less attractive electronics behind closed doors. The result is a luxurious entertainment wall that feels intentional rather than improvised. Even beginners can achieve this look using modular cabinetry systems and careful planning.
What It Is
A full wall entertainment cabinet system spans the entire width—and sometimes height—of your basement wall. It typically includes lower closed cabinets, a central TV section, and upper shelving or glass-front display cabinets. The design can be symmetrical or slightly asymmetrical depending on your space.
Step-by-Step How-To
- Measure the entire wall width and ceiling height.
- Sketch a layout dividing the wall into base cabinets, center TV section, and upper storage.
- Select modular cabinets or design a custom build plan.
- Install base cabinets first, securing them to wall studs.
- Mount vertical panels or side towers for structure.
- Install upper cabinets or shelving units.
- Mount the TV in the center section at eye level.
- Add crown molding or trim for a built-in look.
- Conceal wiring behind panels or inside cabinetry.
- Style shelves with balanced décor pieces.
Materials Needed
- Modular cabinet system or plywood for custom build
- Stud finder
- Drill and screws
- Level
- Trim and molding
- TV mount
- Cable management kit
- Paint or stain
This design creates a luxurious, Pinterest-worthy entertainment wall that looks professionally installed and dramatically elevates your basement.
12. Board and Batten Entertainment Accent Wall
Introduction
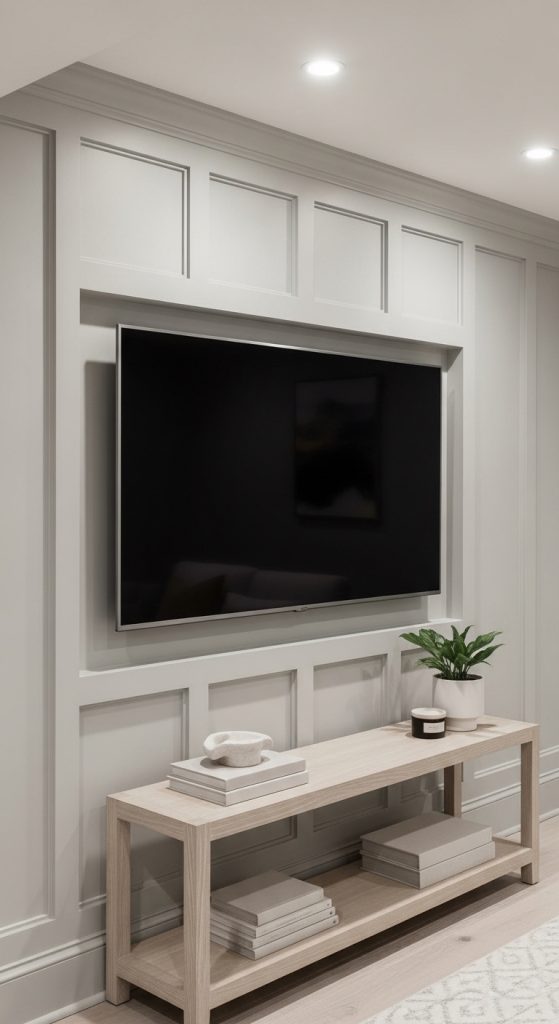
Board and batten walls have surged in popularity because they add subtle architectural depth without overwhelming a room. In a basement entertainment space, this design adds texture and character while keeping the overall aesthetic clean and modern. Since basements often lack architectural detail, adding vertical trim instantly enhances the room’s structure and visual interest.
This idea works beautifully in family-friendly entertainment spaces because it balances sophistication with warmth. Whether painted in soft neutrals or bold dramatic tones, board and batten framing behind your TV creates a refined backdrop that enhances the screen without distracting from it. It’s also surprisingly beginner-friendly and budget-conscious.
What It Is
Board and batten consists of evenly spaced vertical trim boards attached to a wall, creating rectangular or square panel patterns. The TV is mounted centrally within this framed design.
Step-by-Step How-To
- Clean and prime the wall surface.
- Mark equal vertical spacing using a level and pencil.
- Attach vertical MDF trim boards with construction adhesive and nails.
- Add horizontal trim pieces for rectangular framing.
- Caulk seams for a seamless look.
- Paint the entire wall one cohesive color.
- Mount the TV centered within a panel section.
- Add a simple console or floating shelf below.
Materials Needed
- MDF trim boards
- Construction adhesive
- Nail gun
- Caulk
- Paint and primer
- TV wall mount
This design delivers timeless elegance while remaining practical and beginner-friendly.
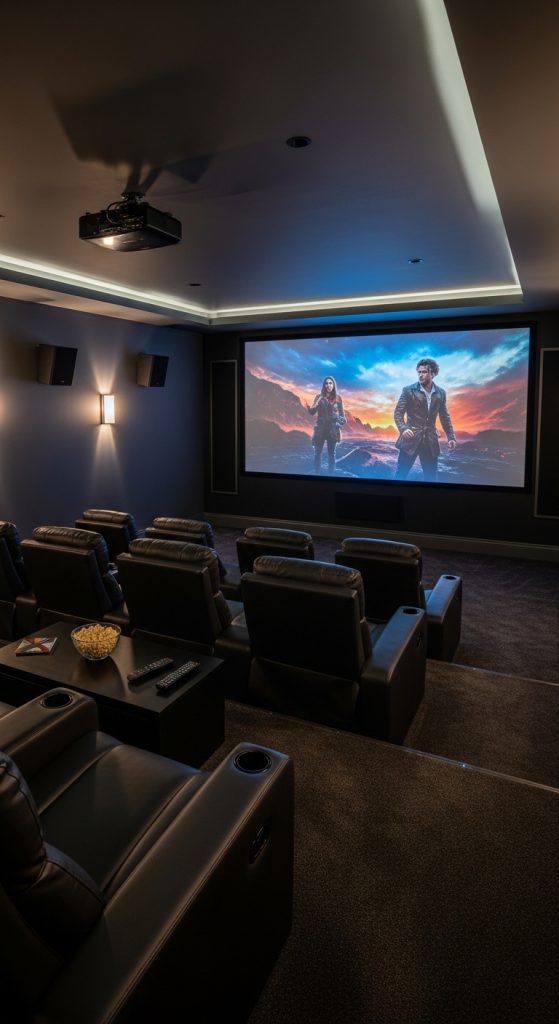
13. Basement Home Theater Projection Wall
Introduction
If you want a true cinematic experience, a projection wall setup takes your basement entertainment to the next level. Basements naturally provide darker environments, which makes them ideal for projector systems. Instead of centering the design around a mounted TV, this concept focuses on creating a large projection screen wall that mimics a real movie theater.
This idea works especially well for families who host movie nights or sports events. It creates a dramatic, immersive feel while keeping the wall clean and minimal when the projector is off. You can even integrate blackout curtains and dimmable lighting to enhance the experience further.
What It Is
A projection entertainment wall uses either a mounted projector screen or a specially painted projection surface to display movies on a large scale.
Step-by-Step How-To
- Choose the appropriate screen size based on seating distance.
- Install a retractable projector screen or prepare a smooth painted wall.
- Mount the projector on the ceiling with proper alignment.
- Run HDMI cables discreetly through ceiling or walls.
- Install surround sound speakers around the room.
- Add blackout curtains if needed.
- Calibrate projector settings for brightness and clarity.
Materials Needed
- Projector
- Ceiling mount bracket
- Projection screen or screen paint
- HDMI cables
- Surround sound system
- Blackout curtains
This setup transforms your basement into a full cinematic retreat.
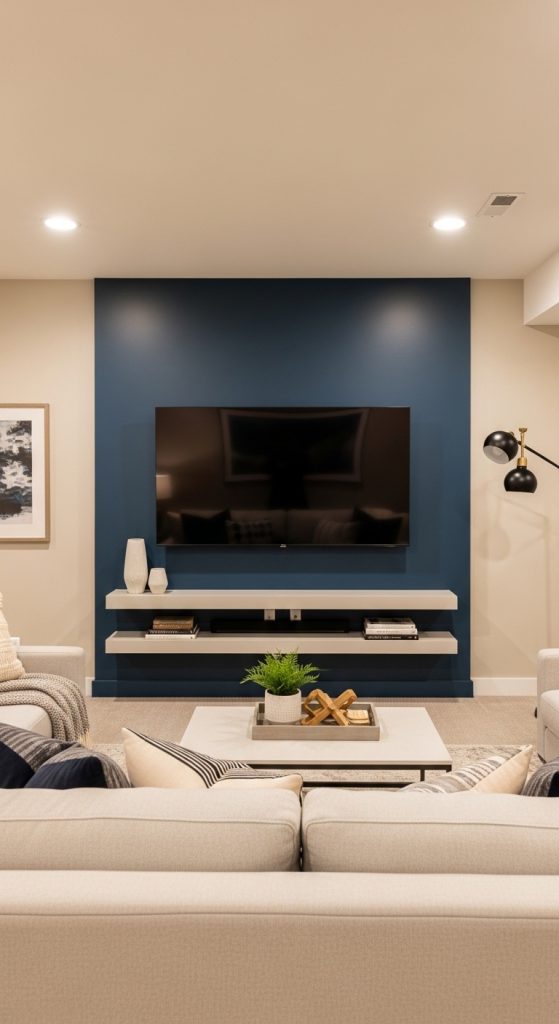
14. Two-Tone Entertainment Wall Design
Introduction
A two-tone entertainment wall adds dimension and style without requiring complex construction. By combining two complementary paint colors or materials, you create a visually layered design that feels curated and Pinterest-ready. This works beautifully in basements where you want to break up large blank walls.
Two-tone walls also allow you to subtly define zones within an open basement layout. The darker section can frame the TV while the lighter section keeps the room feeling open and bright.
What It Is
This design divides the entertainment wall horizontally or vertically into two contrasting colors or finishes.
Step-by-Step How-To
- Decide on horizontal or vertical split.
- Measure and mark separation line with painter’s tape.
- Paint the base color first and allow to dry.
- Apply second contrasting color.
- Remove tape carefully for crisp lines.
- Mount TV centered in darker section.
- Add matching décor accents to tie colors together.
Materials Needed
- Two paint colors
- Painter’s tape
- Rollers and brushes
- TV mount
- Decorative accessories
This idea is simple yet visually impactful.
15. Entertainment Wall with Open Industrial Pipe Shelving
Introduction
For a bold and slightly edgy basement design, industrial pipe shelving creates character and functionality at the same time. This concept pairs metal piping brackets with wood shelves to create open storage around the TV. It’s perfect for loft-style or masculine entertainment rooms.
This design works well for displaying collectibles, books, or vintage décor. It’s highly customizable and can be scaled up or down depending on wall size.
What It Is
Industrial pipe shelving frames the TV using metal pipe brackets secured to wall studs, supporting wood shelves.
Step-by-Step How-To
- Locate studs in wall.
- Secure metal pipe brackets into studs.
- Attach stained wooden shelves.
- Mount TV in center area.
- Style shelves with balanced décor.
Materials Needed
- Industrial pipe brackets
- Wooden planks
- Screws
- Drill
- TV mount
- Wood stain
This design adds urban charm and strong visual lines.
16. Entertainment Wall with Soundproof Panels
Introduction
If your basement is frequently used for gaming, movies, or music, incorporating soundproof panels into your entertainment wall enhances acoustics dramatically. Beyond functionality, modern acoustic panels can also act as stylish design features.
This is especially helpful in homes where basement noise might travel upstairs. It creates a more immersive sound experience while minimizing disturbance.
What It Is
Acoustic foam or fabric-wrapped panels are installed behind or around the TV to absorb sound and improve clarity.
Step-by-Step How-To
- Determine optimal panel placement (behind speakers and TV).
- Mark layout for symmetrical design.
- Attach adhesive-backed acoustic panels.
- Mount TV over central section.
- Test sound quality and adjust panel placement if needed.
Materials Needed
- Acoustic panels
- Adhesive strips
- Measuring tape
- TV mount
- Surround speakers
This solution enhances both sound and style.
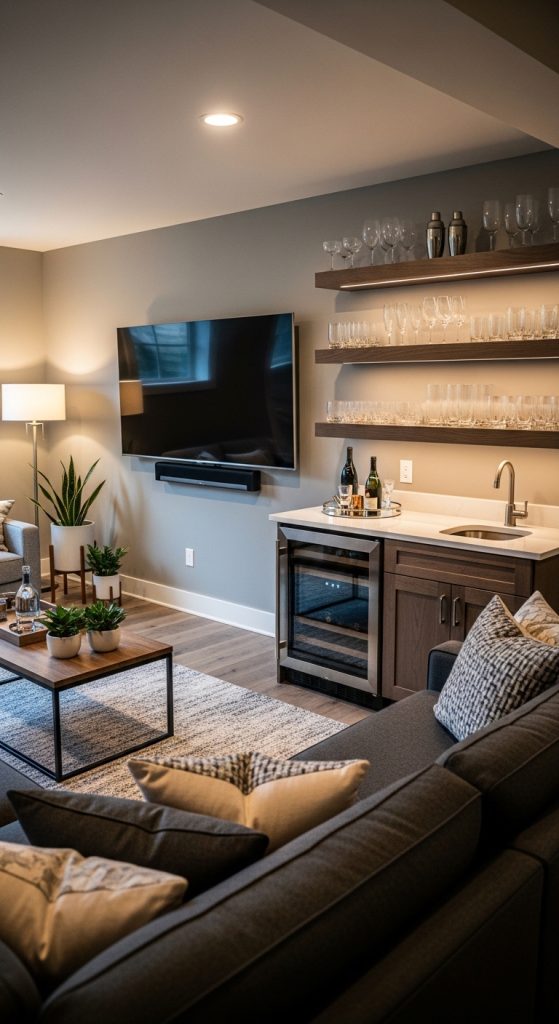
17. Entertainment Wall with Built-In Bar Nook
Introduction
Combining your entertainment wall with a small bar nook turns your basement into a complete social hub. This design is perfect for hosting sports nights, parties, or casual gatherings.
What It Is
The TV is integrated into a wall that also includes a small built-in bar cabinet with shelving for drinks and glassware.
Step-by-Step How-To
- Designate one side of wall for bar section.
- Install lower cabinets with countertop.
- Add floating shelves above for glassware.
- Mount TV in adjacent section.
- Install LED strip lighting under shelves.
Materials Needed
- Base cabinets
- Countertop
- Floating shelves
- LED strips
- TV mount
This multifunctional wall makes entertaining effortless.
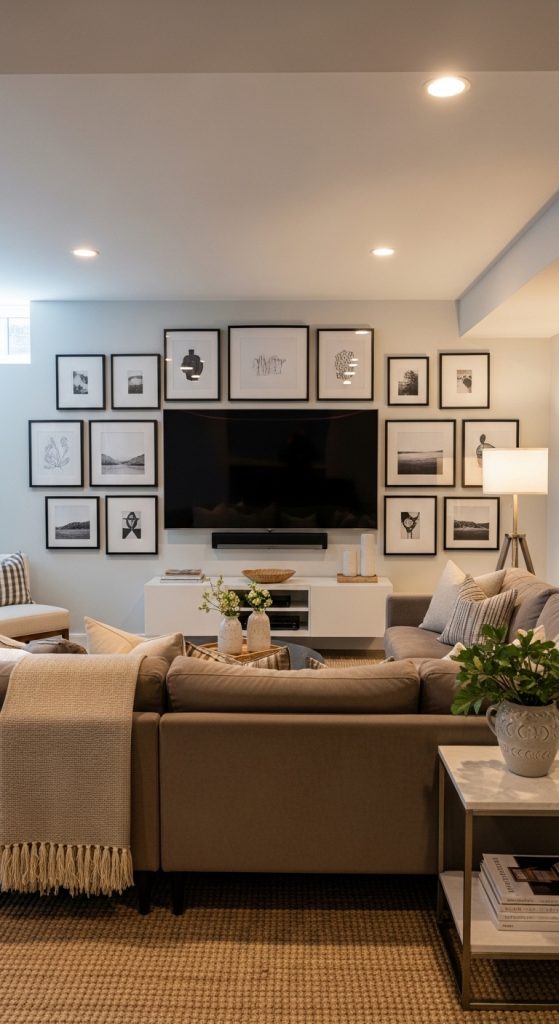
18. Oversized Framed TV Gallery Wall
Introduction
If you want your entertainment wall to double as décor, framing your TV within a gallery wall design is a creative solution. It blends technology with art seamlessly.
What It Is
The TV is surrounded by framed artwork arranged in a symmetrical or curated gallery layout.
Step-by-Step How-To
- Mount TV first.
- Lay frames on floor to plan layout.
- Measure equal spacing around TV.
- Hang frames securely.
- Choose cohesive art theme.
Materials Needed
- Picture frames
- Wall anchors
- Level
- TV mount
- Artwork prints
This design disguises the TV as part of a decorative display.
19. Concrete Finish Modern Entertainment Wall
Introduction
A concrete-look entertainment wall creates a sleek, contemporary aesthetic perfect for minimalist basements. It’s bold yet understated.
What It Is
Using concrete panels or faux concrete finish paint, the wall gains industrial-modern texture.
Step-by-Step How-To
- Prep and prime wall.
- Apply concrete finish compound with trowel.
- Let dry and seal.
- Mount TV and minimal console.
- Add subtle lighting.
Materials Needed
- Concrete finish compound
- Trowel
- Sealant
- TV mount
- Minimal décor
This design feels clean, architectural, and modern.
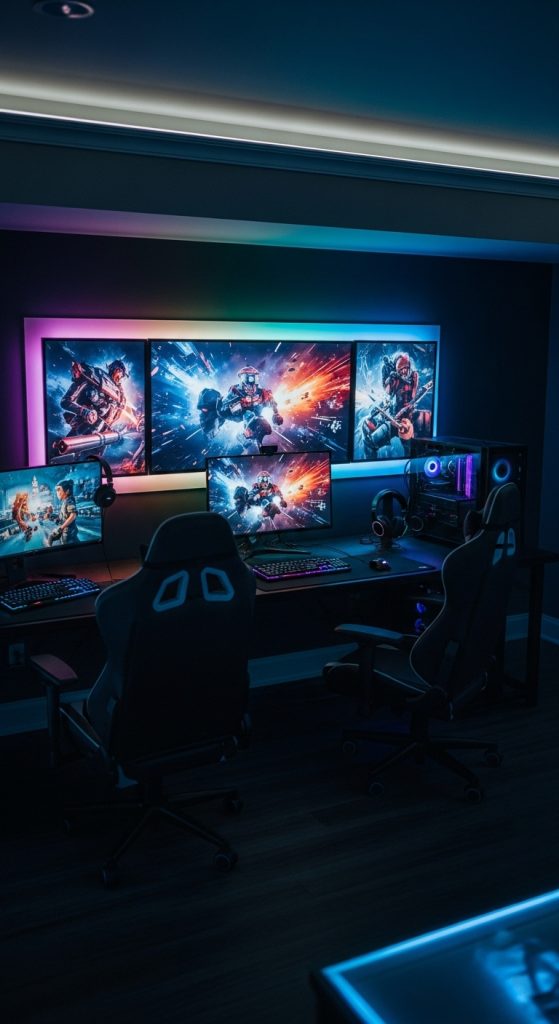
20. Multi-Screen Gaming Entertainment Wall
Introduction
For serious gamers or sports enthusiasts, a multi-screen entertainment wall is the ultimate basement feature. It maximizes screen space while maintaining a cohesive layout.
What It Is
Multiple screens are mounted symmetrically to allow gaming, streaming, or sports viewing simultaneously.
Step-by-Step How-To
- Plan symmetrical layout.
- Install heavy-duty mounts into studs.
- Conceal wiring within wall.
- Connect consoles and splitters.
- Add LED lighting for dramatic effect.
Materials Needed
- Multiple TV mounts
- HDMI splitters
- Cable management kit
- LED strip lights
- Stud finder
This final idea turns your basement into a high-energy entertainment command center.