10 Butterfly Crafts For Kids Ideas

Butterfly crafts for kids are a popular category within Pinterest ideas because they combine creativity, learning, and hands-on activity in a simple and engaging format. These crafts focus on creating butterfly-themed projects using accessible materials and easy techniques that children can follow. They are commonly used in home activities, school projects, and seasonal decorations due to their versatility and visual appeal. Butterfly crafts also introduce children to basic concepts such as symmetry, color coordination, and design structure in a practical way.
This article provides a complete guide to creating butterfly crafts through clear and structured methods. Readers will learn how to prepare materials, organize a creative workspace, and follow step by step processes for each idea. Every project is designed to be beginner friendly, making it suitable for children with minimal crafting experience. The goal is to combine fun with learning while ensuring that each activity remains practical and achievable. These creative projects also support fine motor skills and encourage independent thinking, making them both useful and engaging for kids of different age groups.
Why This Idea Is Trending or Useful
Butterfly crafts are widely shared as trending ideas because they offer a balance between creativity and simplicity. These projects are easy to execute and require minimal materials, making them accessible for beginners and suitable for DIY activities at home or in classrooms. The visual appeal of butterflies, with their bright colors and symmetrical patterns, makes these crafts attractive and engaging for children. This aligns with modern Pinterest inspiration, where aesthetic and creativity are combined in simple formats.
Another reason for their popularity is their educational value. These crafts help children understand shapes, patterns, and color combinations while developing coordination skills. They also encourage hands-on learning, which supports better engagement compared to passive activities. Parents and teachers often use these projects as structured creative tasks that keep children focused and productive.
The flexibility of butterfly crafts adds to their usefulness. They can be adapted using different materials and styles, making each project unique. This adaptability allows for continuous creative ideas while maintaining a consistent theme, making butterfly crafts a reliable and practical choice.
Materials and Preparation
Preparing for butterfly crafts requires simple and accessible materials along with basic planning. Common materials include colored paper, cardboard, glue, scissors, markers, paint, and decorative items such as stickers or glitter. These materials are easy to find and suitable for beginner friendly projects. Selecting a clean and organized workspace is important to ensure safety and efficiency during the crafting process.
Tools should be appropriate for children’s use. Safety scissors and non-toxic glue are recommended to prevent accidents. Preparing materials in advance, such as cutting paper into shapes or organizing colors, helps streamline the process. This step improves focus and reduces interruptions during the activity.
Planning each project before starting is essential for achieving clear results. Reviewing the steps and arranging materials accordingly supports a smooth workflow. This approach also helps children understand the sequence of actions, which improves their ability to follow instructions. Proper preparation ensures that the crafting experience remains structured, safe, and enjoyable while producing visually appealing results.
Idea 1: Paper Fold Butterfly Craft
How to Create
The paper fold butterfly craft focuses on creating symmetrical wings using folding techniques. This concept introduces children to the idea of symmetry, where both sides of the butterfly mirror each other. The design is simple and relies on basic shapes, making it an ideal beginner friendly project. Colored paper is used to create vibrant wings, while markers or crayons add decorative patterns. This craft is commonly used in DIY tutorials because it demonstrates how simple materials can produce structured and aesthetic results.

The folding method allows children to understand how shapes can be transformed through simple actions. It also encourages precision, as proper folding ensures balanced wings. This project fits well within creative ideas for kids because it combines learning with hands-on activity. The final result is a visually appealing butterfly that can be used for decoration or display.
To create this craft, start by folding a sheet of colored paper in half. Draw half of a butterfly shape along the folded edge. Cut along the outline while keeping the fold intact. Open the paper to reveal a symmetrical butterfly shape.
Decorate the wings using markers, paint, or stickers. Add a body using a strip of paper or a simple drawing. Ensure all materials are arranged before starting to maintain a smooth step by step process. This method creates a clean and balanced butterfly design.
Idea 2: Handprint Butterfly Art
Step-by-Step Guide

Handprint butterfly art uses children’s handprints as the base for creating butterfly wings. This craft combines creativity with personal expression, as each handprint produces a unique shape. The design focuses on transforming simple handprints into colorful butterfly wings through painting and decoration. This method is widely used in creative projects because it is interactive and engaging for children.
The concept introduces children to pattern creation and color blending. It also allows them to explore different color combinations while maintaining a structured design. The use of handprints adds a personal element, making each butterfly unique. This approach aligns with Pinterest ideas that emphasize creativity and individuality in simple projects.
To create this craft, apply washable paint to the child’s hands and press them onto paper to form wing shapes. Repeat on both sides to create symmetry. Allow the paint to dry completely before adding details.
Draw or attach a butterfly body in the center. Add antennae and decorative patterns using markers or additional paint. Prepare materials in advance to ensure a smooth workflow. This step by step method results in a colorful and personalized butterfly craft.
Idea 3: Toilet Paper Roll Butterfly
How to Make
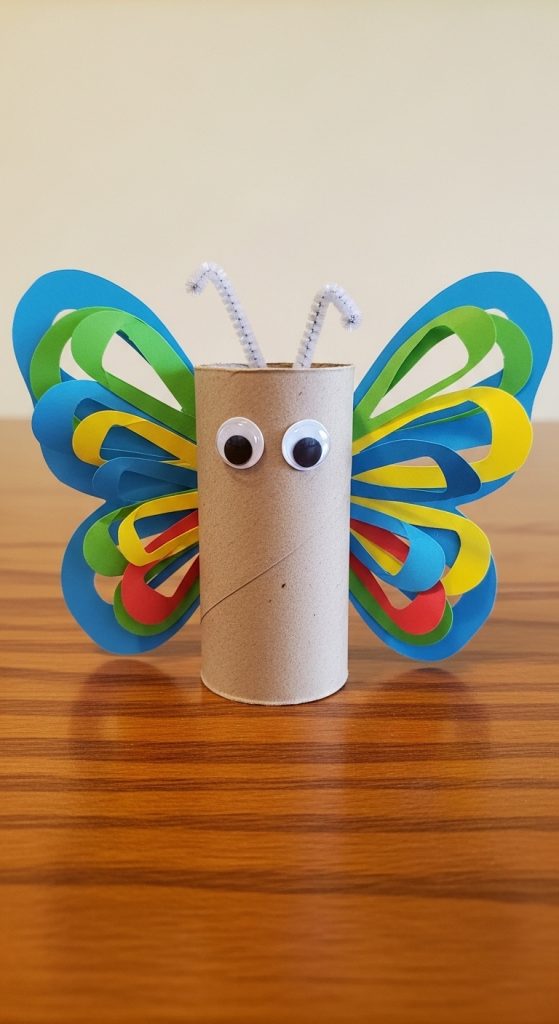
This craft uses recycled materials to create a structured butterfly design. A toilet paper roll forms the body, while paper wings are attached to complete the shape. This approach supports sustainability while providing a simple and effective crafting method.
Start by painting the roll and attaching wings made from colored paper. Add details using markers or decorative materials. This project is practical and easy to execute.

Idea 4: Coffee Filter Butterfly
How to Create
This craft uses coffee filters and water-based coloring to create soft, blended wing designs. The material absorbs color easily, producing a unique pattern.
Color the filter, spray lightly with water, and let it dry. Pinch the center and attach a pipe cleaner to form the body. This creates a lightweight and colorful butterfly.
Idea 5: Clothespin Butterfly Craft
Execution Process

This design uses clothespins as the butterfly body. Wings are made from paper or fabric and attached to the clip.
Paint the clothespin, attach wings, and add details such as antennae. This craft is simple and reusable.
Idea 6: Egg Carton Butterfly
How to Create
Egg cartons are cut into sections to form butterfly shapes. This method uses recycled materials for a creative project.

Cut, paint, and assemble the pieces. Add pipe cleaners for antennae. This craft supports creativity and sustainability.
Idea 7: Popsicle Stick Butterfly
Step-by-Step Guide
Popsicle sticks form the body, while paper wings are attached for structure. This design is sturdy and easy to handle.

Decorate the stick, attach wings, and add finishing details. This project is suitable for group activities.
Idea 8: Painted Rock Butterfly
How to Make

This craft transforms rocks into butterfly designs using paint. The surface allows for detailed decoration.
Paint wings and patterns directly onto the rock. Allow it to dry before display. This creates a durable decorative item.
Idea 9: Tissue Paper Butterfly
Setup Method

Tissue paper is layered to create soft and textured wings. This craft focuses on color blending and layering techniques.
Cut, layer, and tie the center to form a butterfly shape. Add a body using pipe cleaners.
Idea 10: Cardboard Butterfly Collage
Execution Process

This craft uses cardboard as a base for a collage design. Various materials are added to create textured wings.
Cut a butterfly shape, glue decorative materials, and build layers. This project encourages creativity and experimentation.
Common Beginner Mistakes and How to Avoid Them
A common mistake is using too many materials without a clear plan, which can lead to disorganized results. Preparing materials in advance helps maintain structure. Another issue is applying excessive glue, which can damage paper and affect the final appearance. Using controlled amounts improves results.
Skipping drying time is another frequent problem. Allowing paint and glue to dry properly ensures durability. Using inappropriate tools can also cause difficulty, so selecting child-safe tools is essential. Avoiding these mistakes helps maintain a smooth and effective crafting process.
Practical Tips for Better Results
Organizing materials before starting improves efficiency. Using simple color combinations creates a clean and balanced design. Encouraging children to follow steps carefully helps maintain structure.
Keeping the workspace clean reduces distractions. Supervising the use of tools ensures safety. These practical steps improve both the crafting process and the final outcome.
Styling, Presentation, or Organization Ideas
Displaying butterfly crafts enhances their visual impact. Arranging them on walls or boards creates a decorative effect. Grouping crafts by color or size improves organization.
Using simple backgrounds highlights the designs. Maintaining symmetry in display adds to the aesthetic. These ideas improve presentation and make the crafts suitable for home decor.
Budget or Time Planning
Using recycled materials reduces costs and supports sustainability. Planning projects in advance saves time and improves workflow.
Breaking tasks into smaller steps makes the process manageable. Simple designs require less time while still producing effective results. This approach ensures efficiency.
Creative Expansion and Advanced Inspiration
Expanding butterfly crafts involves combining different techniques. Mixing materials or adding layers creates more complex designs.
Introducing new patterns and textures enhances creativity. Gradual experimentation allows children to develop advanced skills while maintaining structure.