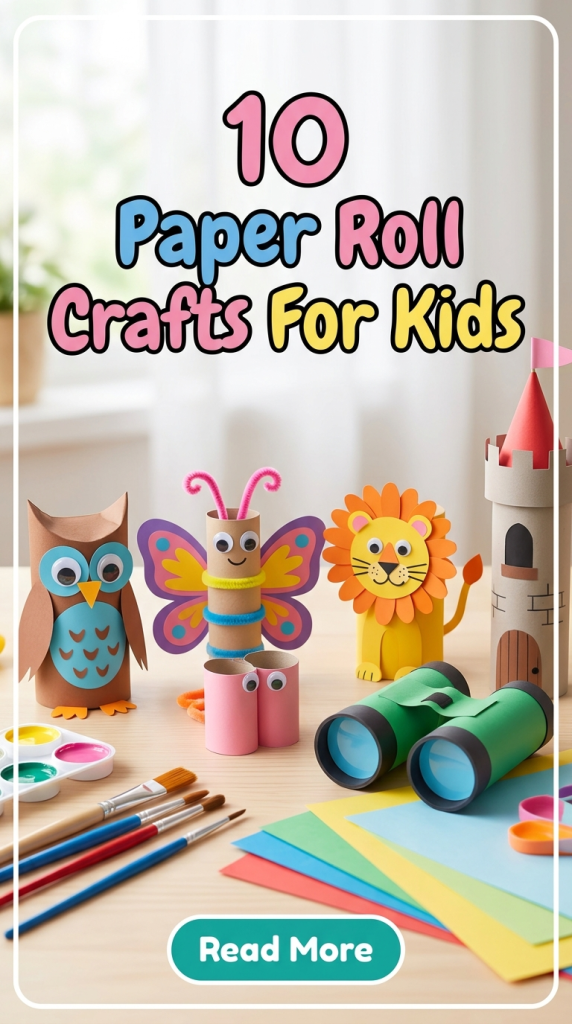
Paper roll crafts for kids are one of the most accessible and beginner friendly DIY activities for creative learning. A paper roll refers to the cardboard tube left after using toilet paper or paper towels. These tubes are lightweight, easy to cut, and simple to decorate, making them ideal for children’s craft projects. On Pinterest ideas boards, paper roll crafts are trending because they combine recycling with hands-on creativity.
They require minimal materials and allow children to practice cutting, painting, folding, and assembling in a structured way. These projects can be adapted for classrooms, home activities, seasonal decoration, or educational themes. Paper roll crafts also support organization skills because children follow step by step instructions and transform basic shapes into finished designs.
With careful planning and clear execution, a simple cardboard tube becomes an animal figure, decorative object, or imaginative toy. This article presents detailed creative ideas with practical guidance, clear materials lists, and structured tutorial methods to ensure successful results for children and adults guiding the activity.
Why Paper Roll Crafts Are Trending and Educational
Paper roll crafts are widely shared as trending ideas because they encourage sustainability and hands-on learning at the same time. Instead of discarding cardboard tubes, families and teachers reuse them in creative projects. This approach supports environmental awareness while keeping crafting affordable. These DIY projects are practical for group activities because the base material is uniform in size and easy to distribute. On Pinterest, parents search for easy project inspiration that balances fun and skill development. Paper roll crafts improve fine motor coordination through cutting, gluing, and painting. They also enhance spatial awareness because children learn how to attach parts to a cylindrical surface. Another reason these crafts remain popular is their flexibility. A single paper roll can become an animal, vehicle, character, or decorative item with simple adjustments. The structure is stable enough to stand upright, making it useful for display. These creative ideas are beginner friendly and adaptable for different age groups, ensuring both simplicity and educational value.
Materials and Preparation for Safe and Organized Crafting
Before starting paper roll crafts, preparation ensures a smooth and safe creative process. Basic materials include clean paper rolls, child-safe scissors, glue, tape, acrylic or washable paint, colored paper, markers, and pencils. Additional materials such as googly eyes, yarn, fabric scraps, or stickers can enhance decoration but are not essential. Always flatten or trim uneven edges on the cardboard tube before use. If painting, cover the workspace with protective paper to prevent stains. Organize materials into small containers so children can access supplies easily without clutter. Pre-cut templates are helpful for younger children who may struggle with complex shapes. Allow paint to dry completely before attaching additional elements. Clear step by step guidance supports organization and reduces frustration. Preparing all materials in advance keeps the activity focused and structured. With thoughtful planning, paper roll crafts become efficient creative projects that combine fun with clear instructional value.
1. Paper Roll Animal Zoo
How to Create
A paper roll animal zoo transforms simple cardboard tubes into standing animal figures. Begin by selecting an animal design such as a lion, elephant, or fox. Paint the entire paper roll in the base color of the animal and allow it to dry fully. Cut out ears, tails, or trunks from colored paper and attach them securely with glue. Draw facial features using markers or attach paper cutouts for eyes and nose. If creating multiple animals, maintain proportional sizing so they look consistent together. The cylindrical shape serves as the animal’s body, while added paper elements define character details. This creative project is beginner friendly because it uses simple shapes and clear steps. Encourage children to plan their design before painting to avoid color confusion. A completed set can be arranged together as a decorative zoo display. This DIY tutorial supports imagination while teaching structured assembly and surface decoration techniques.
2. Rocket Ship Adventure Craft

Step-by-Step Guide
A rocket ship craft introduces children to basic construction techniques using a paper roll as the rocket body. Start by painting the roll in a bold color such as red, blue, or silver. Cut a circular paper piece and shape it into a cone to create the rocket top. Secure the cone firmly with glue. Attach three or four triangular paper fins evenly around the base to stabilize the structure. Cut small round windows from contrasting paper and glue them to the front. Ensure spacing between fins is equal for balance. Allow all glued sections to dry before standing the rocket upright. This easy project works well as a classroom space theme activity. It encourages careful measurement and symmetrical placement. By following a clear execution process, children understand how flat paper shapes can form a three-dimensional object. The finished rocket can be used for imaginative play or displayed as part of a themed decoration setup.
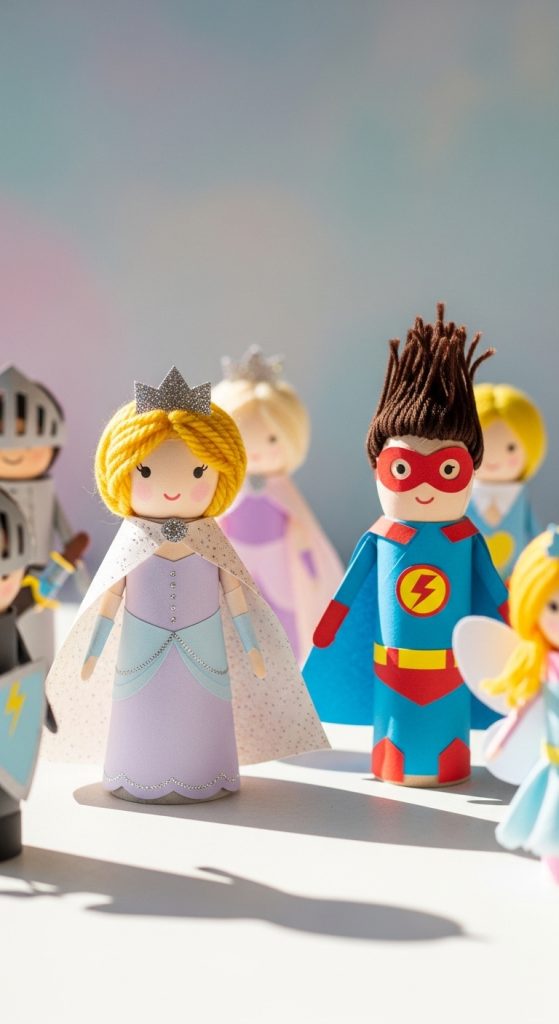
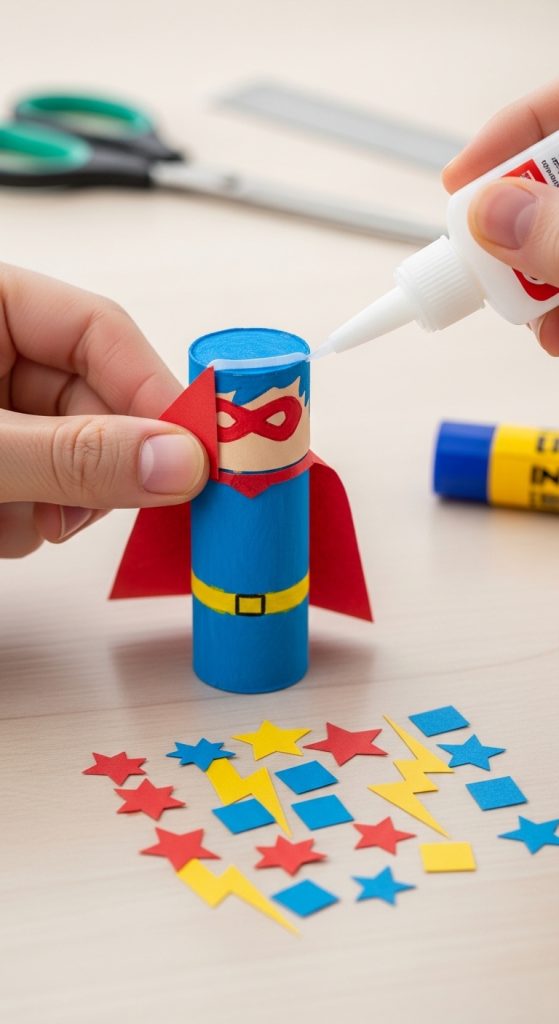
3. Paper Roll Princess or Superhero Characters
Execution Process

Creating character figures using paper rolls allows children to personalize their craft. Begin by painting the roll to represent clothing or costume colors. Cut paper pieces for capes, dresses, belts, or masks. Attach these details evenly around the tube. Draw facial features on a circular paper cutout and glue it near the top. Add yarn hair if desired, ensuring secure attachment. Keep proportions consistent so accessories do not overpower the figure. This craft combines drawing, cutting, and assembly into one structured activity. Encourage children to sketch their character on paper before starting. Planning prevents overcrowding of decorative elements. This beginner friendly creative project supports storytelling and imaginative development. The cylindrical base ensures the figure stands upright, making it suitable for display. Following step by step organization ensures neat results and helps children understand how layering materials builds a complete design.
4. Butterfly Paper Roll Craft
How to Make

A butterfly craft uses the paper roll as the insect’s body. Paint the roll in a bright color and let it dry. Cut two large symmetrical wing shapes from colored paper. Decorate the wings with patterns using markers or smaller paper shapes. Fold the wings slightly at the center to create dimension before attaching them to the back of the roll. Add antennae using thin strips of paper or pipe cleaners. Ensure wings are aligned evenly for balance. This project introduces symmetry as an important design principle. Children learn that both wings should match in size and placement. The butterfly can be hung using string or displayed upright. This easy project supports color coordination and pattern planning. By following a structured tutorial approach, children understand how flat elements combine with a cylindrical base to form a recognizable figure.
5. Paper Roll Binoculars for Pretend Play
Setup Method

Paper roll binoculars are created by attaching two rolls side by side. Secure them tightly using glue or tape. Wrap colored paper around the exterior to create a unified appearance. Punch small holes on opposite sides and attach string for wearing around the neck. Ensure alignment is even so both tubes face forward. Decorating with stickers or markers adds personality without affecting structure. This project emphasizes measurement and alignment. Children learn that stable attachment is necessary for durability. The binoculars can be used for outdoor exploration activities or pretend play indoors. This DIY tutorial demonstrates how combining identical shapes creates a new functional object. Organized preparation ensures strong adhesion and neat finishing. The finished binoculars encourage active engagement and imaginative exploration.
6. Paper Roll Bird Feeder Decoration
Step-by-Step Guide
A paper roll bird feeder decoration teaches simple environmental awareness concepts. Spread a thin layer of glue over the outside of the roll. Roll it in birdseed placed on a tray until fully covered. Insert a stick or skewer through the center to create a perch. Tie string securely around the roll for hanging. Ensure all surfaces are evenly coated and firmly attached. Allow the glue to dry before hanging outdoors. This project requires adult supervision for safety. It introduces children to recycling and nature support. The structure remains lightweight but functional. Clear execution ensures durability. This creative idea blends craft with outdoor learning and supports hands-on environmental understanding.
7. Paper Roll Pencil Holder Organizer
How to Create

A pencil holder organizer transforms a paper roll into a desk accessory. Paint or wrap the roll with decorative paper. Attach a cardboard base cut slightly larger than the tube diameter for stability. Secure firmly and allow drying time. Decorate with simple shapes or labels. Ensure the base is aligned evenly to prevent tipping. This project introduces organization skills by creating functional storage. Children learn that craft can serve practical use. Keeping decorations simple maintains stability. This easy project supports clean desk habits while allowing personalization. Structured planning ensures neat assembly and balanced design.
8. Paper Roll Snake Craft
Execution Process

To create a snake, cut the paper roll into a spiral shape while maintaining continuous structure. Paint the entire spiral evenly and allow drying. Draw or attach eyes and a small paper tongue at one end. Gently stretch the spiral to create movement. Ensure cuts are smooth to prevent tearing. This craft introduces cutting control and shape transformation. The cylindrical tube becomes flexible once cut in a spiral pattern. Clear guidance is important to maintain even width throughout the spiral. This creative project demonstrates how altering structure changes function. The finished snake can hang or rest on surfaces for decoration.
9. Paper Roll Castle Tower

How to Make
A castle tower uses the roll as a structural base. Paint it in gray or stone-like patterns. Cut small rectangular shapes along the top edge to create battlements. Attach paper flags or draw brick details using markers. If building multiple towers, connect them using cardboard walls. Maintain consistent height for uniformity. This project introduces architectural design basics. Children learn about structure, proportion, and surface detailing. Careful cutting ensures clean battlements. This beginner friendly creative idea supports imaginative play while reinforcing planning and execution skills.
10. Paper Roll Wind Chime Decoration
Setup Method
A wind chime decoration uses multiple paper rolls cut into shorter segments. Paint each segment in bright colors. Punch holes near the top and thread string through each piece. Attach them to a circular cardboard base. Space them evenly for balanced hanging. Ensure knots are tight to prevent falling. This project teaches measurement and spacing principles. Lightweight materials create gentle movement. Clear step by step assembly ensures even distribution. The final decoration can hang indoors as a colorful craft display. This creative project combines structure with motion, encouraging careful planning and alignment.

Common Beginner Mistakes and How to Avoid Them
One common mistake is using rolls that are crushed or uneven. Always reshape or trim edges before starting. Applying too much glue can weaken cardboard. Use thin, even layers. Skipping drying time may cause pieces to detach. Allow adequate drying between steps. Poor alignment leads to unstable crafts. Measure and position carefully before attaching. Organized preparation prevents clutter and confusion. Addressing these issues improves final results and supports smoother project execution.
Practical Tips for Cleaner and More Durable Results
Use sturdy paper rolls for structural projects. Reinforce bases when creating standing figures. Keep decorative elements lightweight. Plan color combinations before painting. Clean tools after use to maintain sharp cutting edges. Supervise younger children during cutting steps. Structured organization ensures neat results and longer-lasting crafts.
Budget Planning and Expanding Creativity
Paper roll crafts are budget ideas because the main material is recycled. Save rolls in advance to ensure supply. Purchase multipurpose craft materials that can be reused across projects. Batch preparation of templates reduces time. After mastering basic designs, experiment with combining multiple rolls into larger structures. Integrate seasonal themes such as holiday decoration or classroom learning topics. Continuous practice strengthens creative planning skills and improves design precision over time.