20 Easter Diy Crafts For Kids
Easter is one of the most exciting times of the year for children. The arrival of spring brings bright pastel colors, blooming flowers, playful bunnies, cheerful chicks, and of course, colorful Easter eggs. It’s a season filled with joy, creativity, and meaningful traditions. For families, teachers, and caregivers, Easter offers the perfect opportunity to slow down and engage kids in hands-on activities that are both fun and educational. That’s where DIY Easter crafts come in.

Crafting during Easter isn’t just about decorating; it’s about building memories. When children cut, glue, paint, and create something with their own hands, they develop fine motor skills, creativity, problem-solving abilities, and confidence. DIY Easter crafts also encourage imagination and storytelling. A simple paper bunny can turn into a puppet show character. A painted egg can become part of a spring display. These small projects often become treasured keepsakes that families save for years.
One of the biggest advantages of Easter DIY crafts for kids is that they don’t require expensive materials. Many of the best projects use everyday items like paper plates, toilet paper rolls, cotton balls, construction paper, glue sticks, washable paint, and recycled household materials. This makes crafting accessible, budget-friendly, and easy to organize whether you’re at home or in a classroom.
In this guide, you’ll discover 20 detailed Easter DIY crafts designed specifically for kids. These projects are beginner-friendly and adaptable for toddlers, preschoolers, and elementary-aged children. Each craft includes a clear explanation, step-by-step instructions, and a complete materials list so you can get started right away.
Whether you’re planning Easter classroom activities, homeschool art lessons, church events, Easter party stations, or simply looking for screen-free weekend fun, this collection has you covered. These ideas are Pinterest-worthy, colorful, practical, and designed to inspire creativity.
Let’s begin with the first 10 Easter DIY crafts your kids will absolutely love.
1. Paper Plate Easter Bunny

The Paper Plate Easter Bunny is a timeless classic that never goes out of style. It’s simple, affordable, and perfect for younger children who are just learning how to cut and glue. This craft transforms an everyday paper plate into an adorable fluffy bunny face using easy-to-find materials. Kids love adding cotton balls for texture and personalizing their bunny with different facial expressions.
This project is especially ideal for preschool and kindergarten classrooms because it requires minimal prep and allows children to explore shapes and textures. It also makes a beautiful Easter wall decoration for bedrooms, classrooms, or bulletin boards.
What This Craft Is
This craft turns a standard white paper plate into a 3D bunny face using construction paper, cotton balls, and simple embellishments.
Step-by-Step How-To
- Start with a plain white paper plate.
- Cut two large bunny ear shapes from white construction paper.
- Cut smaller pink ear shapes and glue them inside the white ears.
- Attach the ears to the back of the plate.
- Glue cotton balls around the plate for a fluffy effect.
- Add googly eyes.
- Glue on a pink pom-pom nose.
- Draw whiskers and a smile with a black marker.
- Let dry completely before displaying.
Materials Needed
- White paper plates
- White and pink construction paper
- Cotton balls
- Glue
- Scissors
- Googly eyes
- Pink pom-pom
- Black marker
2. Handprint Easter Chick
Introduction
Handprint crafts are always a favorite because they turn a child’s own hand into a keepsake piece of art. The Handprint Easter Chick is adorable, sentimental, and easy to make. Parents love saving these crafts because they capture how small their child’s hands once were.
This craft works beautifully for toddlers and preschoolers and encourages sensory exploration through paint.

What This Craft Is
Children use yellow washable paint to stamp their handprint onto paper, forming the body of a baby chick.
Step-by-Step How-To
- Pour yellow washable paint onto a tray.
- Help the child coat their hand evenly with paint.
- Press the hand firmly onto white cardstock.
- Allow the print to dry completely.
- Add googly eyes.
- Cut and glue an orange triangle beak.
- Draw legs with an orange marker.
Materials Needed
- Yellow washable paint
- White cardstock
- Paintbrush
- Googly eyes
- Orange construction paper
- Glue
- Marker
3. DIY Popsicle Stick Easter Basket
Introduction
This craft is slightly more structured and perfect for elementary-aged children. Building a mini Easter basket from popsicle sticks encourages patience, creativity, and problem-solving skills. It also doubles as a functional decoration that can hold small candies.
What This Craft Is
Kids glue popsicle sticks together to form a small basket structure and decorate it in pastel colors.
Step-by-Step How-To

- Glue popsicle sticks side by side to form the base.
- Glue sticks vertically around the edges.
- Allow the structure to dry fully.
- Paint the basket pastel colors.
- Attach a pipe cleaner handle.
- Let dry and fill with treats.
Materials Needed
- Popsicle sticks
- Craft glue
- Acrylic or washable paint
- Paintbrush
- Pipe cleaner
4. Easter Egg Sponge Painting

Introduction
Sponge painting is perfect for younger children who may struggle with paintbrush control. This technique creates beautiful textured patterns and encourages color exploration.
What This Craft Is
Children use cut-out egg templates and sponge pieces to dab colorful paint patterns.
Step-by-Step How-To
- Cut large egg shapes from cardstock.
- Pour pastel paints onto plates.
- Dip sponge pieces into paint.
- Dab onto egg template.
- Let dry completely.
Materials Needed
- Cardstock
- Scissors
- Washable paint
- Sponges
- Paper plates
5. Toilet Paper Roll Bunny
Introduction
Recycling crafts teach kids creativity and sustainability. This 3D bunny craft uses empty toilet paper rolls and transforms them into adorable standing figures.
What This Craft Is

A painted toilet paper roll decorated to look like a bunny.
Step-by-Step How-To
- Paint the roll white or pastel.
- Let dry completely.
- Cut bunny ears from paper.
- Glue ears inside the roll.
- Add eyes, nose, and whiskers.
- Glue a cotton tail on the back.
Materials Needed
- Toilet paper rolls
- Paint
- Construction paper
- Glue
- Cotton balls
- Markers
6. Bunny Ear Headbands
Introduction
Wearable crafts make Easter celebrations extra fun. Bunny headbands allow kids to step into imaginative play immediately after crafting.
What This Craft Is
A paper headband with attached bunny ears sized to fit a child’s head.

Step-by-Step How-To
- Measure and cut a long strip of paper for the band.
- Staple or tape ends together.
- Cut bunny ear shapes.
- Add pink inner ear details.
- Attach ears to headband.
Materials Needed
- Construction paper
- Scissors
- Glue
- Stapler or tape
7. Easter Egg Garland
Introduction
Garlands are decorative and fun for group projects. This craft helps children practice patterns and repetition.
What This Craft Is

Decorated paper eggs strung together to create festive décor.
Step-by-Step How-To
- Cut multiple egg shapes.
- Decorate with paint or crayons.
- Punch holes in each egg.
- Thread string through holes.
Materials Needed
- Construction paper
- Markers or paint
- Hole punch
- String
8. Cotton Ball Lamb Craft
Introduction
Soft textures make crafts more engaging for kids. This lamb craft is simple and sensory-friendly.

What This Craft Is
A paper lamb decorated with cotton balls for a fluffy effect.
Step-by-Step How-To
- Draw or print a lamb template.
- Glue cotton balls onto the body.
- Color the face and legs.
Materials Needed
- Paper
- Cotton balls
- Glue
- Markers
9. Paper Bag Bunny Puppet
Introduction
Puppets combine crafting with storytelling, making this a creative and interactive project.
What This Craft Is
A brown paper lunch bag decorated as a bunny puppet.
Step-by-Step How-To
- Glue ears onto the top flap.
- Add eyes and nose.
- Draw whiskers.
- Let kids create stories with their puppet.

Materials Needed
- Paper lunch bags
- Construction paper
- Glue
- Markers
10. Easter Slime
Introduction
Slime is always exciting for kids. Creating pastel Easter-themed slime makes the activity seasonal and engaging.
What This Craft Is
A stretchy slime mixture colored in soft Easter shades.
Step-by-Step How-To
- Pour white glue into a bowl.
- Add baking soda and mix.
- Add food coloring.
- Slowly mix in contact solution until slime forms.
- Knead until stretchy.
Materials Needed

- White glue
- Baking soda
- Contact solution
- Food coloring
- Mixing bowl
11. Easter Egg Collage Art
Introduction
Easter Egg Collage Art is a wonderful creative activity that allows children to explore colors, textures, and patterns in a hands-on way. Unlike simple coloring pages, collage art encourages layering, tearing, arranging, and gluing different materials together to create something unique. This makes it ideal for mixed-age groups because the level of detail can easily be adjusted depending on a child’s skill level. Younger children can glue large tissue paper pieces, while older kids can create detailed mosaic-style patterns.
This craft is also perfect for classroom settings because it introduces basic design concepts like symmetry, repetition, and color coordination. Plus, the finished eggs look vibrant and eye-catching when displayed on walls or bulletin boards.
What This Craft Is
A large egg template decorated with layered paper pieces, stickers, or magazine cutouts to create a colorful collage effect.
Step-by-Step How-To
- Draw or print a large egg shape onto thick cardstock.
- Cut out the egg carefully.
- Prepare collage materials by cutting or tearing tissue paper, patterned scrapbook paper, or magazine pages into small pieces.
- Apply glue to small sections of the egg at a time.
- Press paper pieces onto the glued areas, layering as desired.
- Continue until the egg is fully covered.
- Let dry completely before displaying.
Materials Needed
- Cardstock
- Tissue paper
- Patterned paper or magazines
- Glue
- Scissors
- Stickers (optional)
12. Bunny Footprint Keepsake
Introduction
The Bunny Footprint Keepsake is a sentimental craft that transforms a child’s painted footprint into an adorable bunny. Parents especially love this project because it captures a moment in time and can be framed as a memory. It’s simple enough for toddlers but meaningful enough to treasure for years.
This craft is also wonderful for Easter gifts for grandparents. It combines creativity with emotional value, making it one of the most popular Easter DIY crafts for young children.
What This Craft Is
A painted footprint turned upside down to resemble a bunny’s face and ears.

Step-by-Step How-To
- Pour white or pastel washable paint onto a tray.
- Paint the bottom of the child’s foot evenly.
- Press the foot firmly onto cardstock.
- Allow the footprint to dry completely.
- Turn the page upside down so the heel forms the bunny’s face.
- Add googly eyes and a small pom-pom nose.
- Draw whiskers and a smile with a marker.
Materials Needed
- Washable paint
- Cardstock
- Paintbrush
- Googly eyes
- Pom-pom
- Marker
13. Easter Egg Sun Catcher
Introduction
Sun catchers are magical because they transform sunlight into colorful displays. An Easter Egg Sun Catcher made from tissue paper and contact paper creates a stained-glass effect when hung in a window. Kids love watching the sunlight shine through their creation.

This craft also introduces children to light and transparency concepts in a simple and fun way.
What This Craft Is
A decorative egg frame filled with colorful tissue paper pieces and sealed between clear contact sheets.
Step-by-Step How-To
- Cut out an egg frame from construction paper, leaving a border.
- Cut a piece of clear contact paper slightly larger than the frame.
- Stick the frame onto the sticky side of the contact paper.
- Add tissue paper pieces inside the frame.
- Seal with another sheet of contact paper.
- Trim edges and attach string for hanging.
Materials Needed
- Construction paper
- Tissue paper
- Clear contact paper
- Scissors
- String
14. Carrot Treat Cones

Introduction
Carrot Treat Cones are fun, functional, and festive. Kids love crafts that double as treat holders, and this project is simple yet adorable. It’s perfect for Easter parties or classroom celebrations.
This craft encourages basic shaping skills and is easy to personalize.
What This Craft Is
A cone-shaped orange paper carrot filled with candy and topped with green paper leaves.
Step-by-Step How-To
- Roll orange construction paper into a cone shape.
- Secure with glue or tape.
- Cut green paper strips for carrot leaves.
- Insert the green strips into the top of the cone.
- Fill with wrapped candies.
Materials Needed
- Orange construction paper
- Green paper
- Glue or tape
- Scissors
- Candy
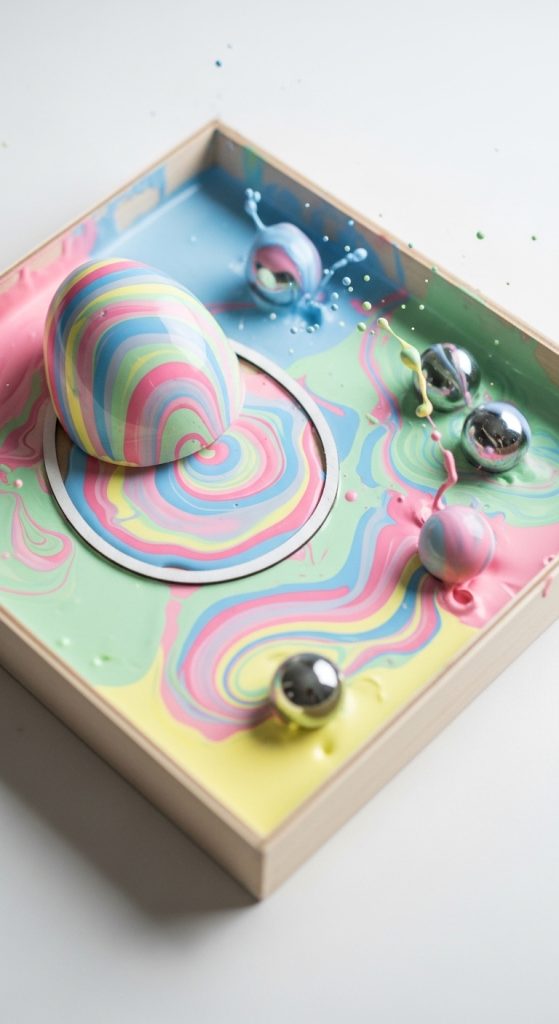
15. Marble Painted Easter Eggs
Introduction
Marble painting is exciting because it feels like a mini science experiment. Kids enjoy tilting the box and watching the marbles roll through paint to create unique abstract designs. Each egg turns out different, making it a fun and unpredictable craft.
What This Craft Is

An egg cutout painted using rolling marbles dipped in paint.
Step-by-Step How-To
- Place an egg cutout inside a shallow box lid.
- Add small drops of pastel paint.
- Place one or two marbles inside.
- Gently tilt the box so the marbles roll through the paint.
- Continue until fully decorated.
- Remove and let dry.
Materials Needed
- Egg cutouts
- Washable paint
- Marbles
- Shallow box lid
16. Paper Strip Easter Egg Weaving
Introduction
Weaving crafts are excellent for improving focus and coordination. This Easter egg weaving activity introduces children to basic weaving patterns in a colorful and simple way.
What This Craft Is

A paper egg with slits cut into it, woven with colorful paper strips.
Step-by-Step How-To
- Cut out a large egg shape.
- Cut evenly spaced slits across the egg.
- Cut strips of colored paper.
- Weave strips over and under through the slits.
- Glue ends to secure.
Materials Needed
- Cardstock
- Colored paper strips
- Scissors
- Glue
17. Easter Bunny Rock Painting
Introduction
Rock painting combines outdoor exploration with art. Kids can collect smooth stones and transform them into Easter bunny decorations. This craft is calming, creative, and budget-friendly.

What This Craft Is
A smooth rock painted to resemble a bunny face or full bunny.
Step-by-Step How-To
- Wash and dry the rocks.
- Paint a base coat in white or pastel.
- Let dry fully.
- Add bunny facial features.
- Seal with clear varnish (adult supervision).
Materials Needed
- Smooth rocks
- Acrylic paint
- Paintbrushes
- Clear sealant
18. Easter Cross Decoration
Introduction

For families celebrating the religious meaning of Easter, creating a cross decoration offers a meaningful hands-on activity. It allows children to express faith creatively while learning about symbolism.
What This Craft Is
A decorated cardboard cross enhanced with paint, flowers, or mosaic pieces.
Step-by-Step How-To
- Cut a cross shape from cardboard.
- Paint the cross in pastel shades.
- Decorate with tissue paper flowers or glitter.
- Add ribbon for hanging.
Materials Needed
- Cardboard
- Paint
- Tissue paper
- Glue
- Ribbon
19. Easter Button Art
Introduction
Button art is perfect for older children who enjoy detailed crafting. This textured egg design uses colorful buttons to create a bold and decorative look.

What This Craft Is
An egg outline filled with glued-on buttons of various sizes and colors.
Step-by-Step How-To
- Draw a large egg shape on cardstock.
- Spread glue inside the outline.
- Press colorful buttons onto the glue.
- Allow to dry fully before displaying.
Materials Needed
- Cardstock
- Buttons
- Glue
20. Easter Sensory Bin
Introduction

Sensory bins are especially beneficial for toddlers and preschoolers. An Easter-themed sensory bin encourages tactile exploration, color recognition, and imaginative play.
What This Craft Is
A plastic bin filled with Easter grass, plastic eggs, and small toys for hands-on play.
Step-by-Step How-To
- Fill a large bin with shredded paper grass.
- Add plastic eggs.
- Hide small toys inside eggs.
- Let children explore and sort items.
Materials Needed
- Plastic bin
- Easter grass
- Plastic eggs
- Small toys