20 dollar tree bowl ornaments
Decorating for the holidays doesn’t have to be expensive to look luxurious. In fact, some of the most stunning Christmas décor pieces start with simple, affordable materials — and one of the most versatile hidden gems is the Dollar Tree plastic bowl. Yes, you read that right. Those lightweight plastic bowls that cost just a dollar can be transformed into breathtaking Christmas ornaments that look high-end, custom-made, and Pinterest-worthy.
Dollar Tree bowl ornaments have exploded in popularity because they’re budget-friendly, beginner-friendly, and incredibly versatile. With just a few craft supplies — spray paint, ribbon, glitter, faux snow, mini figurines, or vinyl decals — you can turn a basic bowl into elegant hanging ornaments, oversized tree decorations, farmhouse-style accents, or even personalized gifts.
The beauty of these bowl ornaments is their shape. When you place two bowls together rim-to-rim, they create a globe-like structure perfect for filling, painting, or decorating. You can create snow globes, rustic farmhouse ornaments, glam glitter balls, gingerbread themes, and so much more. They’re lightweight, easy to hang, and perfect for both indoor and outdoor décor.
Whether you’re decorating on a tight budget, hosting a DIY craft night, selling handmade holiday items, or simply looking for creative Christmas inspiration, these 20 Dollar Tree bowl ornament ideas will guide you step by step. Each idea is practical, detailed, and beginner-friendly, so you can confidently create beautiful decorations without expensive supplies.
Let’s start with the first 10 creative ideas you can make today.
1. Classic Snow Globe Bowl Ornament
Introduction
If you love traditional Christmas décor, a classic snow globe ornament made from Dollar Tree bowls is the perfect starting point. This design transforms two simple plastic bowls into a large, hanging snow globe filled with winter magic. It’s charming, nostalgic, and surprisingly easy to assemble.
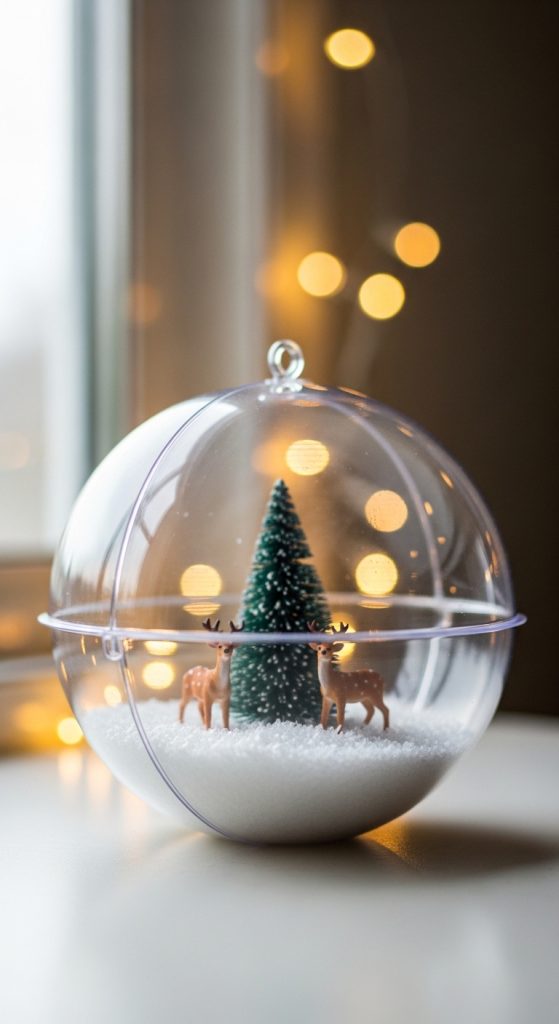
Snow globes are timeless holiday decorations that instantly create cozy vibes. The rounded bowl shape mimics the dome of a real snow globe, making this DIY feel intentional and high-end. Whether you choose a miniature Christmas tree, a tiny house, or a reindeer figurine, the final result looks like something from a boutique holiday store.
This ornament works beautifully on large Christmas trees, stair railings, or as hanging window décor.
What This Idea Is
Two plastic bowls glued together to create a clear globe filled with faux snow and miniature winter décor.
Materials Needed
- 2 clear Dollar Tree plastic bowls
- Hot glue gun
- Faux snow
- Mini Christmas figurines
- Ribbon
- Small eye hook or strong string
Step-by-Step How-To
- Place faux snow inside one bowl.
- Glue miniature figurines securely to the inside base.
- Apply hot glue around the rim of the bowl.
- Press the second bowl on top to seal.
- Attach ribbon loop for hanging.
- Optional: Add glitter to outside for frosted effect.
This design is cozy, magical, and highly giftable.
2. Farmhouse Twine-Wrapped Ornament
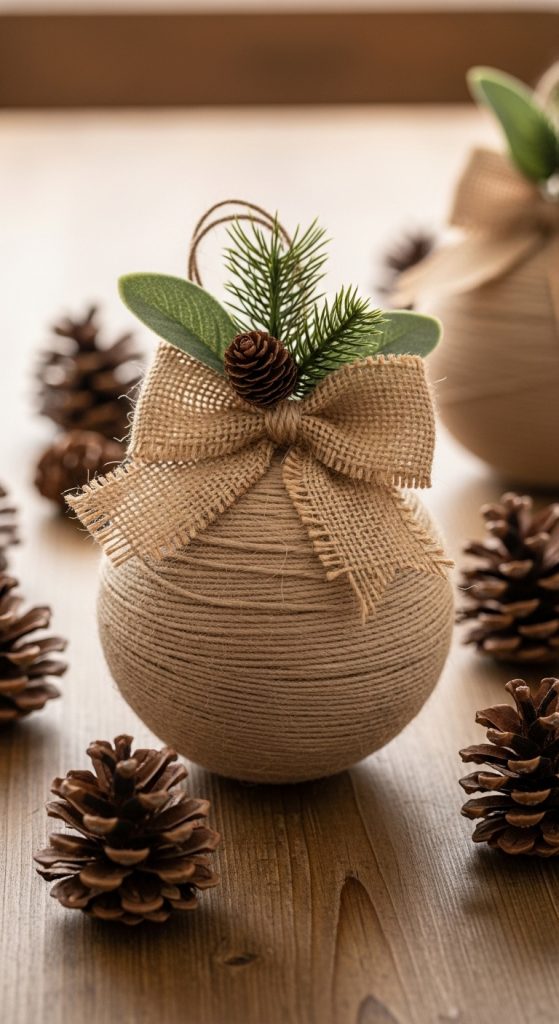
Introduction
Farmhouse Christmas décor remains a Pinterest favorite year after year. Neutral tones, rustic textures, and natural materials create a warm, welcoming holiday look. A twine-wrapped bowl ornament fits perfectly into this aesthetic.
This idea is incredibly simple yet visually impactful. By wrapping jute twine around the exterior of the bowl, you create texture and warmth. Add a small greenery sprig or wooden bead accent, and the result looks handcrafted and intentional.
Perfect for neutral-themed Christmas trees or rustic mantels.
What This Idea Is
A bowl ornament wrapped entirely in twine for a rustic farmhouse look.
Materials Needed
- Dollar Tree bowl
- Jute twine
- Hot glue
- Faux greenery sprig
- Ribbon
Step-by-Step How-To
- Apply glue at bottom center of bowl.
- Begin wrapping twine in circular pattern.
- Continue wrapping until fully covered.
- Secure end with glue.
- Attach greenery and ribbon at top.
Simple, rustic, and cozy.
3. Glitter Glam Ball Ornament
Introduction

If you prefer sparkle and glam, this glitter bowl ornament is for you. Using spray adhesive and fine glitter, you can transform a plain bowl into a dazzling Christmas statement piece.
Glitter ornaments catch light beautifully, making them perfect for evening holiday displays.
What This Idea Is
A bowl ornament fully coated in fine glitter for a glam finish.
Materials Needed
- Plastic bowl
- Spray adhesive
- Fine glitter
- Clear sealant spray
- Ribbon
Step-by-Step How-To
- Spray bowl evenly with adhesive.
- Sprinkle glitter generously.
- Shake off excess.
- Seal with clear spray.
- Attach hanging ribbon.
Elegant and festive.
4. Gingerbread Theme Ornament
Introduction
Nothing says Christmas like gingerbread décor. This bowl ornament can be painted brown and decorated to look like a giant gingerbread cookie.
Perfect for whimsical or candy-themed Christmas trees.
What This Idea Is
A bowl painted brown and decorated with white “icing” designs.
Materials Needed
- Bowl
- Brown acrylic paint
- White puff paint
- Red and green embellishments
Step-by-Step How-To
- Paint bowl brown.
- Let dry fully.
- Add icing designs with white puff paint.
- Attach candy embellishments.
- Add hanging loop.
Playful and sweet.
5. Buffalo Check Christmas Ornament
Introduction
Buffalo check patterns are iconic in farmhouse holiday décor. Transforming a Dollar Tree bowl into a buffalo check ornament adds cozy cabin vibes instantly.

What This Idea Is
A bowl painted with red and black plaid pattern.
Materials Needed
- Bowl
- Red paint
- Black paint
- Painter’s tape
- Ribbon
Step-by-Step How-To
- Paint bowl red base.
- Let dry.
- Use tape to create plaid lines.
- Paint black stripes.
- Remove tape carefully.
Bold and festive.
6. Frosted Winter Wonderland Ornament
Introduction

For a soft and elegant winter look, create a frosted glass-style ornament using clear bowls and faux snow spray.
This design looks delicate and high-end.
What This Idea Is
Clear bowl with frosted spray and snowy interior.
Materials Needed
- Clear bowl
- Frosted glass spray
- Faux snow
- Mini trees
Step-by-Step How-To
- Spray bowl lightly with frosted spray.
- Add snow and mini décor inside.
- Seal with second bowl.
- Attach ribbon.
Soft winter charm.
7. Personalized Vinyl Name Ornament
Introduction

Personalized ornaments make wonderful gifts. Adding vinyl names to bowl ornaments instantly upgrades them.
Perfect for family gifts.
What This Idea Is
A painted bowl ornament with custom vinyl lettering.
Materials Needed
- Bowl
- Spray paint
- Vinyl decal
- Ribbon
Step-by-Step How-To
- Spray paint bowl.
- Let dry.
- Apply vinyl name.
- Seal if desired.
- Attach hanger.
Meaningful and custom.
8. Snowman Face Ornament
Introduction
Turn your bowl into a cheerful snowman face for a whimsical holiday tree.
Kid-friendly and fun.
What This Idea Is
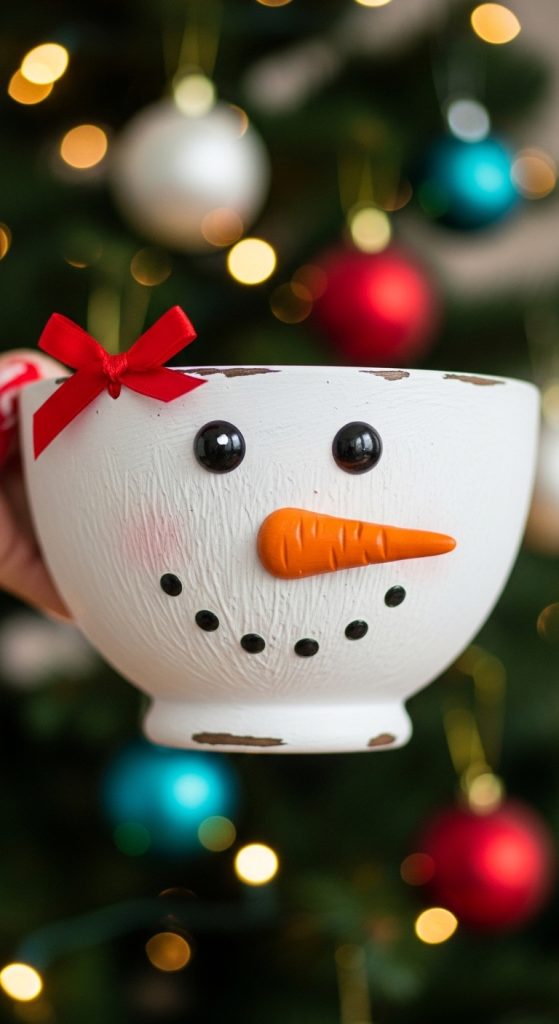
A white-painted bowl decorated as a snowman face.
Materials Needed
- Bowl
- White paint
- Black and orange paint
- Ribbon
Step-by-Step How-To
- Paint bowl white.
- Add eyes, carrot nose, smile.
- Attach scarf ribbon at top.
- Add hanger.
Adorable and festive.
9. Rustic Wood Bead Ornament
Introduction
Wood beads add a trendy rustic touch. Combine beads with bowl ornament for modern farmhouse style.
What This Idea Is
Neutral bowl with wooden bead hanger detail.
Materials Needed
- Bowl
- Spray paint (neutral)
- Wood beads
- Twine

Step-by-Step How-To
- Paint bowl neutral tone.
- String beads onto twine.
- Attach twine hanger.
Simple and modern.
10. Santa Belt Ornament
Introduction
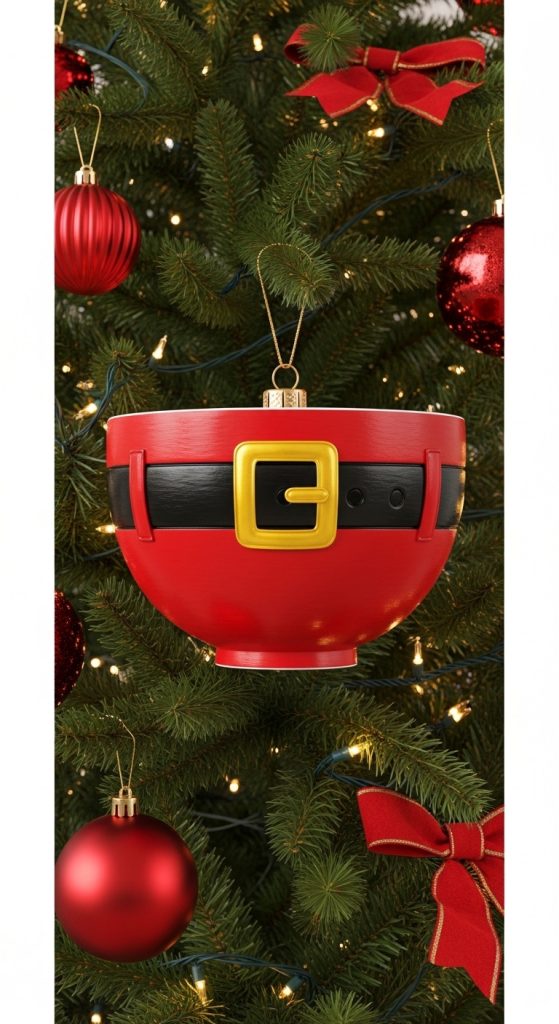
A Santa belt design is bold, classic, and instantly recognizable.
What This Idea Is
Red bowl painted with black belt stripe and gold buckle.
Materials Needed
- Bowl
- Red, black, gold paint
- Painter’s tape
Step-by-Step How-To
- Paint bowl red.
- Tape belt stripe area.
- Paint black stripe.
- Add gold buckle detail.
- Attach hanger.
Fun and traditional.
11. Peppermint Candy Bowl Ornament
Introduction
If you love classic red-and-white Christmas décor, a peppermint candy bowl ornament is a must-try. This design is bright, cheerful, and instantly recognizable. Peppermint-themed decorations are especially popular in candyland Christmas trees, kitchen holiday décor, and playful family spaces. The circular shape of the Dollar Tree bowl makes it perfect for mimicking oversized peppermint candies.
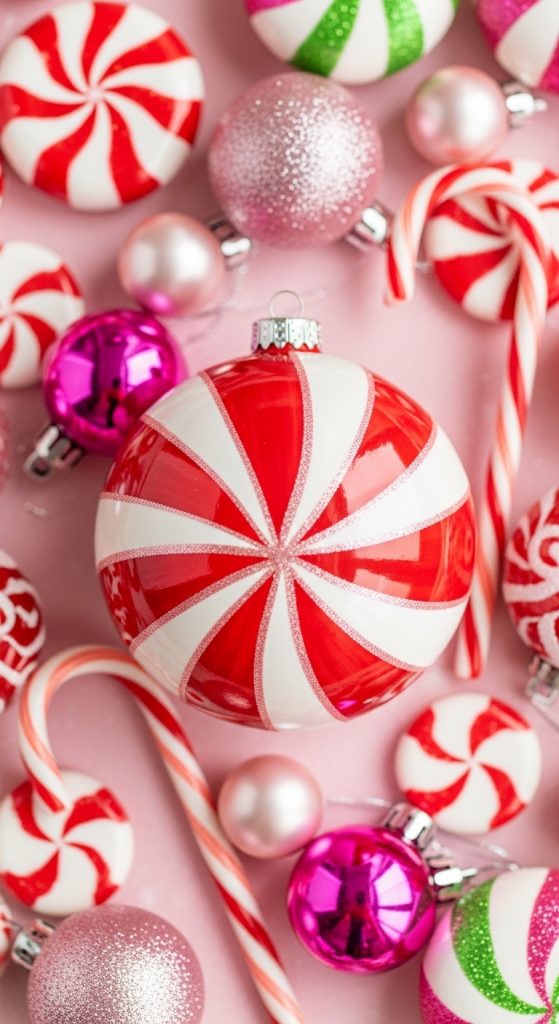
This ornament looks impressive but is surprisingly simple to create. With just paint and careful sectioning, you can achieve that iconic swirled candy effect. It’s also lightweight, making it perfect for large trees or even garland accents.
This project is ideal for beginners who want something bold and festive without complicated assembly. It pairs beautifully with gingerbread ornaments, candy canes, and red ribbon accents.
What This Idea Is
A bowl ornament painted to resemble a classic red-and-white peppermint candy swirl.
Materials Needed
- Dollar Tree plastic bowl
- White acrylic paint
- Red acrylic paint
- Painter’s tape
- Pencil
- Clear sealer spray
- Red ribbon
Step-by-Step How-To
- Paint the entire bowl white and let it dry completely.
- Lightly sketch swirl sections radiating from the center.
- Use painter’s tape to section off alternating stripes.
- Paint exposed sections red.
- Remove tape carefully once dry.
- Seal with clear spray for shine.
- Attach red ribbon hanger.
The finished ornament is bold, playful, and perfect for candy-themed Christmas décor.
12. Rustic Lantern-Style Bowl Ornament
Introduction
Rustic lantern décor remains extremely popular during the holidays, especially in farmhouse and cozy cabin themes. This lantern-style bowl ornament mimics the look of a vintage lantern globe, making it unique and eye-catching.
By painting the bowl in matte black and adding faux “window panes” using thin black tape or paint, you create a miniature lantern effect. You can even place a battery-operated tea light inside if sealing two bowls together.
This design works beautifully for outdoor trees, porch décor, or even hanging in windows. It gives off cozy winter vibes without requiring complicated crafting skills.
What This Idea Is

A bowl ornament styled to look like a miniature rustic lantern.
Materials Needed
- Dollar Tree bowl
- Black matte spray paint
- Black tape or thin paintbrush
- Battery tea light (optional)
- Twine or chain-style ribbon
Step-by-Step How-To
- Spray paint the bowl matte black and allow to dry.
- Use tape or paint to create vertical and horizontal “window” lines.
- If using two bowls, glue them together.
- Insert a small battery tea light inside.
- Attach rustic twine or chain-style hanger.
It creates a cozy, glowing winter accent.
13. Snowy Pinecone Winter Ornament
Introduction
Natural elements bring warmth and texture to Christmas décor. A snowy pinecone bowl ornament combines rustic charm with winter elegance. Pinecones are affordable and easy to find, making this project budget-friendly.
This ornament looks beautiful in neutral or woodland-themed Christmas trees. The round bowl shape becomes a globe filled with frosted pinecones and faux snow.
The final result feels organic and high-end, perfect for winter-inspired décor lovers.
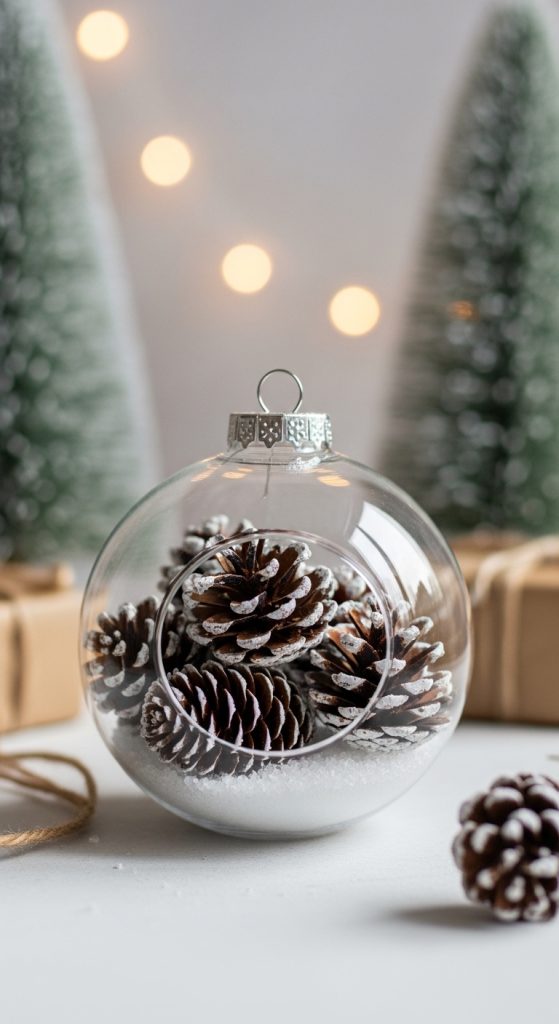
What This Idea Is
A clear bowl ornament filled with pinecones dusted in faux snow.
Materials Needed
- Two clear bowls
- Small pinecones
- Faux snow
- White acrylic paint
- Hot glue
- Twine
Step-by-Step How-To
- Lightly brush pinecones with white paint for a frosted look.
- Let them dry fully.
- Add faux snow inside one bowl.
- Arrange pinecones securely with glue.
- Glue second bowl on top.
- Attach twine hanger.
This design feels natural and wintery.
14. Elegant Pearl Ornament
Introduction
For a glamorous, sophisticated Christmas tree, a pearl-covered bowl ornament adds timeless elegance. This design is perfect for white, gold, or blush-themed trees.
Pearls add texture and shine without being overly flashy. When applied evenly across the bowl, the result looks luxurious and boutique-worthy.
This project takes patience but is simple in technique, making it suitable for beginners willing to take their time.
What This Idea Is
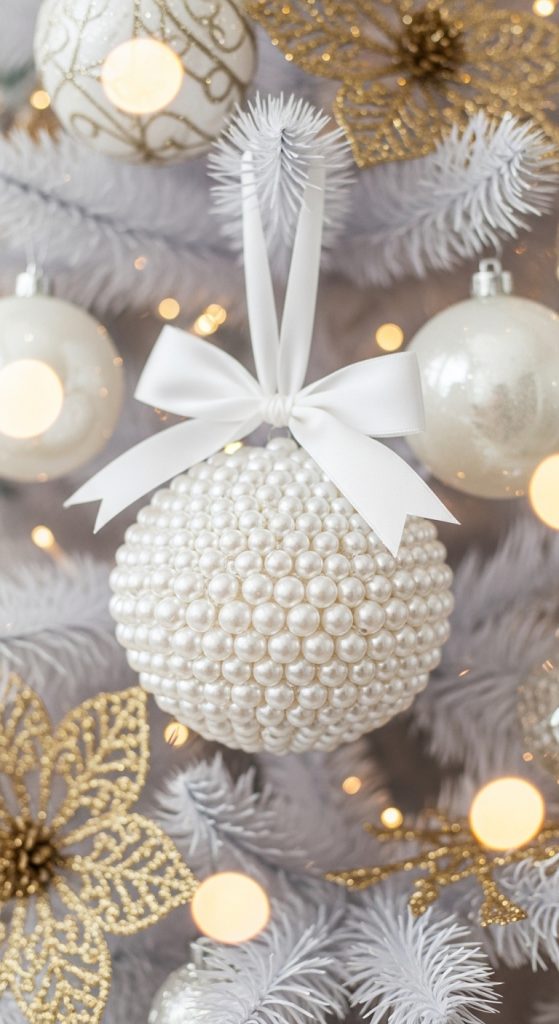
A bowl ornament covered entirely in adhesive pearl beads.
Materials Needed
- Dollar Tree bowl
- Self-adhesive pearl strips or beads
- Hot glue (if needed)
- Satin ribbon
Step-by-Step How-To
- Start at the bottom center of the bowl.
- Apply pearls in circular rows moving upward.
- Press firmly to secure.
- Attach elegant satin ribbon hanger.
The result is soft, glamorous, and stunning.
15. Grinch-Inspired Ornament
Introduction
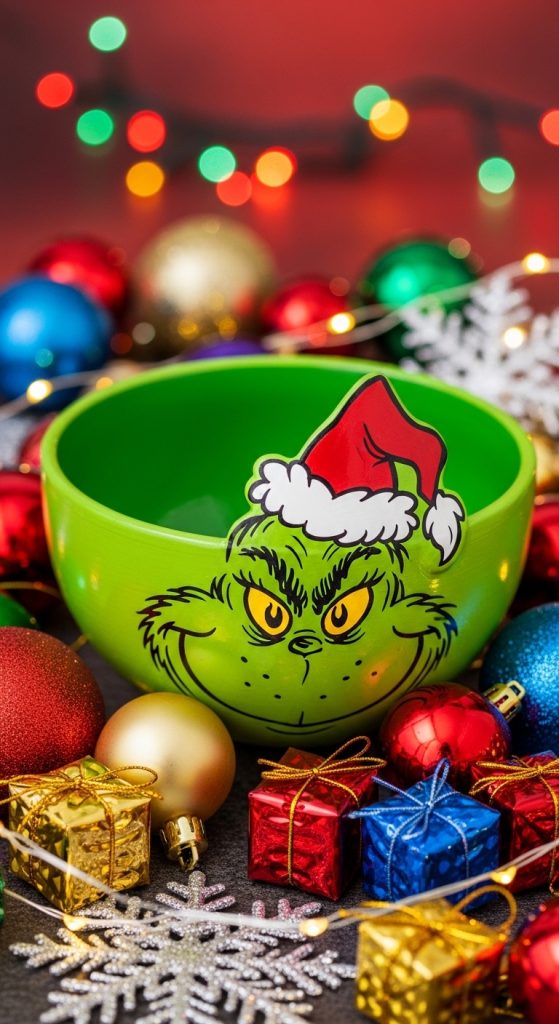
For fans of whimsical holiday décor, a Grinch-inspired bowl ornament adds personality and fun. Bright green paint and simple facial features transform the bowl into a playful character ornament.
This idea is especially fun for family trees or children’s holiday décor themes.
What This Idea Is
A bowl painted green with simple Grinch-style facial expression.
Materials Needed
- Bowl
- Green acrylic paint
- Black and white paint
- Fine paintbrush
- Red ribbon
Step-by-Step How-To
- Paint bowl bright green and dry completely.
- Sketch simple eyes and smile.
- Carefully paint facial details.
- Add red ribbon hanger.
Playful and full of personality.
16. Nativity Scene Globe Ornament
Introduction
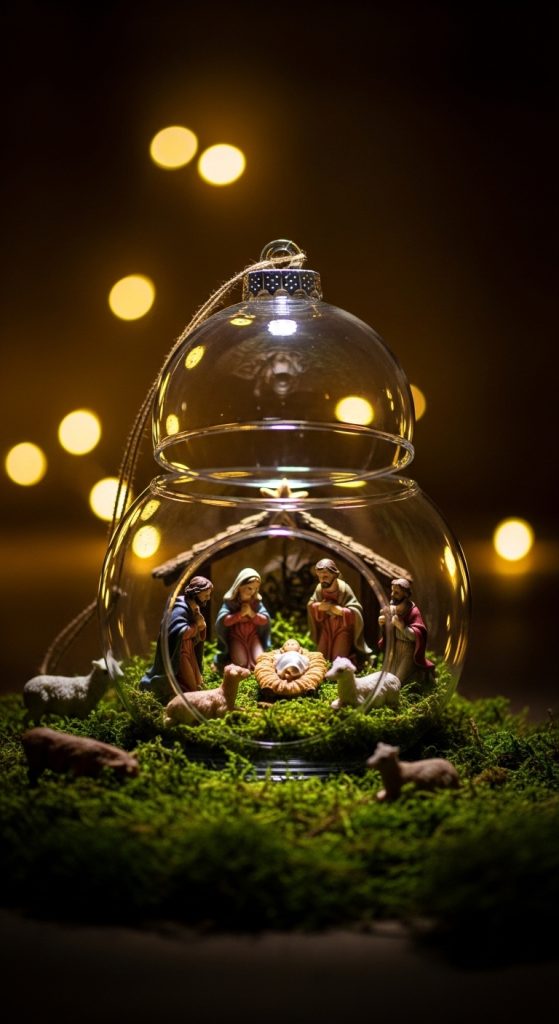
For a faith-centered Christmas decoration, a nativity globe bowl ornament creates a meaningful holiday display. The bowl acts as a protective dome around miniature nativity figurines.
This ornament feels heartfelt and symbolic, perfect for gifting or decorating church trees.
What This Idea Is
A sealed globe ornament featuring a miniature nativity scene inside.
Materials Needed
- Two clear bowls
- Mini nativity figurines
- Faux moss or straw
- Hot glue
- Gold ribbon
Step-by-Step How-To
- Glue moss inside base bowl.
- Secure nativity figurines in place.
- Glue second bowl on top.
- Attach gold hanging ribbon.
Elegant and meaningful.
17. Frosted Icicle Ornament

Introduction
This winter-inspired ornament uses hot glue to mimic dripping icicles along the bowl edges. Once painted white or frosted, it creates a magical frozen effect.
Perfect for winter wonderland themes.
What This Idea Is
A clear bowl decorated with faux icicles and frosted spray.
Materials Needed
- Bowl
- Hot glue gun
- Frosted spray
- Silver ribbon
Step-by-Step How-To
- Create dripping icicle shapes along rim with hot glue.
- Let cool fully.
- Spray lightly with frosted paint.
- Attach silver hanger.
Delicate and icy.
18. Plaid & Pine Christmas Ornament
Introduction
Combining plaid paint with faux pine sprigs creates a cozy cabin-inspired ornament. This design works beautifully for rustic homes.
What This Idea Is
Painted plaid bowl accented with small pine sprig and bow.

Materials Needed
- Bowl
- Red and black paint
- Painter’s tape
- Faux pine
- Twine
Step-by-Step How-To
- Paint bowl red base.
- Add black plaid lines.
- Glue small pine sprig at top.
- Tie twine bow.
Warm and festive.
19. Crystal Snowflake Ornament
Introduction

For sparkle lovers, attaching crystal-style gems in snowflake patterns elevates the bowl ornament beautifully.
What This Idea Is
Clear or white bowl decorated with rhinestone snowflakes.
Materials Needed
- Bowl
- Rhinestones
- Glue
- White paint (optional)
Step-by-Step How-To
- Paint bowl white if desired.
- Arrange rhinestones into snowflake shapes.
- Glue securely.
- Attach hanger.
Elegant winter sparkle.
20. Oversized Ornament Tree Topper

Introduction
Why stop at regular ornaments? A large Dollar Tree bowl ornament can become a stunning oversized tree topper. When painted metallic gold or silver, it looks dramatic and eye-catching.
Perfect for statement trees.
What This Idea Is
A large metallic-painted bowl turned into a hanging or topper ornament.
Materials Needed
- Large Dollar Tree bowl
- Metallic spray paint
- Strong ribbon or tree topper attachment
- Optional glitter
Step-by-Step How-To
- Spray paint bowl metallic gold or silver.
- Let dry completely.
- Add glitter if desired.
- Attach strong ribbon or secure to tree top.
Bold, glamorous, and budget-friendly.


