
10 entryway light fixture ideas

Entryways create the first visual and functional impression of a home. Lighting in this area plays a critical role in defining atmosphere, improving visibility, and supporting practical daily movement through the space. Entryway light fixtures combine illumination with decorative value, making them an important element in both home decor and interior organization. On Pinterest, entryway lighting appears frequently in trending ideas because it blends aesthetics with functionality while remaining accessible as a beginner friendly DIY upgrade.
This article explores practical Pinterest ideas for entryway lighting that can be implemented in different home layouts. Readers will learn how to select appropriate fixture styles, understand how lighting affects spatial perception, and apply step by step approaches to installing or styling entryway lights. Each concept focuses on clear design definitions, materials, and simple planning strategies so the ideas remain realistic and achievable.
Entryway lighting projects also serve as manageable creative projects for homeowners interested in home decor improvements without large renovations. By applying the ideas described in this guide, readers can create welcoming entrances that combine modern design, minimalist style, and functional decoration. The article provides ten detailed lighting ideas along with preparation guidance and practical tips to help beginners successfully complete an entryway lighting project.
Why This Idea Is Trending or Useful
Entryway lighting has become a prominent topic in Pinterest inspiration because it offers immediate visual impact with relatively small changes. Unlike large renovation projects, changing a light fixture requires limited materials and planning, making it a highly accessible DIY improvement. Homeowners frequently seek creative ideas that enhance both design and functionality, and entryway lighting satisfies both requirements.
Another reason this idea is trending is the increased focus on curated home entrances. Entryways serve as transitional spaces between outdoors and interior living areas. Proper lighting improves navigation, enhances safety, and highlights decorative elements such as mirrors, benches, or storage furniture. When designed carefully, lighting fixtures also contribute to organization by illuminating storage zones for coats, shoes, and everyday items.
Pinterest trends also emphasize aesthetic presentation. Many modern design styles rely on statement lighting as a focal element. Entryway fixtures therefore act as decorative anchors that define the tone of the interior environment. Minimalist style pendant lights, geometric chandeliers, and warm ambient fixtures are often used to establish visual balance in narrow spaces.
Because lighting installations can often be completed with basic tools, entryway lighting projects also appeal to beginners exploring DIY tutorials. The combination of accessibility, decorative impact, and practical improvement explains why entryway light fixture ideas remain widely shared across Pinterest inspiration boards.
Materials and Preparation
Before beginning any entryway lighting project, careful preparation ensures safe installation and consistent design results. Planning starts by evaluating the existing electrical setup and ceiling height. Understanding the available space helps determine whether pendant lights, flush mounts, chandeliers, or wall fixtures will function best within the entryway.
Basic materials typically include a light fixture unit, mounting hardware, screws, ceiling brackets, electrical connectors, and a compatible light bulb. Tools required for installation usually include a screwdriver, ladder, voltage tester, wire connectors, and a drill if new mounting holes are necessary. For DIY projects, preparing these tools beforehand allows the process to proceed smoothly without interruption.
Design planning is equally important. Consider how the light fixture will interact with surrounding decor elements such as mirrors, console tables, coat racks, or decorative wall panels. Entryway lighting should distribute illumination evenly while supporting visual organization within the space. Measuring ceiling height and available wall clearance helps determine the proper fixture size and hanging height.
Safety preparation is essential before handling any electrical components. Turning off the electrical circuit at the breaker panel prevents accidental electrical contact. Testing wires with a voltage tester confirms that power has been disconnected before installation begins.
With proper planning, materials preparation, and safety precautions, entryway lighting becomes an easy project that beginners can complete while achieving professional-looking results.
MAIN IDEAS
Idea 1: Minimalist Pendant Light Entryway
How to Create
Minimalist pendant lighting is widely used in modern design because it emphasizes clean structure, balanced proportions, and simple materials. In entryways, a pendant fixture suspended from the ceiling creates a focused lighting zone that visually anchors the space. This approach works particularly well in homes with narrow hallways or compact foyers where minimal clutter is preferred. The minimalist style typically uses simple geometric forms such as spheres, cylinders, or dome shapes, often finished in neutral tones like matte black, white, or brushed metal.
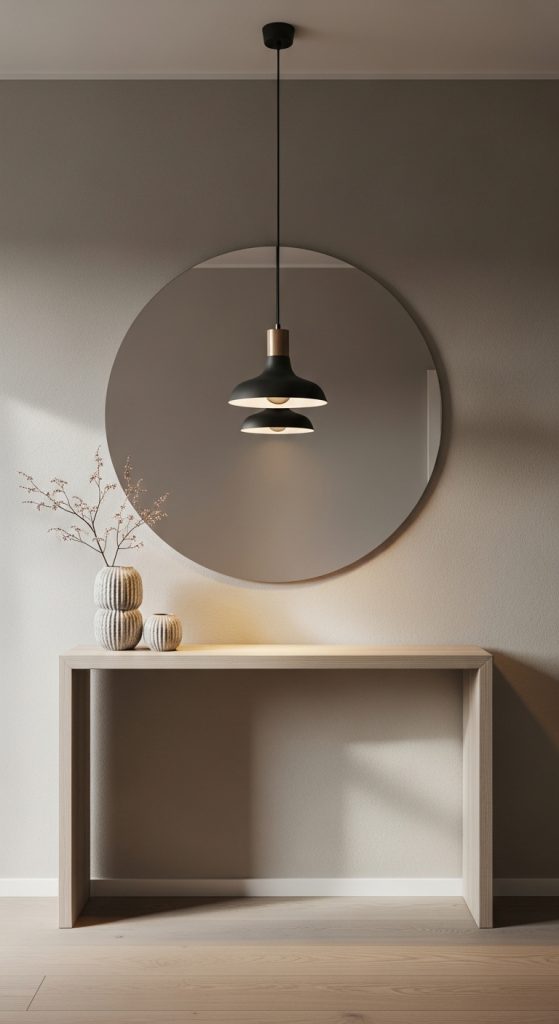
From a design perspective, pendant lights help establish vertical structure in the entryway. Because the light hangs below the ceiling, it draws attention to the center of the space and helps guide movement toward the interior rooms. Pinterest inspiration boards frequently highlight pendant lighting as a simple way to upgrade an entrance without extensive remodeling.
Minimalist fixtures also complement other decorative elements often found in entryways, including mirrors, storage benches, and small console tables. By maintaining a clean visual appearance, the lighting fixture supports organization while still functioning as a decorative focal point. This balance between decoration and functionality makes pendant lighting a common feature in modern Pinterest ideas for entryway design.
Step-by-Step Installation Method
Begin by selecting a pendant fixture appropriate for the size of the entryway. Smaller foyers benefit from compact pendant lights, while taller ceilings allow for slightly larger designs. Gather installation materials including mounting hardware, electrical connectors, screws, and a compatible bulb. Ensure the electrical circuit is switched off before starting the installation process.
Remove the existing ceiling fixture if one is present. Carefully disconnect the wires and detach the mounting bracket from the ceiling junction box. Attach the new pendant mounting plate to the junction box using the screws provided with the fixture. This plate will support the weight of the pendant light.
Next, connect the fixture wires to the ceiling wires using electrical connectors. Typically, black wires connect to black, white wires connect to white, and the ground wire attaches to the grounding screw. After confirming secure connections, tuck the wires neatly into the junction box.
Adjust the pendant cord length so the light hangs at an appropriate height, usually about seven feet above the floor for safe clearance. Secure the canopy against the ceiling and tighten all screws. Finally, install the bulb and restore power at the breaker panel to test the fixture.
Idea 2: Flush Mount Ceiling Light for Small Entryways
How to Create
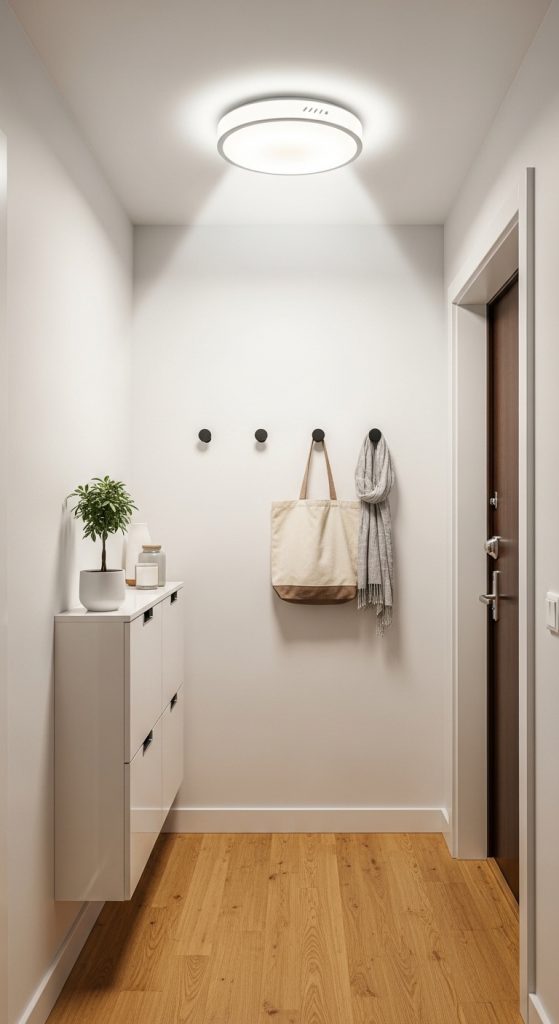
Flush mount ceiling lights are designed to sit directly against the ceiling surface, making them ideal for entryways with limited vertical clearance. This lighting style is frequently used in minimalist home decor because it maintains a clean ceiling line without introducing large hanging fixtures. On Pinterest, flush mount lighting appears often in budget ideas and beginner friendly projects because installation is straightforward and the fixtures adapt well to different design styles.
In terms of functionality, flush mount lights distribute illumination evenly across the entryway. Because the fixture is positioned close to the ceiling, the light spreads outward in a wide radius, reducing shadows and improving visibility. This makes flush mount lighting particularly useful in small foyers, apartment entrances, or narrow hallways where pendant lights might feel visually overwhelming.
The design flexibility of flush mount fixtures also contributes to their popularity. Materials such as frosted glass, metal frames, or geometric panels allow the fixture to complement various modern design themes. Many homeowners choose simple circular designs that align with minimalist style interiors.
Flush mount entryway lighting demonstrates how a simple decorative element can enhance the atmosphere of a space while maintaining organization and clarity. By combining subtle aesthetics with efficient lighting distribution, this fixture style supports both functional and decorative goals.
Step-by-Step Installation Method
Start by selecting a flush mount fixture sized appropriately for the entryway ceiling. Compact entryways generally require fixtures between eight and twelve inches in diameter. Prepare tools including a screwdriver, ladder, wire connectors, and mounting screws. Turn off power at the circuit breaker before beginning the installation.
Remove the existing ceiling fixture and disconnect the wires. Once the junction box is exposed, attach the mounting bracket provided with the flush mount light. This bracket typically secures directly to the junction box using two screws.
Connect the fixture wiring by matching the color-coded wires. Attach the black wire from the fixture to the black ceiling wire, and the white wire to the white ceiling wire. Secure the ground wire to the grounding screw or metal junction box. Use wire connectors to ensure tight connections.
After wiring is complete, position the fixture base over the mounting bracket and tighten the screws to secure it against the ceiling. Install the light bulb and attach the decorative cover or diffuser panel if included.
Restore power to the circuit and test the fixture. The flush mount light should provide consistent illumination across the entryway while maintaining a clean, unobtrusive ceiling appearance.
Idea 3: Statement Chandelier Entryway Fixture
How to Create
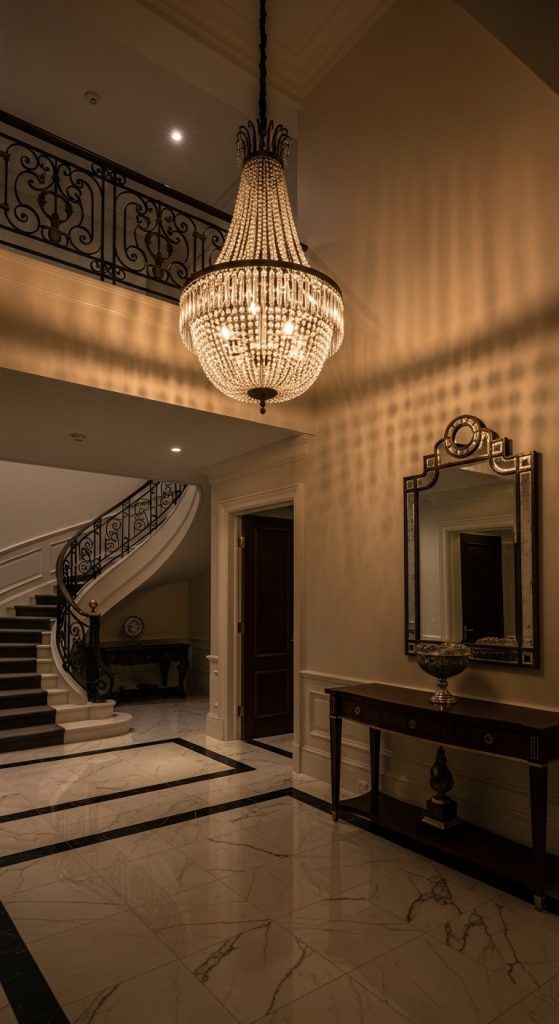
A chandelier functions as a central decorative feature that immediately captures attention upon entering the home. In entryways with high ceilings or spacious foyers, chandeliers provide both illumination and architectural emphasis. Pinterest inspiration boards often highlight chandeliers as a dramatic entryway upgrade that transforms the atmosphere of the entire entrance.
Unlike small fixtures that blend into the ceiling, chandeliers act as sculptural elements within the interior space. Their multi-arm structures distribute light in several directions, increasing brightness while creating visual depth. Many modern chandeliers use geometric metal frames or layered light arrangements that align with contemporary interior design trends.
The presence of a chandelier also helps define the entryway as a welcoming transition zone. When positioned above the center of the foyer, the fixture anchors surrounding decor elements such as rugs, console tables, or decorative mirrors. This balance creates a cohesive visual composition that enhances overall organization.
Entryway chandeliers appear frequently among Pinterest creative ideas because they combine functional lighting with strong decorative impact. Even relatively simple chandelier designs can elevate the perceived sophistication of the entrance area while maintaining practical illumination for everyday movement through the space.
Step-by-Step Installation Method
Begin by measuring the entryway ceiling height to confirm sufficient clearance for a chandelier. In most foyers, the bottom of the chandelier should remain at least seven feet above the floor. Gather materials including mounting hardware, a ceiling bracket, electrical connectors, and a sturdy ladder.
Turn off power to the electrical circuit before removing the existing fixture. Detach the current mounting plate from the junction box and install the chandelier support bracket supplied with the fixture. Chandeliers often require stronger brackets because they weigh more than standard lights.
Next, assemble the chandelier arms if required by the design. Connect the electrical wires by matching the black and white wires with the corresponding ceiling wires. Attach the grounding wire securely to the junction box.
Lift the chandelier canopy into position and secure it to the mounting bracket using screws. Adjust the hanging chain length so the fixture sits at an appropriate height within the entryway.
Install bulbs in each socket and restore power to the circuit. Once illuminated, the chandelier will create a balanced distribution of light while functioning as a decorative centerpiece in the entryway.
Idea 4: Lantern Style Entryway Light Fixture
How to Create
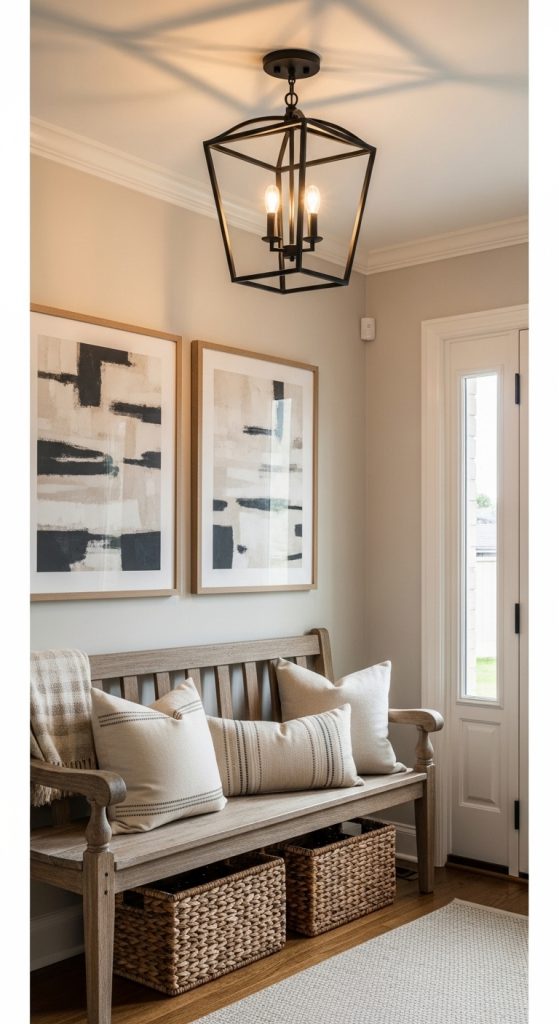
Lantern style light fixtures bring structured form and balanced illumination to entryway spaces. This fixture design is inspired by traditional lantern shapes, typically featuring a framed structure that surrounds the light source with glass or open panels. On Pinterest, lantern fixtures appear frequently in entryway inspiration because they combine decorative structure with practical lighting. Their geometric shape helps visually frame the entryway, creating a clear focal point while maintaining a clean and organized appearance.
Lantern fixtures work well in both modern design and transitional interiors because their structure emphasizes symmetry and proportion. The rectangular or square frame draws attention without overwhelming the space. This makes the lantern fixture suitable for medium-sized foyers where a statement light is desired but a large chandelier may feel excessive.
Another advantage of lantern fixtures is the way they distribute light. Because many lantern designs use multiple glass panels or open sides, light spreads evenly throughout the entryway. This improves visibility around storage areas such as coat hooks, benches, and shoe cabinets.
Pinterest ideas often pair lantern entryway lighting with simple decorative elements such as mirrors, minimal wall art, or small console tables. The fixture functions as both lighting and architectural decoration, reinforcing organization while enhancing the visual identity of the entryway.
Step-by-Step Installation Method
Begin by selecting a lantern fixture proportionate to the entryway size. Taller ceilings allow for hanging lantern fixtures, while lower ceilings may require semi-flush lantern designs. Gather necessary materials including mounting hardware, electrical connectors, screws, and compatible light bulbs.
Turn off the power supply to the entryway lighting circuit before beginning installation. Remove the existing ceiling fixture and disconnect the wires from the junction box. Install the mounting bracket included with the lantern fixture. This bracket provides the structural support required for the fixture.
Connect the lantern fixture wires to the ceiling wires using wire connectors. Match black wires together, white wires together, and secure the grounding wire to the grounding screw. Carefully tuck the wires into the junction box.
Attach the lantern canopy to the mounting bracket using screws provided with the fixture. If the lantern uses a chain suspension, adjust the chain length to maintain safe walking clearance below the fixture.
Insert the light bulb and restore electrical power to test the installation. The lantern fixture should provide balanced illumination while introducing a structured decorative element to the entryway.
Idea 5: Glass Globe Entryway Lighting
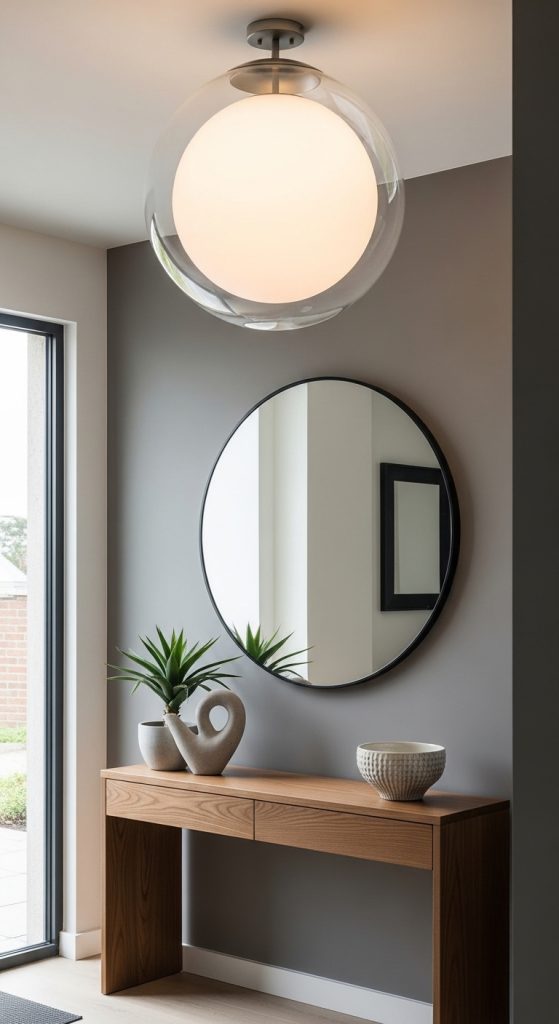
How to Create
Glass globe lighting offers a simple yet visually refined approach to entryway illumination. This lighting style uses spherical glass shades that diffuse light evenly in all directions. The globe shape creates a balanced visual form that complements both minimalist interiors and modern design themes. On Pinterest, glass globe fixtures frequently appear among trending ideas because they deliver a clean aesthetic while maintaining strong lighting performance.
The spherical design softens the appearance of the entryway by introducing curved geometry into the space. In many interiors dominated by rectangular furniture and straight architectural lines, the globe light adds visual contrast. Frosted or translucent glass shades are commonly used to reduce glare while distributing light evenly across the entryway.
Glass globe fixtures are particularly effective in smaller entryways because they provide bright illumination without complex structural elements. Their compact design allows them to blend into the ceiling area while still contributing to the overall aesthetic of the space.
Many Pinterest home decor boards highlight globe lighting in combination with minimalist furniture, neutral wall colors, and natural materials. This lighting style reinforces a calm and organized entry environment while maintaining practical brightness for daily movement through the space.
Step-by-Step Guide
Begin by selecting a glass globe fixture designed for ceiling mounting. Fixtures with frosted or semi-opaque glass shades are ideal for evenly diffused lighting. Prepare installation tools including a ladder, screwdriver, electrical connectors, and mounting hardware.
Turn off electrical power to the entryway lighting circuit. Remove the existing light fixture and disconnect the wiring from the ceiling junction box. Attach the mounting bracket provided with the globe fixture to the junction box using screws.
Next, connect the fixture wires to the ceiling wiring. Match the black wire from the fixture with the black ceiling wire and the white wire with the white ceiling wire. Secure the grounding wire to the grounding screw. Use wire connectors to ensure the electrical connections remain stable.
After wiring is complete, position the fixture base against the ceiling bracket and tighten the screws to secure it. Carefully attach the glass globe shade according to the fixture design. Many globe fixtures use threaded rings or support clips to hold the glass shade in place.
Insert a compatible light bulb and restore power to the circuit. The glass globe fixture will produce soft, evenly distributed lighting that enhances the entryway atmosphere.
Idea 6: Linear Multi-Light Entryway Fixture
How to Create
Linear multi-light fixtures feature multiple light sources arranged along a horizontal frame or bar. While this fixture style is often associated with kitchen islands, it can also function effectively in long entryways or hallway-style foyers. Pinterest inspiration frequently highlights linear lighting as a modern design solution that introduces structured geometry and balanced illumination.
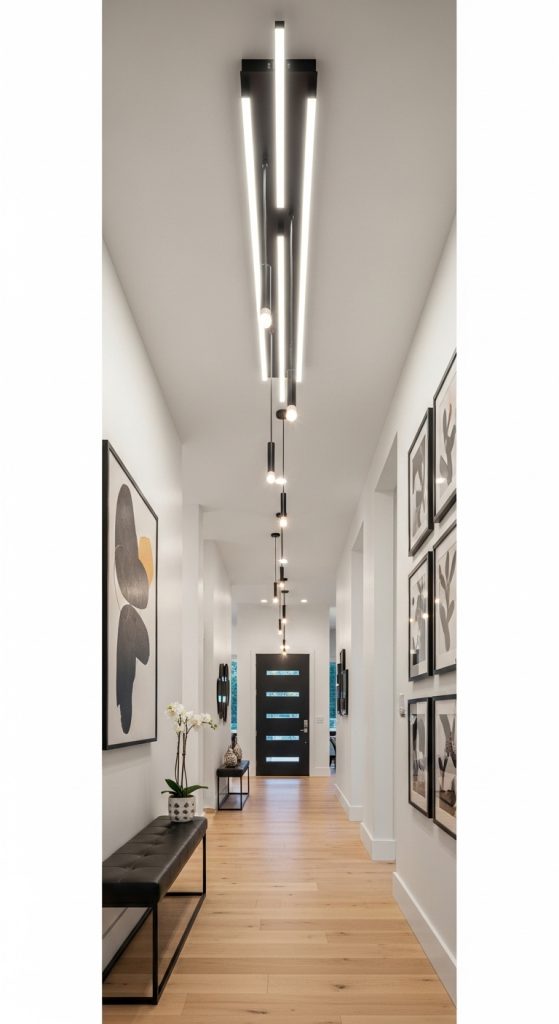
The design principle behind linear lighting involves distributing light evenly along the length of the entryway. Instead of relying on a single central fixture, multiple bulbs illuminate the space from different points along the frame. This approach improves brightness while maintaining a cohesive visual structure.
Linear fixtures also reinforce the directional flow of an entryway. Because the lights are arranged in a straight line, they naturally guide movement through the space toward adjacent rooms. This subtle design feature improves spatial orientation and supports organization within narrow or elongated entry areas.
Many modern linear fixtures use exposed bulbs, small pendant shades, or minimalist metal frames. This allows the fixture to function as both a decorative element and a practical lighting solution. In Pinterest creative projects, linear lighting often appears in entryways with contemporary decor themes and neutral color palettes.
Execution Process
Start by measuring the length of the entryway ceiling area where the linear fixture will be installed. Choose a fixture that provides balanced coverage without extending too close to nearby walls or door frames. Gather installation materials including mounting brackets, screws, electrical connectors, and a screwdriver.
Turn off the electrical power supply before removing the existing ceiling fixture. Disconnect the wires and detach the old mounting plate from the junction box. Install the new mounting bracket supplied with the linear fixture.
Connect the wiring by matching color-coded wires. Attach the black fixture wire to the black ceiling wire and the white fixture wire to the white ceiling wire. Secure the grounding wire to the grounding point in the junction box.
Once wiring is complete, position the fixture frame against the mounting bracket and secure it with screws. Ensure the frame remains level before tightening the hardware completely.
Install the light bulbs into each socket and restore electrical power. The linear multi-light fixture will illuminate the entire entryway while creating a modern architectural lighting effect.
Idea 7: Semi-Flush Mount Decorative Fixture
How to Create
Semi-flush mount fixtures combine characteristics of flush mount lights and pendant fixtures. Instead of sitting directly against the ceiling, these lights extend slightly downward while remaining compact. This makes them suitable for entryways with moderate ceiling height where a pendant light might hang too low.
On Pinterest, semi-flush fixtures appear frequently in entryway lighting inspiration because they provide visual interest without occupying excessive vertical space. The small gap between the fixture and the ceiling allows light to spread both downward and upward, improving overall brightness.
Semi-flush fixtures often feature decorative metal frames, layered glass shades, or geometric structures. These design elements introduce subtle architectural detail into the entryway. The fixture therefore functions as both illumination and decoration.
Because the fixture hangs only a short distance below the ceiling, it maintains safe clearance for movement through the entryway. This makes it a practical choice for busy household entrances where functionality is as important as style.
The versatility of semi-flush lighting allows it to complement many interior themes, including minimalist style, modern design, and transitional decor. Pinterest boards frequently showcase these fixtures paired with neutral color palettes and simple entryway furniture arrangements.
Setup Method
Choose a semi-flush fixture that matches the scale of the entryway ceiling. Prepare installation tools including a ladder, screwdriver, mounting bracket, and electrical connectors. Switch off the power supply to the lighting circuit before beginning installation.
Remove the existing ceiling light and disconnect the wiring from the junction box. Attach the mounting bracket included with the new fixture to the junction box using screws.
Connect the fixture wires to the ceiling wires by matching the black and white wires. Attach the grounding wire securely to the grounding screw. Use wire connectors to secure each electrical connection.
Position the fixture base over the mounting bracket and tighten the screws to hold it in place. Ensure the fixture remains centered and stable before attaching any decorative components such as glass shades or metal frames.
Install the light bulb and restore power to the circuit. The semi-flush mount fixture will provide balanced illumination while introducing decorative depth to the entryway ceiling area.
Idea 8: Cluster Pendant Lighting
How to Create
Cluster pendant lighting uses multiple small pendant lights grouped together to form a visually dynamic lighting arrangement. This design approach is widely shared across Pinterest inspiration boards because it creates a sculptural lighting display while maintaining practical illumination.

Cluster pendants are particularly effective in entryways with high ceilings. Instead of installing one large chandelier, several smaller pendants hang at varying heights from a central canopy. This layered arrangement creates depth and visual movement within the space.
The cluster design distributes light across multiple points, improving brightness throughout the entryway. At the same time, the varied pendant heights introduce artistic structure that enhances the aesthetic quality of the entrance area.
Cluster lighting also allows flexibility in decorative style. Glass shades, metal domes, or simple bulb pendants can be arranged together to create a custom lighting composition. Many Pinterest creative ideas emphasize asymmetrical arrangements that add visual interest without overwhelming the space.
Because cluster pendants act as both lighting and decoration, they often become the focal feature of the entryway. This approach transforms a functional lighting fixture into a central design element that defines the atmosphere of the entrance.
Step-by-Step Installation Method
Select a cluster pendant fixture designed for ceiling installation. These fixtures typically include a single canopy with several pendant cords attached. Gather necessary tools including a ladder, screwdriver, electrical connectors, and mounting hardware.
Turn off the electrical circuit before removing the existing light fixture. Disconnect the wiring and install the mounting bracket supplied with the cluster fixture.
Connect the fixture wiring to the ceiling wiring using wire connectors. Attach black wires together, white wires together, and secure the grounding wire.
Mount the canopy to the bracket and tighten the screws. Adjust the length of each pendant cord so the lights hang at varying heights. This arrangement creates the layered cluster effect.
Install light bulbs in each pendant socket and restore power to test the installation. The cluster pendant fixture will produce multi-directional illumination while acting as a decorative focal point.
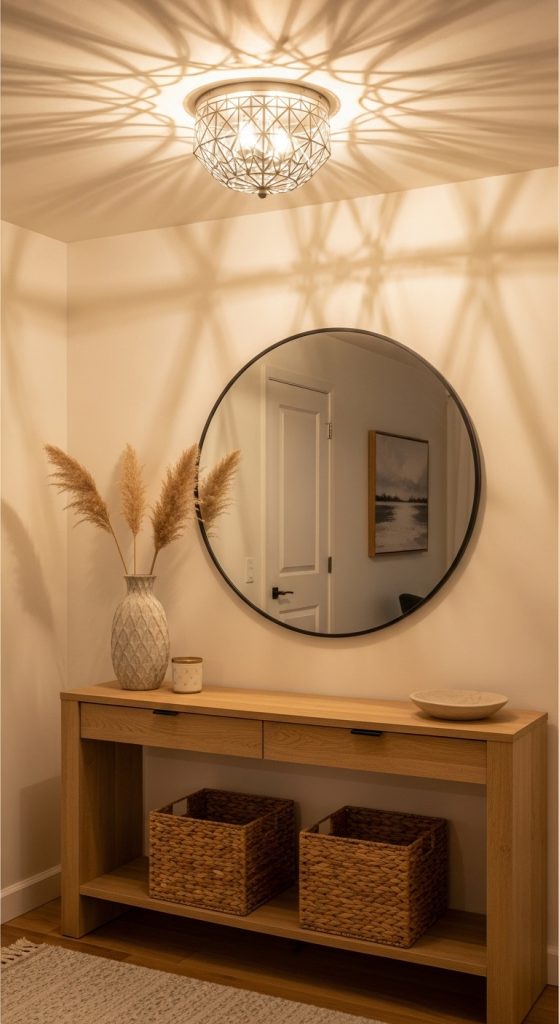
Idea 9: Industrial Cage Entryway Light
How to Create
Industrial cage lighting uses metal frameworks that surround the bulb, creating a protective and decorative structure. This lighting style originates from industrial architecture where exposed fixtures emphasized functionality and durability. On Pinterest, cage lighting has become popular for entryway inspiration because it introduces strong geometric lines and minimalist structure.
The open cage design allows light to radiate freely in all directions, improving brightness across the entryway. Unlike enclosed fixtures, the exposed bulb provides direct illumination that enhances visibility around storage areas and walkways.
Cage fixtures often feature simple metal frames arranged in cube, rectangular, or spherical shapes. This structural design reinforces modern industrial aesthetics while remaining compatible with minimalist interiors.
Because cage lighting emphasizes structural simplicity, it pairs well with neutral entryway decor elements such as wooden benches, simple coat racks, and framed mirrors. The fixture becomes an architectural accent rather than a heavily decorative object.
Pinterest boards frequently highlight industrial cage fixtures as budget friendly DIY upgrades that introduce bold character into the entrance area without requiring complex installation.
Step-by-Step Guide
Select a cage-style ceiling fixture appropriate for the size of the entryway. Gather installation tools including mounting screws, electrical connectors, a screwdriver, and a ladder. Turn off electrical power before beginning installation.
Remove the existing fixture from the ceiling junction box. Disconnect the wiring and attach the mounting bracket provided with the cage light fixture.
Connect the fixture wires to the ceiling wires by matching the color-coded wiring. Secure the connections using wire connectors and attach the grounding wire to the grounding screw.
Position the cage fixture over the mounting bracket and tighten the screws to secure it in place. Ensure the fixture remains level and stable before installing the bulb.
Insert the bulb into the socket and restore power to test the light. The industrial cage fixture will produce bright, unobstructed lighting while introducing structured design detail into the entryway.
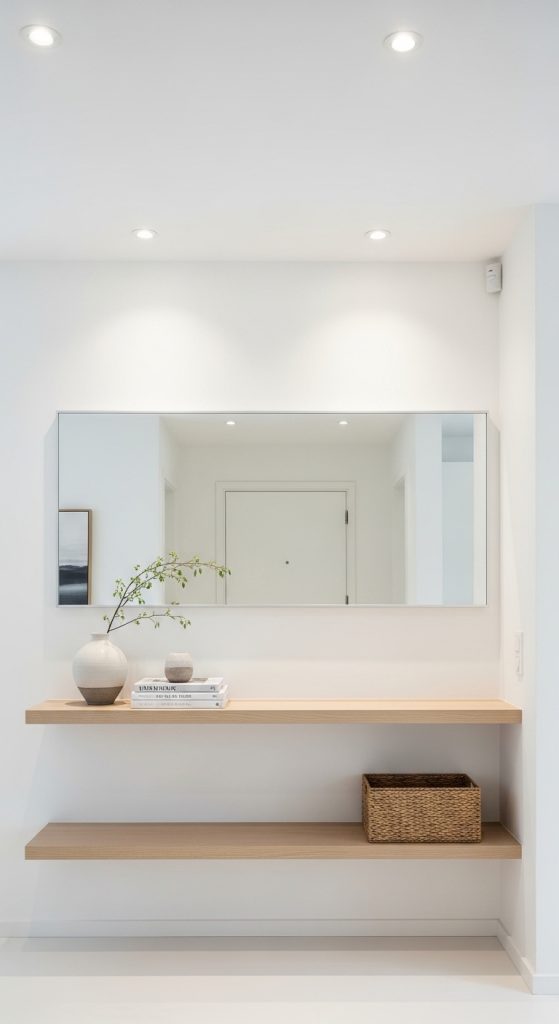
Idea 10: Recessed Lighting Entryway Layout
How to Create
Recessed lighting is installed directly inside the ceiling, creating a clean and minimalist lighting solution. Instead of visible fixtures, the lights sit within the ceiling surface, producing a streamlined appearance that aligns with modern design principles. Pinterest inspiration boards frequently showcase recessed lighting in entryways where a minimalist style is preferred.
The primary advantage of recessed lighting is its ability to illuminate the space without occupying visual or physical space. This makes it ideal for small entryways or low ceilings where hanging fixtures may feel restrictive. Recessed lights can also be arranged in multiple positions to ensure consistent illumination across the entire entryway.
Another benefit of recessed lighting is its ability to highlight architectural elements such as wall textures, artwork, or mirrors. By directing light downward, the fixtures emphasize decorative features while maintaining a clean ceiling surface.
Recessed lighting often appears in modern home decor projects because it supports organization and spatial clarity. The unobtrusive design allows other decorative elements in the entryway to stand out while still providing effective illumination.
Execution Process
Begin by planning the placement of recessed lights across the entryway ceiling. Measure the ceiling space and determine where each light should be installed to achieve balanced coverage. Mark the positions with a pencil before cutting any openings.
Turn off electrical power to the lighting circuit. Use a hole saw or ceiling cutting tool to create openings sized for the recessed light housings. Ensure the openings align with the fixture dimensions.
Install the recessed light housing into the ceiling opening according to the manufacturer’s mounting system. Connect the electrical wiring from the ceiling circuit to the fixture wiring using wire connectors.
Secure the housing clips so the fixture remains firmly attached to the ceiling surface. Insert the recessed light trim and install the bulb or LED module.
Restore electrical power and test the lighting arrangement. The recessed lighting layout will create evenly distributed illumination while maintaining a clean and modern entryway ceiling design.
Additional Sections
Common Beginner Mistakes and How to Avoid Them
One of the most common mistakes in entryway lighting projects is choosing a fixture that does not match the scale of the space. Oversized fixtures can overwhelm small entryways, while fixtures that are too small may fail to provide adequate illumination. Measuring ceiling height and entryway width before selecting a fixture helps ensure proper proportions. Another frequent issue involves incorrect hanging height for pendant lights or chandeliers. Fixtures that hang too low can obstruct movement and create safety concerns. Maintaining at least seven feet of clearance between the floor and the bottom of the fixture prevents this problem. Improper electrical preparation is another mistake beginners often encounter. Failing to turn off the circuit breaker before installation can create electrical hazards. Always verify that power is disconnected using a voltage tester before handling wires. Inconsistent lighting distribution can also reduce the effectiveness of the entryway design. Choosing fixtures that spread light evenly across the space helps maintain visibility and functionality. Careful planning, accurate measurements, and proper safety procedures help beginners avoid these common issues while completing their DIY lighting projects successfully.
Practical Tips for Better Results
Successful entryway lighting projects depend on thoughtful planning and attention to detail. One effective tip is to consider how natural light interacts with the entryway during the day. Fixtures should complement natural lighting rather than compete with it. Warm-toned bulbs can create a welcoming atmosphere, while neutral lighting improves visibility for everyday tasks. Another helpful strategy is selecting fixtures that coordinate with existing home decor elements. Matching metal finishes or geometric shapes with nearby furniture can create a cohesive design appearance. Positioning the fixture at the visual center of the entryway helps maintain balance within the space. For entryways with storage furniture, lighting should illuminate areas where coats, bags, and shoes are frequently used. This improves functionality and supports better organization. Adjustable brightness options can also enhance lighting flexibility, allowing homeowners to modify brightness levels depending on time of day or activity. These practical considerations help transform a simple lighting installation into a well-integrated home decor feature.
Styling, Presentation, or Organization Ideas
Lighting fixtures can significantly influence the presentation of an entryway. To enhance the overall aesthetic, lighting should be coordinated with surrounding decorative elements. Mirrors are often placed near entryway lighting because they reflect light and increase the perceived brightness of the space. Positioning a mirror across from a light fixture can amplify illumination and create visual depth. Console tables beneath entryway lights provide additional opportunities for decorative organization. Small decorative objects, storage baskets, or framed artwork can be arranged beneath the light to create a structured focal point. Rugs can also define the entryway zone and visually anchor the lighting fixture above. When styling the space, maintaining visual balance is essential. Avoid overcrowding the area with too many decorative objects. Instead, focus on a few carefully arranged elements that complement the lighting design. Consistent color palettes and simple furniture shapes help maintain an organized appearance while allowing the entryway light fixture to function as the primary decorative highlight.
Budget or Time Planning
Entryway lighting projects are often appealing because they can be completed with relatively limited time and financial investment. Budget planning begins by determining the type of fixture required and evaluating whether the existing electrical setup can support it. Simple flush mount fixtures typically require fewer materials and less installation time, making them suitable for budget friendly DIY upgrades. More complex fixtures such as chandeliers or cluster pendants may require additional mounting hardware and slightly longer installation periods. Planning the project in stages can help manage time efficiently. Begin by gathering all materials and tools before starting the installation process. This prevents interruptions during the project. Allocating sufficient time for preparation, installation, and testing ensures the fixture is installed correctly. For beginners, setting aside one to two hours for a standard fixture replacement is often sufficient. Budget conscious planning also includes selecting durable fixtures that require minimal maintenance. Careful project planning allows homeowners to complete entryway lighting improvements efficiently while maintaining control over both time and costs.
Creative Expansion and Advanced Inspiration
Once the basic entryway lighting project is completed, additional creative ideas can expand the design further. Layered lighting is one advanced technique frequently seen in Pinterest inspiration boards. This approach combines ceiling fixtures with wall sconces or accent lighting to create multiple light sources within the entryway. Layered lighting improves brightness while adding depth to the overall design. Another creative option involves integrating decorative ceiling patterns or architectural details around the light fixture. Simple ceiling medallions or textured panels can frame the fixture and enhance its visual impact. Smart lighting systems also allow homeowners to control brightness levels and color temperature through mobile applications, providing flexible lighting conditions for different times of day. For larger entryways, combining multiple fixture styles can produce dramatic results. For example, recessed lights can provide general illumination while a chandelier or pendant serves as a decorative centerpiece. These advanced ideas allow homeowners to transform a basic lighting installation into a fully developed entryway design that reflects both creativity and functionality.

