10 birdcage decor ideas
Birdcage decor has become a widely shared theme across Pinterest ideas because it combines vintage character with flexible decorative possibilities. A birdcage is no longer used only as a functional item for birds. Instead, it has become a versatile decorative element that can be transformed into creative home decor, event decoration, or seasonal displays. Its open structure allows designers and DIY enthusiasts to experiment with lighting, plants, flowers, and handmade decorative elements. This makes it suitable for many interior styles, including rustic homes, minimalist interiors, cottage aesthetics, and modern design spaces.
This article explains practical birdcage decor ideas that can be created through clear step by step processes. Readers will learn how to transform simple birdcages into decorative centerpieces, lighting accents, plant displays, and creative organization pieces. Each idea focuses on realistic materials, beginner friendly preparation methods, and practical execution steps. The goal is to provide inspiration that can be recreated at home without specialized tools or advanced crafting experience.
Birdcage decor projects are often considered easy projects because they rely on simple assembly techniques rather than complicated construction. Many designs can be completed with basic materials that are commonly available in craft stores or home supply sections. This guide focuses on structured planning, balanced styling, and creative decoration techniques that help turn a simple birdcage into a visually appealing decorative feature.
Why This Idea Is Trending or Useful
Birdcage decoration appears frequently in trending ideas on Pinterest because it provides a balance between vintage charm and modern decorative flexibility. The structure of a birdcage naturally creates a framed display area, allowing decorative elements to be layered inside and around the cage. This characteristic makes birdcages useful for many decorative purposes, including table centerpieces, shelf styling, seasonal decoration, and wedding decor. Their open metal framework also allows light, plants, and hanging ornaments to be displayed clearly from multiple angles.
Another reason birdcage decor remains popular is its accessibility for beginner friendly DIY projects. Many birdcages can be repurposed from thrift stores or secondhand markets. With basic materials such as flowers, lights, candles, ribbons, or greenery, a simple cage can be converted into a decorative focal point. This allows homeowners and decorators to create handmade decoration pieces without expensive tools or specialized skills.
Birdcage designs also adapt well to modern design and minimalist style interiors. A plain metal cage can function as a sculptural display object when styled with limited decorative elements. At the same time, rustic and cottage interiors often use birdcages as layered decor pieces filled with flowers or greenery.
Because birdcage decor supports multiple aesthetic directions, it fits well into home decor planning. From seasonal decoration to everyday interior styling, birdcage displays offer flexible inspiration for creative projects that combine structure, balance, and visual interest.
Materials and Preparation
Preparing a birdcage decor project begins with selecting a cage that matches the desired decorative style. Birdcages are commonly available in metal, wire, or wood designs. Metal cages are often preferred for DIY decoration because they are durable and easy to modify with paint or decorative attachments. Before beginning the project, the cage should be cleaned and inspected to ensure that hinges, doors, and wires are secure.
Basic materials used in birdcage decor projects typically include artificial flowers, greenery, ribbon, candles, fairy lights, decorative stones, or small ornaments. These materials allow different decorative themes to be created inside the cage. Additional tools such as floral wire, scissors, adhesive hooks, or small clips help secure decorations without damaging the structure of the cage.
Planning is an important step before beginning the decoration process. The designer should determine the intended purpose of the birdcage display. Some birdcage projects function as table centerpieces, while others act as hanging decor or shelf displays. The intended location influences material choices and arrangement techniques.
Lighting conditions should also be considered during planning. For example, fairy lights work well in darker areas, while plant displays benefit from locations with natural light. Measuring the display space ensures the cage fits proportionally within the room or tabletop arrangement.
Preparation also includes organizing materials in advance. Having flowers, greenery, lighting elements, and structural supports ready allows the decoration process to proceed smoothly. Careful preparation improves efficiency and helps achieve balanced, aesthetically pleasing birdcage decoration results.
MAIN IDEAS
Idea 1: Floral Birdcage Centerpiece
How to Create
A floral birdcage centerpiece is one of the most recognizable birdcage decor ideas used in Pinterest inspiration boards. The design focuses on transforming a simple cage into a floral display that functions as a decorative centerpiece for tables, shelves, or entryway consoles. This concept works well in home decor settings because the cage structure naturally frames the flowers while allowing them to be visible from all sides. Artificial flowers are commonly used because they maintain their shape and color without requiring water or maintenance.
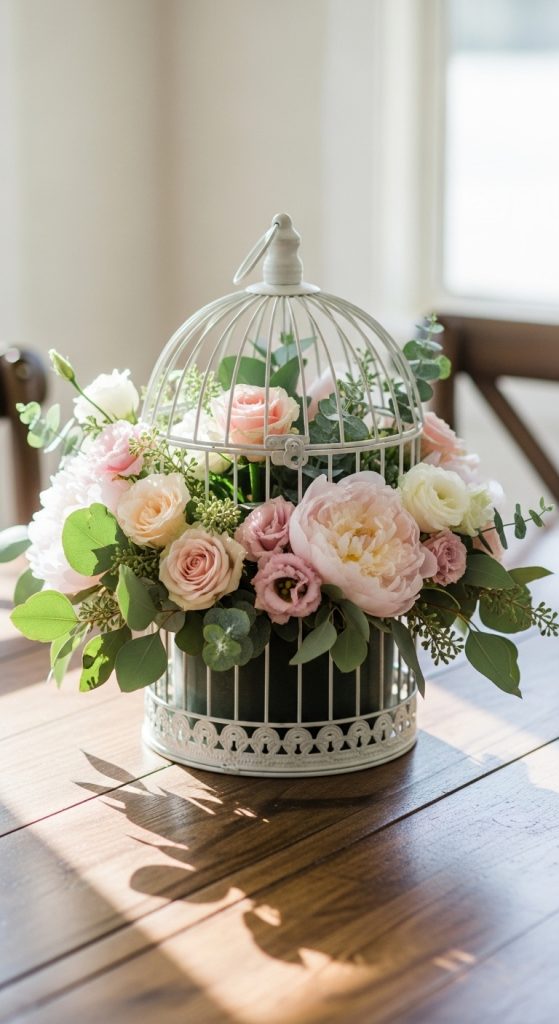
When planning a floral birdcage design, the choice of flowers influences the overall aesthetic. Soft pastel flowers create a romantic aesthetic, while greenery combined with white flowers creates a minimalist style arrangement. The cage itself can remain its original color or be painted to match the surrounding decor. Neutral colors such as white, matte black, or soft gold are often used in modern design settings.
Floral birdcage centerpieces also allow layering of materials. Small decorative stones, moss, or wooden bases can be placed at the bottom of the cage to create a foundation for the flowers. This layered structure improves visual depth and helps secure the arrangement. The cage door can remain slightly open to add dimension to the design and create a natural, styled appearance.
Step-by-Step Guide
The first step in creating a floral birdcage centerpiece is preparing the base of the cage. Place decorative moss, stones, or a small foam block inside the cage to stabilize the arrangement. Floral foam works particularly well because it allows stems to be inserted and secured easily. The base should cover the floor of the cage while leaving space for flower placement.
Next, begin inserting artificial flower stems into the foam base. Larger flowers should be placed first to establish the main shape of the arrangement. These primary flowers form the focal point inside the cage. Smaller flowers and greenery are then added around the primary blooms to fill empty spaces and create a balanced composition.
Once the interior flowers are arranged, additional greenery can be wrapped lightly around the exterior wires of the birdcage. This technique softens the metal structure and visually connects the inside arrangement with the outer frame. Floral wire or small clips can secure these elements.
Finally, position the completed birdcage on a table, tray, or decorative surface. The centerpiece should remain visually balanced and visible from multiple angles. This simple step by step method creates a beginner friendly decoration piece suitable for dining tables, weddings, or everyday home decor styling.
Idea 2: Candle Lantern Birdcage
How to Make
A candle lantern birdcage design transforms the cage into a decorative lighting feature. This concept uses the cage structure as a protective frame around a candle, allowing soft light to pass through the wire pattern. The result is a warm lighting accent that works well for living rooms, entry tables, patios, or seasonal decoration setups.
Birdcage lanterns appear frequently in Pinterest inspiration collections because they combine vintage design with functional lighting. The cage provides visual structure while allowing the candlelight to create shadows and texture around the surrounding space. This makes the decor piece useful both during the day as a decorative object and in the evening as an atmospheric lighting source.
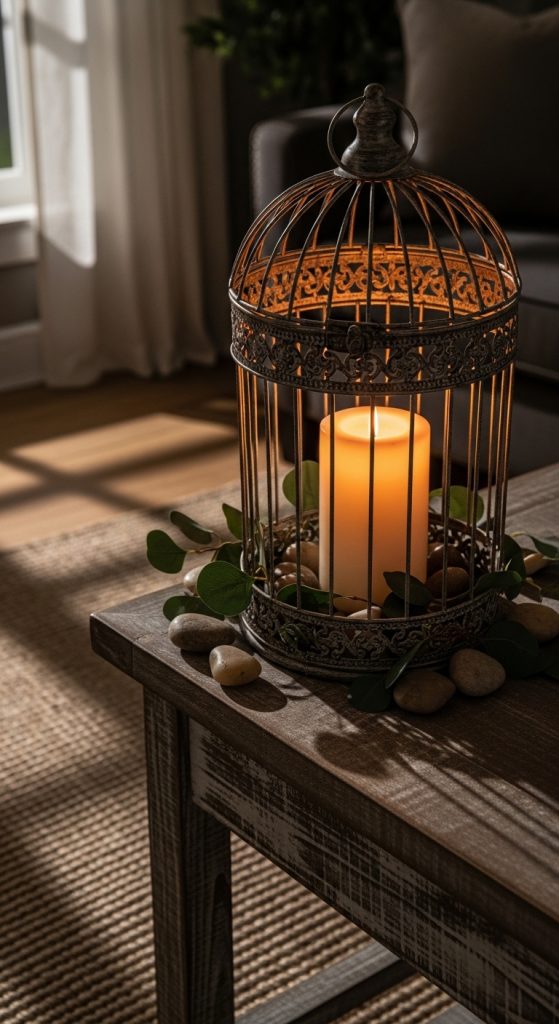
Different decorative styles can be achieved through candle selection and surrounding materials. A large pillar candle creates a classic lantern appearance, while multiple small candles produce layered light patterns. Decorative elements such as stones, dried flowers, or greenery can be added to the base to enhance the aesthetic.
This type of creative project is often classified as an easy project because the cage itself already functions as a frame. Only minimal materials are required to transform the birdcage into a decorative lantern.
Step-by-Step Guide
Start by preparing the base of the birdcage with a heat-resistant platform. A small metal plate, ceramic tile, or thick glass coaster can be placed at the bottom of the cage. This surface protects the cage base and ensures safe candle placement.
Next, position a pillar candle or LED candle in the center of the cage. LED candles are often used in decorative settings because they eliminate fire risk while maintaining a similar visual effect. The candle should be tall enough to remain visible through the cage wires but small enough to allow space for additional decoration.
Decorative stones or moss can be placed around the candle base to stabilize it and add texture to the display. Greenery or small floral stems can also be wrapped lightly around the cage exterior to soften the metal frame.
Once the candle and decorative materials are arranged, close the cage door securely. The completed lantern can be placed on a table, shelf, or outdoor patio surface. When lit, the candle creates patterned shadows through the cage wires, producing a warm decorative lighting effect that enhances the surrounding environment.
Idea 3: Hanging Plant Birdcage
How to Create
A hanging plant birdcage display converts the cage into a suspended plant holder. This design introduces natural greenery into interior spaces while using the cage structure as a decorative container. The open wire design allows plants to grow outward and downward, creating a layered botanical display that fits well within modern design interiors.
Plant birdcage decor often appears in Pinterest ideas because it merges home decor styling with indoor gardening. Trailing plants such as ivy or string-style vines are commonly used because they extend naturally through the cage wires. This creates a dynamic appearance where greenery interacts with the metal frame.
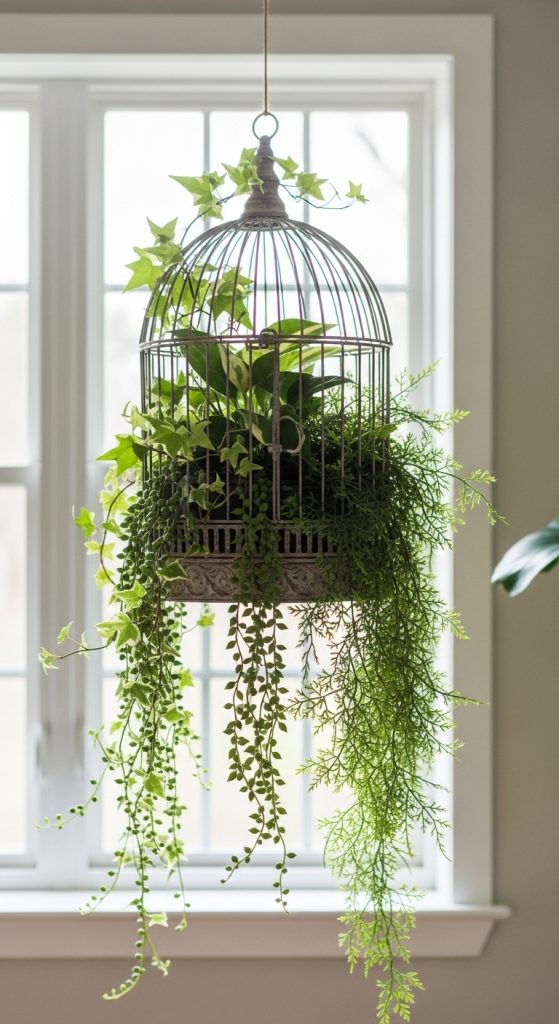
The birdcage can be hung from ceiling hooks, wall brackets, or decorative stands. When suspended, the cage becomes a focal point that adds vertical visual interest to the room. This method works particularly well in small apartments where floor space is limited.
Minimalist style homes often use a single plant inside a simple cage to maintain a clean aesthetic. Rustic interiors may incorporate additional greenery, moss, or small flowers for a fuller arrangement.
Step-by-Step Guide
Begin by selecting a small plant container that fits inside the birdcage. Lightweight plastic pots are often used because they reduce stress on the hanging structure. The pot should be slightly smaller than the cage base to allow air circulation.
Next, place the plant pot inside the cage and stabilize it with decorative moss or stones. These materials prevent movement while adding natural texture to the display.
If the plant has trailing vines, gently guide the vines through the cage wires so they can extend outward. This technique allows the greenery to interact with the cage structure and creates a balanced decorative effect.
Finally, attach a sturdy hook or chain to the top loop of the birdcage. The cage can then be suspended from a ceiling hook or wall bracket. Once positioned, adjust the plant vines to distribute them evenly around the cage. The result is a natural hanging decor piece that combines plant life with structural decoration
Idea 4: Fairy Light Birdcage Display
How to Create
A fairy light birdcage display transforms a simple cage into a decorative lighting feature that produces a soft ambient glow. This type of decoration is widely used in Pinterest ideas because it combines lighting with sculptural structure. The cage functions as a frame that contains and distributes the lights, creating an aesthetic focal point suitable for shelves, side tables, or bedroom decor.
Fairy lights are commonly used in DIY decor projects because they are lightweight, flexible, and easy to arrange. Their thin wire strands allow them to be wrapped around the interior structure of the cage without altering the frame. When the lights are evenly distributed, the cage becomes a glowing decorative object that enhances the surrounding space.
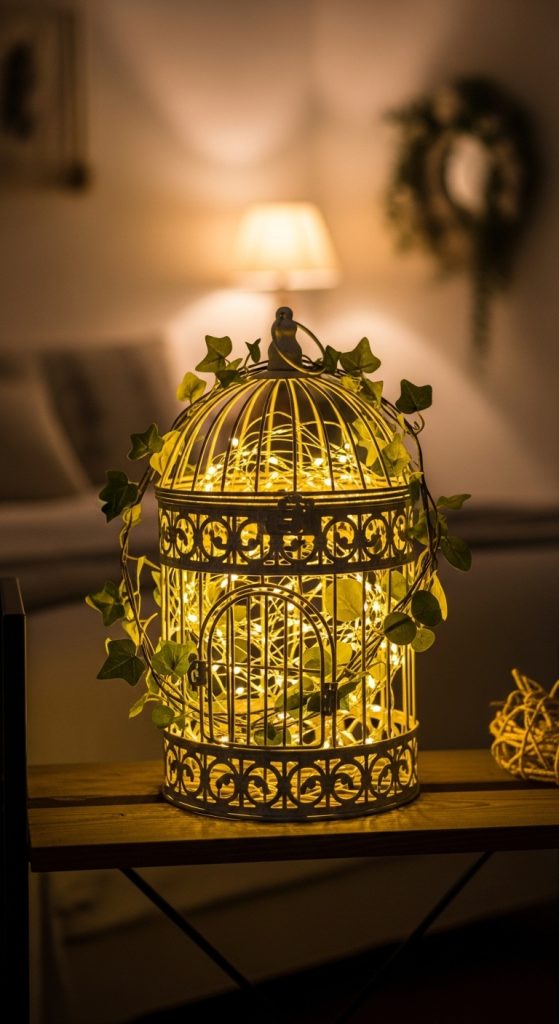
This style works well with modern design interiors as well as rustic or vintage aesthetics. A matte black or white birdcage paired with warm white lights creates a minimalist style display. Decorative additions such as artificial greenery, small flowers, or crystal beads can be layered with the lights to increase visual depth.
Because fairy lights require minimal materials and no complex tools, this decoration is considered a beginner friendly creative project. It can be completed quickly while producing a visually striking lighting feature for home decor.
Step-by-Step Guide
Start by selecting battery powered fairy lights or USB powered lights that are thin and flexible. Battery powered lights are often easier to install because they eliminate the need for visible power cords. Before placing the lights in the cage, test them to ensure they function correctly.
Open the birdcage door and begin wrapping the light strand around the interior wires. The wrapping process should begin near the top of the cage and gradually move downward. This allows the light distribution to appear balanced across the entire structure.
If additional decoration is desired, insert small pieces of artificial greenery or dried flowers between sections of the lights. These materials soften the metal structure and create a layered aesthetic that blends lighting with natural texture.
After the lights are arranged, position the battery pack discreetly inside the cage or attach it behind the cage using small clips. Close the cage door and turn on the lights to evaluate the illumination. The final result is a glowing decorative object that can be used as a centerpiece or accent piece in various areas of the home.
Idea 5: Vintage Book Birdcage Display
How to Make
A vintage book birdcage display is a decorative concept that combines literary elements with structural decor. This idea uses stacked books as a base inside the birdcage to create a layered and intellectual aesthetic. The cage acts as a protective frame that highlights the arrangement while maintaining an organized appearance.
This decor style appears frequently in Pinterest inspiration boards focused on vintage decor and cottage aesthetics. Books introduce texture, color variation, and historical character to the display. When combined with a birdcage, the arrangement becomes a visually interesting decorative feature suitable for living rooms, reading corners, or office shelves.
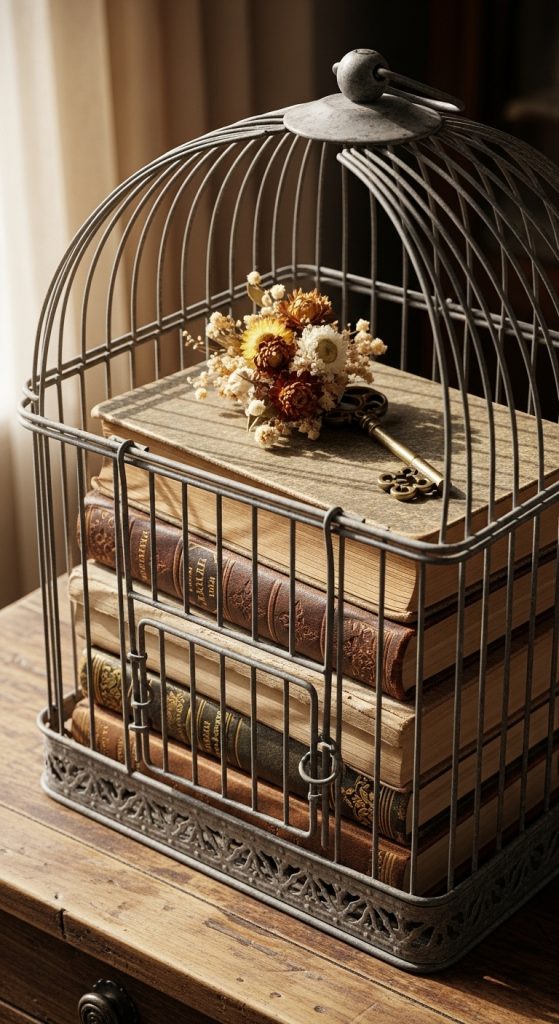
The design often includes additional decorative objects such as small clocks, miniature sculptures, or dried flowers placed on top of the books. These elements enhance the narrative quality of the display and make the arrangement feel intentional rather than random.
Birdcage book displays also fit well within minimalist style interiors when the number of objects is limited. A small stack of neutral colored books paired with a simple decorative item can produce a clean and balanced appearance.
Step-by-Step Guide
Begin by selecting small hardcover books that fit comfortably inside the birdcage. Books with neutral covers or aged paper tones often complement the vintage aesthetic of the cage. The books should be stacked neatly to form a stable platform.
Place the stacked books at the center of the cage floor. If necessary, use a small piece of foam or folded paper beneath the books to stabilize the stack and prevent shifting.
Once the base is prepared, position a decorative object on top of the books. Examples include a small candle, miniature vase, dried flowers, or a decorative key. This object becomes the focal point of the arrangement.
Optional decorative materials such as lace ribbon or thin greenery strands can be wrapped lightly around the cage wires to soften the metal structure. These small details help connect the cage frame with the interior display.
Finally, close the cage door and place the decorated birdcage on a shelf, desk, or side table. The completed display functions as both literary decor and structural decoration, making it suitable for reading spaces or creative work environments.
Idea 6: Seasonal Decoration Birdcage
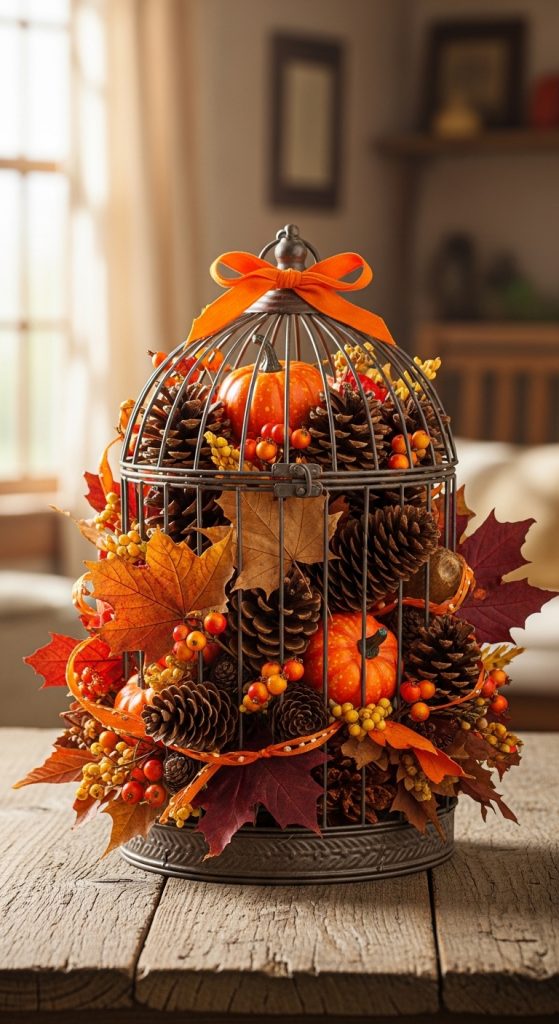
How to Create
A seasonal decoration birdcage is designed to change throughout the year based on seasonal themes. This concept allows the same birdcage to be reused multiple times with different decorative materials. Because the cage functions as a flexible display container, it can easily adapt to seasonal colors, textures, and decorative motifs.
Seasonal birdcage decor frequently appears in Pinterest inspiration collections because it encourages creative reuse. Instead of purchasing new decorations each season, the same cage can be refreshed with new elements. This approach supports budget ideas while maintaining variety in home decor.
Spring displays often include artificial flowers, pastel colors, and small bird figurines. Summer themes may use greenery, seashells, or light fabrics. Autumn decorations commonly feature dried leaves, pinecones, and warm tones. Winter displays often incorporate miniature ornaments, pine branches, or decorative snow textures.
The ability to change decorations quickly makes seasonal birdcage displays an ideal creative project for beginners. Each update requires only minor adjustments rather than complete reconstruction.
Step-by-Step Guide
Begin by clearing the interior of the birdcage so it can be redesigned for the current season. Remove previous decorations and wipe the cage clean if necessary. This ensures that the new arrangement appears fresh and intentional.
Next, select materials that match the seasonal theme. For example, autumn decorations might include pinecones, dried leaves, and small pumpkins. Place a base layer of moss or decorative stones inside the cage to stabilize the display.
Add the primary decorative elements in the center of the cage. Larger objects should be positioned first, while smaller decorations can be arranged around them to fill gaps and create visual balance.
Additional elements such as ribbons, seasonal greenery, or small ornaments can be attached to the exterior wires of the cage. This expands the design beyond the interior space and creates a more dynamic display.
Once the arrangement is complete, place the birdcage in a visible location such as an entryway table or mantel. When the season changes, the decorations can be replaced with new materials while using the same cage structure.
Idea 7: Terrarium Birdcage Garden
How to Create
A terrarium birdcage garden is a decorative concept that transforms the cage into a miniature indoor garden. This design combines plants, soil layers, and natural textures inside the cage to simulate a small ecosystem. The open wire frame allows the plants to receive air circulation while also displaying the greenery clearly.
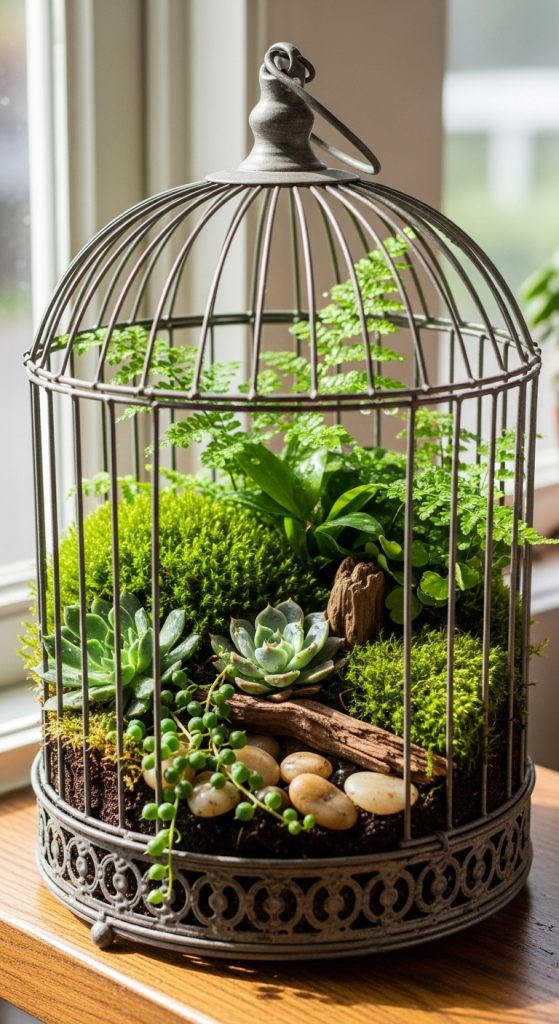
Terrarium birdcage designs are widely shared among Pinterest ideas because they merge gardening with creative home decor. The cage structure adds visual height and dimension compared to traditional terrarium containers.
Small plants such as succulents, moss, or miniature ferns are commonly used for these projects. These plants require minimal maintenance and adapt well to indoor environments. Decorative stones, bark pieces, and soil layers add texture to the base of the arrangement.
This type of creative project works well in both modern design and rustic interiors. The combination of metal structure and natural greenery creates a balanced contrast that fits many decorative styles.
Step-by-Step Guide
Start by placing a shallow container or tray inside the birdcage to hold soil and plants. This container prevents soil from spilling through the cage wires while maintaining a clean structure.
Add a layer of small stones at the bottom of the container to improve drainage. On top of the stones, place a layer of soil suitable for the selected plants. The soil layer should be deep enough to support root growth.
Next, plant small succulents, moss, or ferns in the soil. Arrange the plants with varying heights to create a natural garden appearance. Taller plants should be placed toward the back while smaller plants fill the foreground.
Decorative elements such as bark, small stones, or miniature garden figurines can be added to enhance the landscape effect. These elements help create the impression of a tiny garden environment.
After the arrangement is complete, close the birdcage and place it near a window with indirect sunlight. Regular watering and occasional trimming will maintain the miniature garden inside the decorative cage.
Idea 8: Jewelry Organizer Birdcage
How to Make
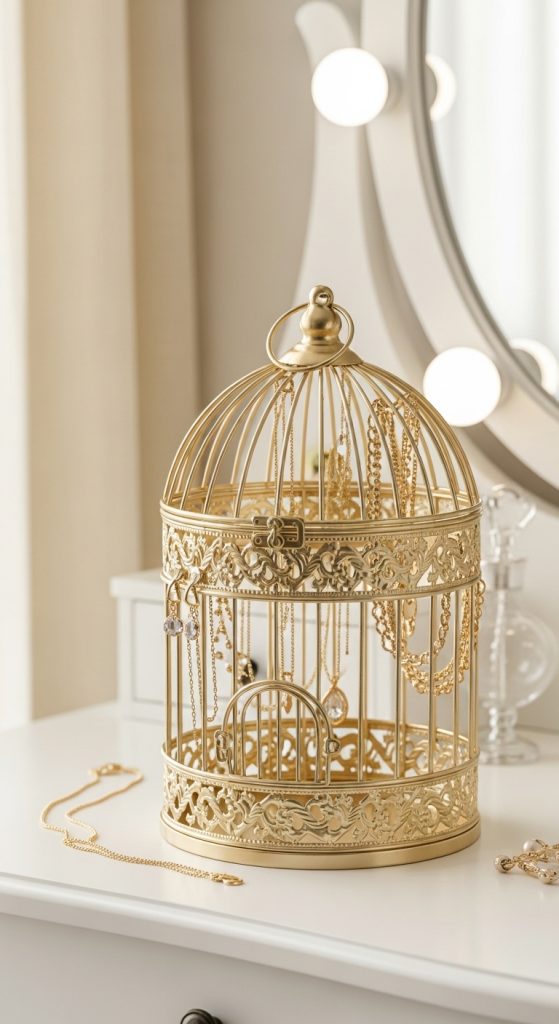
A jewelry organizer birdcage converts the cage into a functional storage solution. The wire structure provides multiple hanging points for necklaces, bracelets, and earrings. This allows jewelry to remain visible, organized, and easy to access.
This concept appears in Pinterest inspiration boards because it merges organization with decorative styling. Instead of storing jewelry in drawers or boxes, the cage displays it as part of the room decor. The result is both practical and visually interesting.
Birdcages are particularly suitable for jewelry organization because their curved wires create natural hooks for hanging accessories. Earrings can also be clipped directly onto the cage wires.
Minimalist interiors often use white or black cages for jewelry displays because they create a clean visual background that highlights the accessories.
Step-by-Step Guide
Begin by cleaning the birdcage thoroughly to remove dust or residue. Jewelry should only be placed on clean surfaces to avoid tarnishing or damage.
Open the cage door and begin hanging necklaces from the upper wires of the cage. Distribute them evenly to prevent tangling and maintain visual balance.
Bracelets can be hung along the side wires, while earrings can be clipped onto horizontal bars of the cage. This arrangement allows each item to remain visible and easily accessible.
If additional storage is needed, a small dish can be placed at the bottom of the cage to hold rings or small accessories.
Once organized, place the birdcage jewelry display on a dresser or vanity table. The cage now functions as both decorative storage and a practical organization tool.
Idea 9: Photo Memory Birdcage
How to Create
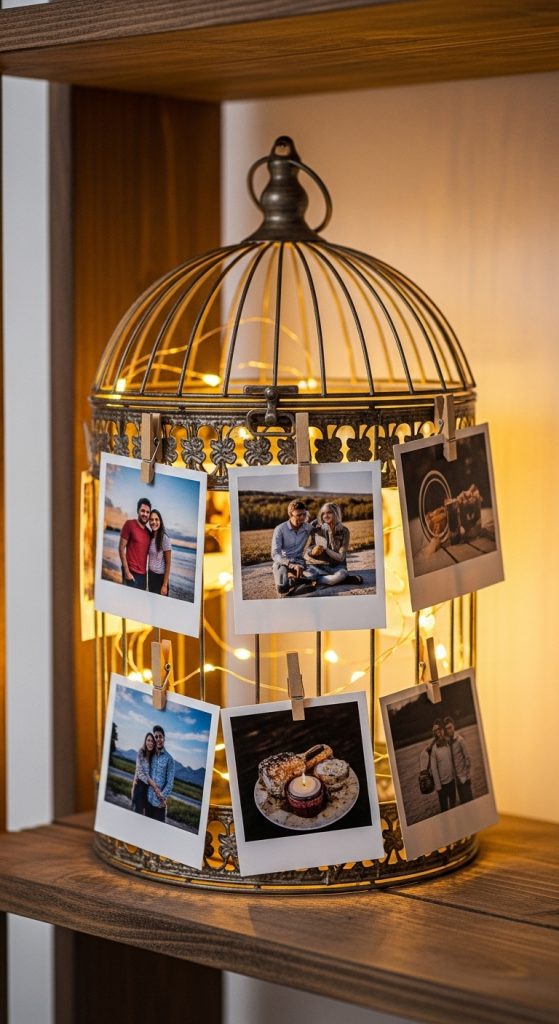
A photo memory birdcage display turns the cage into a personal storytelling piece. Instead of holding plants or candles, the cage contains printed photographs attached to its interior wires. This design allows memories to be displayed in a structured yet creative way.
Photo birdcage displays appear frequently in Pinterest ideas because they transform everyday photographs into artistic decor. The cage acts as a frame that highlights each image while allowing multiple photos to be viewed at once.
The arrangement can include family photos, travel images, or printed quotes. This makes the display suitable for living rooms, bedrooms, or creative workspaces.
Decorative elements such as fairy lights or small greenery strands can be added to enhance the visual composition.
Step-by-Step Guide
Start by printing small photographs in consistent sizes. Uniform photo sizes create a balanced layout inside the cage.
Attach the photos to the interior wires using small clips, clothespins, or decorative paper clips. Arrange the photos at different heights to create a layered gallery effect.
Optional fairy lights can be wrapped around the interior wires to highlight the photographs and add ambient lighting.
Once all photos are attached, close the cage and position it on a shelf or desk. The birdcage now functions as a personal memory display.
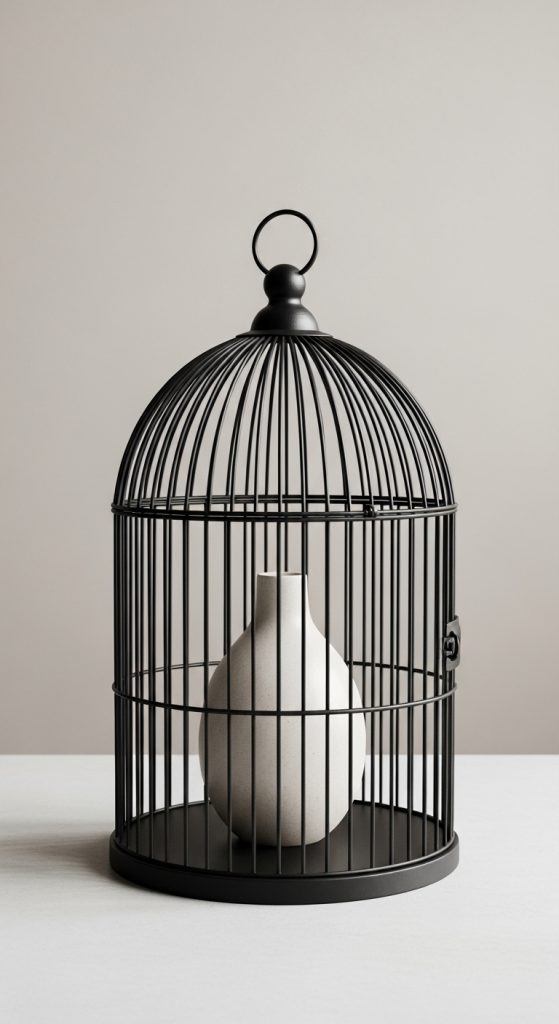
Idea 10: Minimalist Sculpture Birdcage
How to Create
A minimalist sculpture birdcage focuses on simplicity and structural design. Instead of filling the cage with many decorative elements, the design uses one central object placed inside the cage. This approach aligns with minimalist style decor where fewer elements create stronger visual impact.
The cage itself becomes a sculptural frame that emphasizes the object inside. Examples of central objects include a ceramic sphere, geometric sculpture, or simple stone arrangement.
Minimalist birdcage displays are commonly used in modern design interiors because they maintain visual balance while avoiding clutter.
Step-by-Step Guide
Begin by selecting one decorative object that fits proportionally inside the cage. The object should leave open space around it so the cage frame remains visible.
Place the object in the center of the cage base. If necessary, use a small platform or decorative stone base to elevate the object slightly.
Ensure that the object remains stable and centered. Minimalist displays rely heavily on symmetry and balance.
Finally, position the cage on a clean surface such as a shelf, console table, or desk. The simple arrangement transforms the cage into a sculptural decor element.
Common Beginner Mistakes and How to Avoid Them
A common mistake in birdcage decor projects is overcrowding the interior space. Because the cage structure is visually open, adding too many decorative elements can create a cluttered appearance that reduces the impact of the design. Beginners often attempt to fill every part of the cage with flowers, lights, or ornaments. A better approach is to select a clear focal point and build the arrangement around it while leaving empty space to maintain visual balance.
Another frequent issue involves poor material stability. Lightweight decorations may shift or fall if they are not secured properly. Materials such as floral foam, decorative stones, or adhesive clips can help stabilize objects inside the cage. These supports prevent movement and keep the arrangement organized.
Improper scale is also a common problem. Decorations that are too large may overwhelm the cage, while very small objects may disappear visually. Selecting elements that match the cage size ensures that each component remains visible and proportionate.
By focusing on balanced composition, stable materials, and appropriate object size, beginners can create birdcage decor projects that appear intentional and aesthetically organized.
Practical Tips for Better Results
Achieving successful birdcage decoration often depends on thoughtful material selection and arrangement planning. One helpful technique is to start with a neutral base. Materials such as moss, stones, or small platforms create a stable foundation for decorative objects. This base layer also adds texture and prevents the cage from appearing empty or unfinished.
Lighting can significantly enhance birdcage displays. Small LED lights or fairy lights provide subtle illumination that highlights the structure of the cage and the decorative elements inside. When placed carefully, lighting can create depth and shadow patterns that enhance the aesthetic effect.
Color coordination is another important factor. Limiting the color palette to two or three complementary tones helps maintain visual harmony. For example, greenery paired with white flowers creates a clean aesthetic, while warm tones and wood textures support rustic decor themes.
Finally, consider the surrounding environment where the cage will be placed. Birdcage decor should complement nearby furniture and decorative elements. By integrating the cage into the overall interior styling plan, the decoration becomes part of a cohesive home decor arrangement.
Styling, Presentation, or Organization Ideas
Styling birdcage decor effectively involves considering both placement and surrounding decorative elements. Birdcages can function as standalone centerpieces or as part of a layered decorative arrangement. When used as a centerpiece, the cage should be positioned where it remains visible from multiple angles. Round dining tables and entryway tables are often suitable locations.
Another styling technique involves grouping multiple birdcages of different sizes. When arranged together, these cages create a decorative cluster that adds height variation and visual depth. The cages can share a common theme, such as greenery or candles, while varying in size or color.
Shelving arrangements also work well with birdcage decor. A cage placed on a bookshelf can serve as a focal point between books and smaller decorative objects. This method integrates the cage into an organized display rather than isolating it as a single object.
Finally, decorative trays can be used to anchor birdcage displays on tables. A tray frames the arrangement and allows additional elements such as candles or small plants to accompany the cage.
Budget or Time Planning
Birdcage decor projects are considered budget friendly because they rely on simple materials and reusable structures. Many birdcages can be found at thrift stores, flea markets, or secondhand shops at affordable prices. Reusing these cages for decoration reduces the need for expensive decorative items.
Artificial flowers, moss, stones, and ribbon are inexpensive materials that can be reused across multiple projects. By storing leftover materials after each project, future decorations can be created without purchasing new supplies.
Time planning is also straightforward for most birdcage decor ideas. Simple arrangements such as candle lanterns or jewelry organizers can be completed in less than an hour. More detailed projects such as terrarium gardens may require additional preparation time but remain manageable for beginners.
Preparing materials in advance can significantly reduce the time needed for the project. When all decorative components are organized before starting, the assembly process becomes faster and more efficient.
Creative Expansion and Advanced Inspiration
Once the basic birdcage decor techniques are mastered, the designs can be expanded into more advanced creative projects. Larger birdcages can be transformed into floor decor pieces that function as statement objects in living rooms or entryways. These larger displays allow for more complex arrangements involving plants, lighting, and decorative sculptures.
Another creative expansion involves combining birdcages with wall decor. Cages can be mounted on decorative wall brackets or integrated into gallery wall arrangements. When combined with framed artwork or mirrors, the cage becomes part of a larger decorative composition.
Seasonal transformations also provide opportunities for ongoing creativity. By changing the decorative elements throughout the year, the same birdcage can produce many different aesthetic results.
Advanced inspiration may also involve painting or modifying the cage structure itself. Matte finishes, metallic tones, or distressed paint techniques can change the visual character of the cage and help it match specific interior styles.
Through experimentation with materials, arrangement techniques, and styling approaches, birdcage decor can evolve into a versatile creative project that continues to generate new inspiration for home decor design.