
If you love decorating on a budget but still want your home to look high-end and Pinterest-perfect, you’re going to fall in love with these Dollar Tree stackable eggs ideas. These large plastic eggs are one of the most versatile seasonal finds you can grab for just a few dollars. Originally designed as simple Easter décor, stackable eggs have become a viral DIY base for farmhouse centerpieces, modern spring accents, whimsical kids’ crafts, and even elegant neutral home styling.
What makes Dollar Tree stackable eggs so special? First, their size. They’re large enough to make a statement. Second, their hollow structure makes them lightweight and easy to customize. Third, they can be transformed with paint, fabric, texture paste, florals, rope, and more. Whether your aesthetic is rustic farmhouse, neutral minimal, cottagecore, glam, or kid-friendly colorful, these eggs can be styled to match.
The best part? Every idea in this post is beginner-friendly. You don’t need professional crafting skills. With a little creativity and some simple supplies, you can turn inexpensive plastic eggs into décor that looks boutique-worthy.
In this detailed Pinterest-style guide, you’ll discover 10 deeply explained, beautifully styled, and practical Dollar Tree stackable egg ideas. Each one includes step-by-step instructions and a full materials list so you can confidently recreate them.
Let’s start crafting something stunning — without spending a fortune.
1. Rustic Twine-Wrapped Farmhouse Eggs
If you love cozy farmhouse vibes, this idea is a must-save. Twine-wrapped eggs instantly create warmth and texture, making them perfect for tiered trays, entryway tables, or dining room centerpieces. The natural rope texture gives the eggs a handcrafted, organic feel that pairs beautifully with wood beads, white florals, and neutral tones.

These eggs look high-end, especially when styled in a wooden bowl or on a distressed tray. You can keep them plain for a minimal aesthetic or add small wooden crosses, lace accents, or mini greenery sprigs for extra charm. Because the base egg is lightweight, wrapping it in twine is easy and doesn’t require complicated tools.
This project is ideal for farmhouse lovers who want something subtle yet eye-catching. It also works beautifully for spring décor that transitions seamlessly into summer.
How To
Start by separating the Dollar Tree stackable egg halves if possible. Apply a thin layer of hot glue at the top tip of the egg. Press the end of your twine firmly into the glue and allow it to secure. Begin wrapping the twine tightly around the egg, working in small sections. Add small lines of hot glue as you go to prevent slipping.
Keep the twine snug and close together so no plastic shows through. Continue wrapping until you reach the bottom. Secure the end with glue and trim excess twine. For added dimension, glue a small greenery sprig or tie a simple bow around the center.
Allow everything to cool completely before styling.
Materials Used
- Dollar Tree stackable eggs
- Jute twine or rope
- Hot glue gun and glue sticks
- Scissors
- Optional: faux greenery, lace ribbon, wooden beads
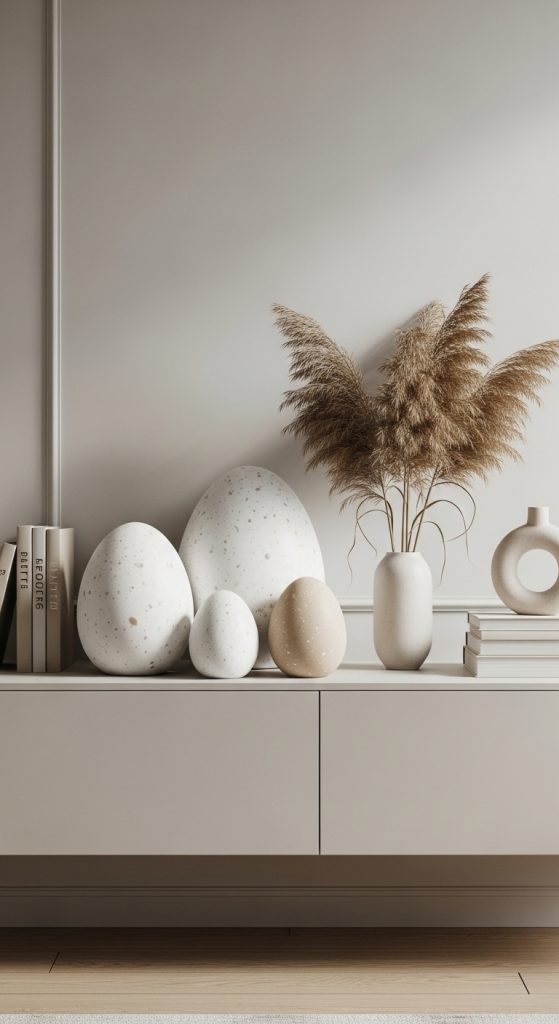
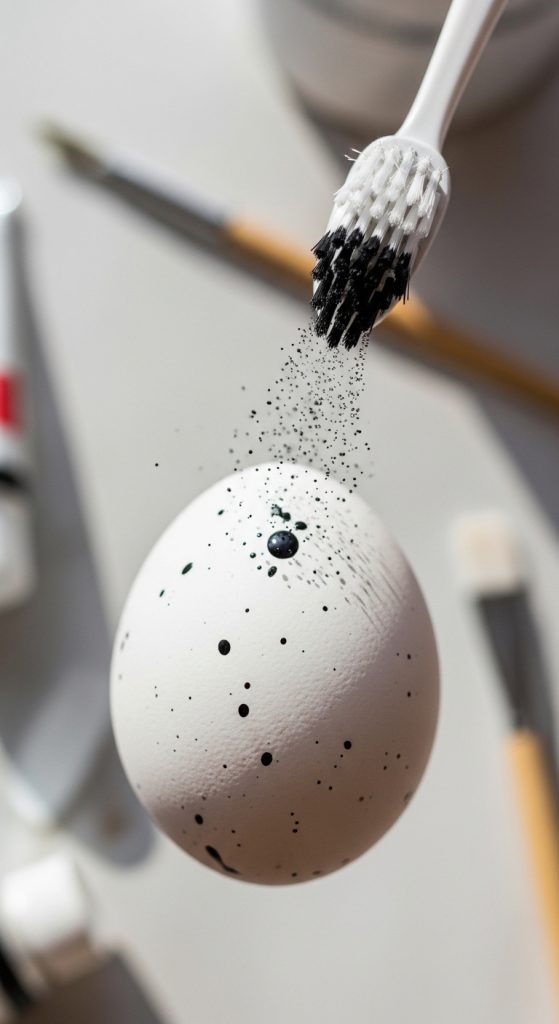
2. Speckled Ceramic Look Eggs
If you adore the modern speckled ceramic trend, this DIY will elevate your stackable eggs into something that looks straight out of a home décor boutique. Speckled eggs are perfect for neutral homes and minimalist interiors.

The beauty of this idea lies in the finish. A matte base coat combined with soft black speckles creates a realistic ceramic effect. These eggs look stunning displayed in a white bowl, paired with pampas grass, or placed on floating shelves.
This idea works beautifully in neutral color palettes like cream, beige, soft gray, or even muted sage green. It’s subtle yet extremely elegant.
How To
Begin by lightly sanding the plastic egg surface to help the paint adhere better. Wipe away dust with a dry cloth. Apply a matte acrylic paint in your chosen base color using a foam brush. Allow it to dry completely and apply a second coat if needed.
To create the speckled effect, dip an old toothbrush into watered-down black acrylic paint. Use your finger to flick the bristles gently, creating small speckles across the egg surface. Let dry completely.
For a realistic ceramic finish, seal with a matte Mod Podge or matte spray sealer.
Materials Used
- Dollar Tree stackable eggs
- Matte acrylic paint (white, cream, beige, sage, etc.)
- Black acrylic paint
- Toothbrush
- Foam paint brush
- Sandpaper (fine grit)
- Matte sealer or Mod Podge
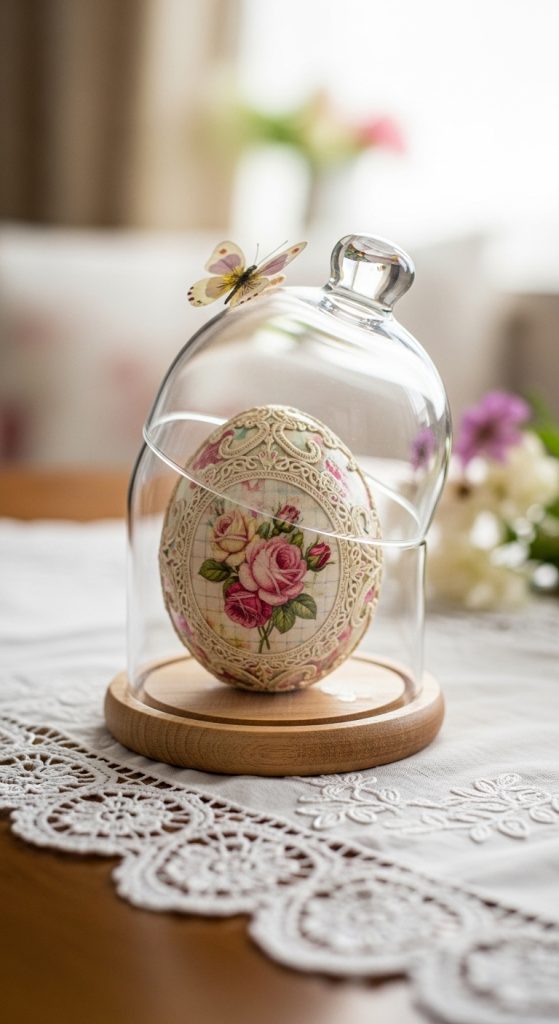
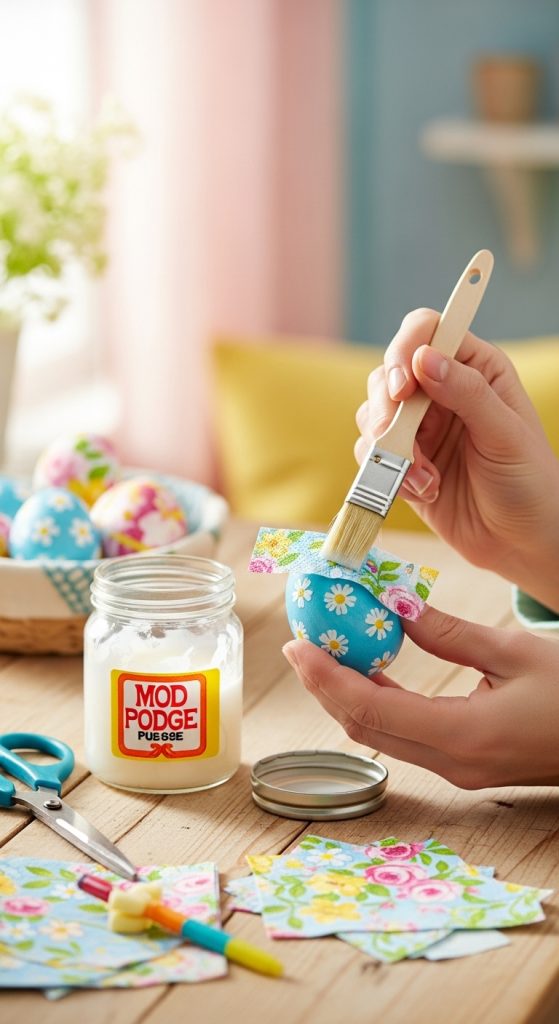
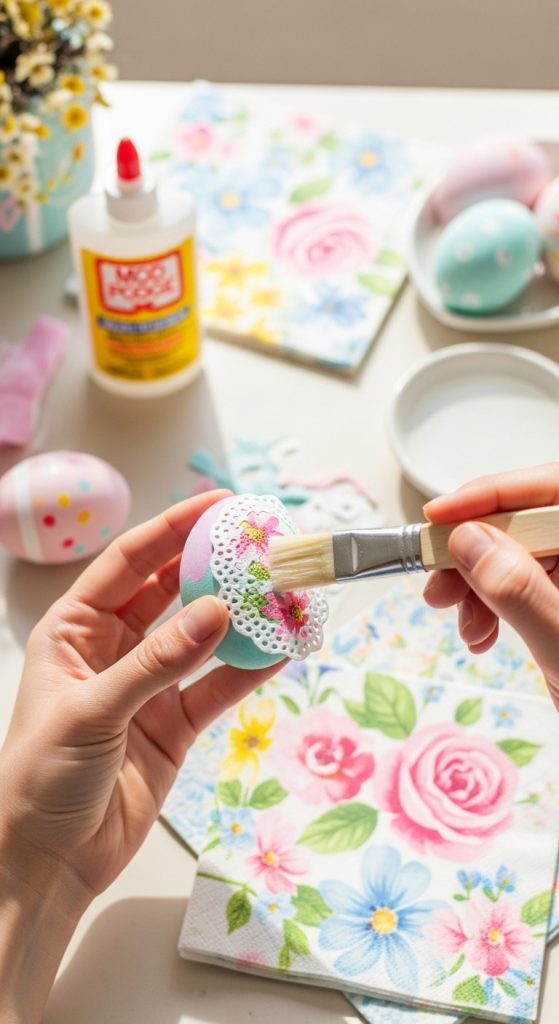
3. Floral Decoupage Spring Eggs
Nothing says spring like florals. Decoupage floral eggs create a soft, romantic look that feels custom-made. This idea is perfect for cottagecore lovers or anyone wanting colorful seasonal décor.
You can use floral napkins, scrapbook paper, or printed tissue paper. The layered paper effect gives the eggs depth and artistic charm. Display them in a glass cloche or as part of a spring mantel setup.
Because each egg will turn out slightly different, they feel one-of-a-kind.
How To
Start by painting your egg white to create a clean base. Let dry. Cut floral designs from decorative napkins, separating the printed layer from backing layers.
Apply a thin layer of Mod Podge to a small section of the egg. Gently place the floral piece on top and smooth carefully with your fingers or a soft brush to avoid wrinkles. Continue layering until the egg is fully covered.
Seal the entire egg with another thin layer of Mod Podge. Allow to dry completely before handling.
Materials Used
- Dollar Tree stackable eggs
- Floral napkins or decorative paper
- White acrylic paint
- Mod Podge
- Soft brush
- Scissors
4. Gold Leaf Glam Eggs
If you prefer a glamorous aesthetic, gold leaf eggs will instantly add elegance to your space. They look luxurious when paired with mirrored trays, candles, or blush florals.
The reflective finish makes these eggs eye-catching statement pieces. You can fully cover them in gold or apply gold leaf partially for a modern abstract look.
These eggs work beautifully beyond Easter — they can even be used for wedding décor or spring parties.
How To
Paint the egg in a neutral base color and allow it to dry. Apply gold leaf adhesive to sections where you want metallic accents. Wait until adhesive becomes tacky.
Gently press gold leaf sheets onto the surface. Use a dry brush to smooth and remove excess flakes. Continue until desired coverage is achieved.
Seal lightly with clear spray sealer to protect the finish.
Materials Used
- Dollar Tree stackable eggs
- Gold leaf sheets
- Gold leaf adhesive
- Soft dry brush
- Acrylic paint (optional base coat)
- Clear sealer spray
5. Moss-Covered Garden Eggs
For a natural outdoor-inspired look, moss-covered eggs bring texture and earthy charm. These are perfect for garden-themed tablescapes or outdoor spring décor.
The rich green texture looks realistic and pairs beautifully with wooden crates and lanterns.
How To
Apply hot glue in small sections and press moss firmly onto the egg. Work gradually to ensure even coverage. Fill any gaps with small moss pieces.
Press gently to secure. Once fully covered, allow to cool and shake lightly to remove loose pieces.
Materials Used
- Dollar Tree stackable eggs
- Craft moss
- Hot glue gun
- Scissors
6. Pastel Ombre Painted Eggs
Ombre eggs create a dreamy, soft gradient effect that feels very Pinterest-worthy. Choose colors like blush pink, baby blue, lavender, or mint green.
The gradual color blending makes these eggs visually stunning when grouped together.
How To
Paint the entire egg with the lightest shade and allow it to dry. Using a damp sponge, apply a slightly darker shade starting from the bottom. Blend upward in soft dabbing motions.
Continue layering progressively darker shades toward the base. Blend gently to create smooth transitions.
Let dry completely before sealing with matte or satin finish.
Materials Used
- Dollar Tree stackable eggs
- 2–3 coordinating acrylic paint shades
- Makeup sponge
- Foam brush
- Sealer
7. Fabric-Wrapped Cottage Eggs

Fabric-wrapped eggs create softness and warmth. Use gingham, linen, floral cotton, or lace for a cozy aesthetic.
These look beautiful in cottage-style homes or nurseries.
How To
Cut fabric into manageable strips or sections. Apply Mod Podge to the egg surface and carefully press fabric down. Smooth wrinkles gently.
Overlap edges slightly to ensure full coverage. Seal with another thin Mod Podge layer.
Let dry fully before styling.
Materials Used
- Dollar Tree stackable eggs
- Cotton fabric or lace
- Mod Podge
- Scissors
- Foam brush
8. Chalkboard Message Eggs
Chalkboard eggs are fun and interactive. You can write seasonal quotes, names, or greetings.

They work perfectly for Easter tables or kids’ crafts.
How To
Apply 2–3 coats of chalkboard paint, allowing each coat to dry fully. Once dry, season the surface by rubbing chalk across and wiping off.
Write messages using chalk or chalk markers.
Materials Used
- Dollar Tree stackable eggs
- Chalkboard paint
- Foam brush
- Chalk or chalk markers
9. Textured Plaster Eggs

For a high-end designer look, textured plaster eggs are stunning. The raised texture adds depth and visual interest.
They fit perfectly in neutral or modern homes.
How To
Apply lightweight spackle or texture paste with a palette knife. Create subtle raised strokes.
Allow to dry completely. Lightly sand if needed and paint in neutral shades.
Seal with matte finish.
Materials Used
- Dollar Tree stackable eggs
- Lightweight spackle or texture paste
- Palette knife
- Sandpaper
- Acrylic paint
- Sealer
10. Personalized Name Display Eggs
These are perfect for Easter tables or gifts. Add vinyl names or hand-lettered calligraphy for a personalized touch.
They make beautiful place settings.
How To
Paint egg in desired color and let dry. Use vinyl cutting machine or stencils to apply names.
Seal lightly if needed and display at each place setting.
Materials Used
- Dollar Tree stackable eggs
- Acrylic paint
- Vinyl letters or stencil
- Paint pen
- Sealer