
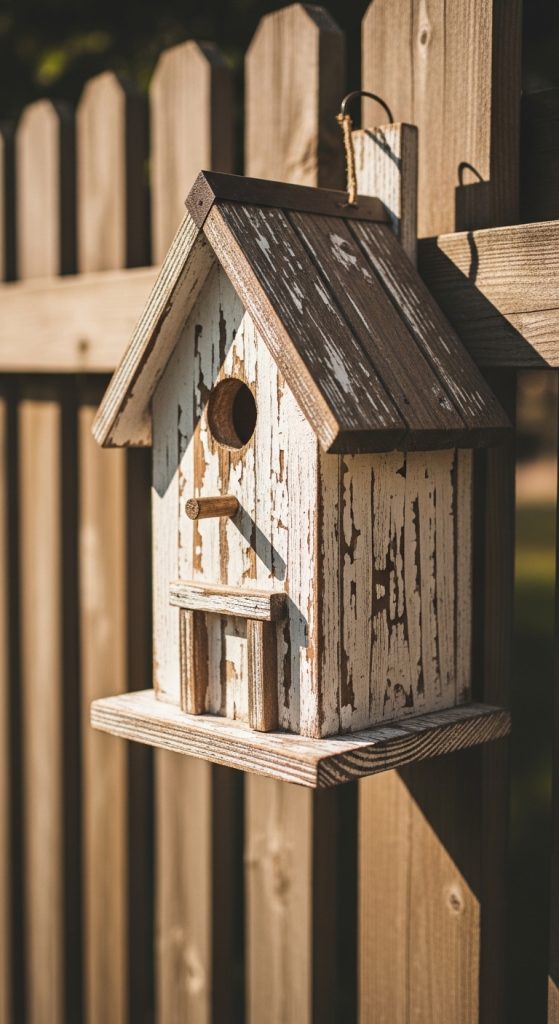
Painted birdhouses combine practical garden features with creative decoration. A birdhouse provides a small shelter designed to attract birds while offering protection from weather and predators. When painted creatively, the structure also becomes a decorative element for outdoor spaces such as gardens, patios, balconies, or backyard landscapes. Many Pinterest ideas focus on painted birdhouses because they combine DIY creativity with nature-friendly design. The project allows individuals to transform a simple wooden structure into a colorful handmade decoration that supports wildlife.
Painted birdhouse crafts are beginner friendly and suitable for anyone interested in creative outdoor projects. With basic materials such as paint, brushes, and simple tools, a plain wooden birdhouse can be customized using patterns, color combinations, and decorative themes. These creative projects also encourage experimentation with artistic styles such as minimalist design, floral painting, geometric patterns, or rustic finishes.
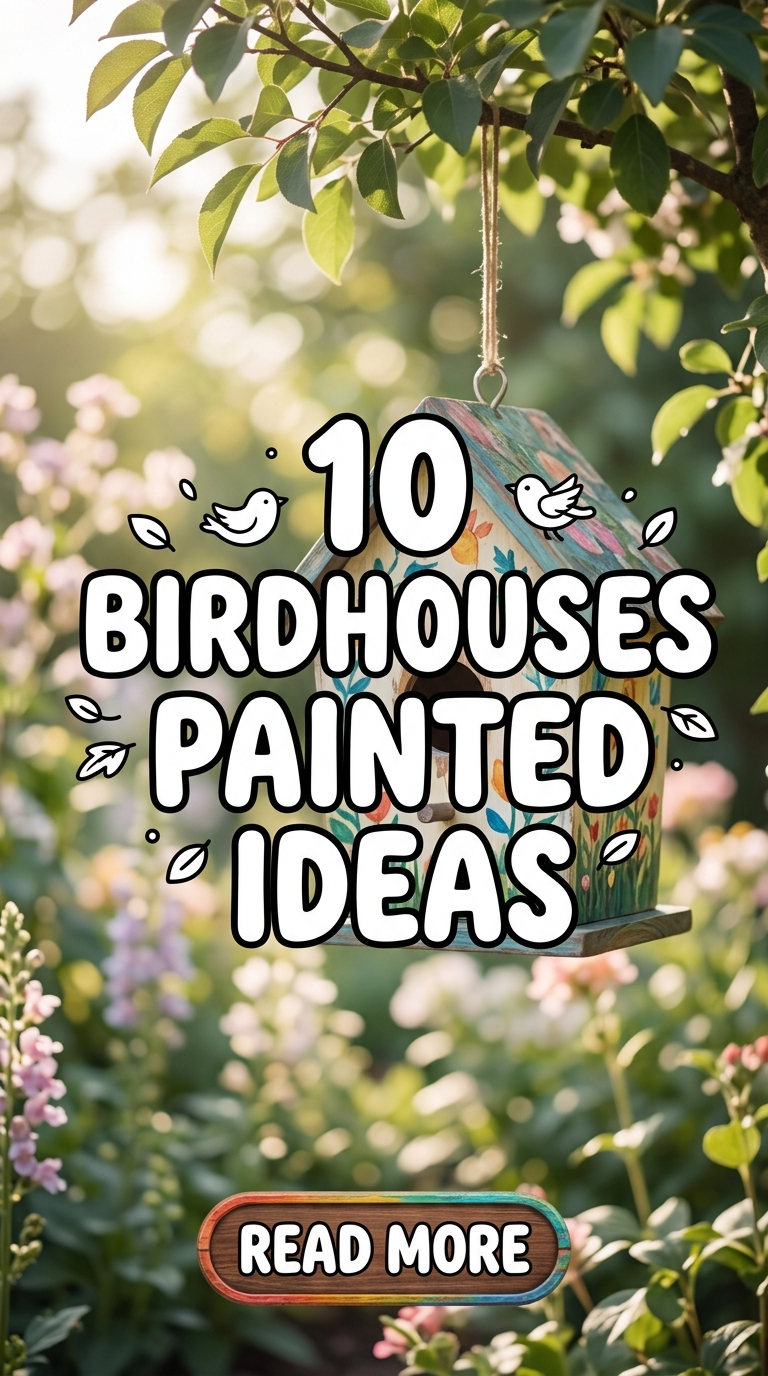
This article presents ten detailed painted birdhouse ideas designed for DIY enthusiasts and beginners. Each idea explains the design concept and the step-by-step creation process. Readers will learn how to prepare materials, apply paint techniques, and design visually appealing birdhouses that function as both shelter and outdoor home decor. These creative ideas offer inspiration for transforming simple birdhouses into attractive decorative garden features.
Why This Idea Is Trending or Useful
Painted birdhouses have become a popular creative project across Pinterest because they combine outdoor decoration with practical wildlife support. Many people search for Pinterest ideas that enhance garden aesthetics while encouraging natural activity such as bird nesting. A painted birdhouse fulfills both purposes by serving as a small habitat for birds while acting as a decorative feature within a landscape design.
The popularity of this project also reflects the increasing interest in DIY outdoor decoration. Homeowners often seek budget ideas for enhancing patios, balconies, or backyard spaces without purchasing expensive decor items. Painting birdhouses allows individuals to customize their outdoor spaces using simple materials and creative techniques.
Another reason for the popularity of this craft is its beginner friendly nature. Most birdhouse painting tutorials require only basic tools and simple painting methods. Even individuals with limited artistic experience can achieve attractive results using stencils, patterns, or color blocking techniques.
Painted birdhouses also provide flexibility in design. They can reflect many decorative styles including rustic garden decor, modern minimalist style, cottage themes, or colorful seasonal decorations. This adaptability makes painted birdhouses a versatile creative project that remains widely shared among trending ideas for garden decoration and outdoor DIY crafts.
Materials and Preparation
Successful birdhouse painting begins with proper preparation and organized materials. Most birdhouses used for DIY painting projects are made from untreated wood. This surface allows paint to adhere easily and supports long-lasting decorative finishes. Preparing the wood surface properly ensures the painted design remains durable when exposed to outdoor conditions.
Common materials required for painted birdhouse projects include acrylic paint, weather-resistant sealant, paint brushes of different sizes, painter’s tape, and sandpaper. Some creative projects may also use decorative materials such as stencils, small wooden shapes, or natural textures. These materials help create detailed patterns and personalized designs.
Before painting begins, the wooden birdhouse should be lightly sanded to remove rough areas and splinters. This step creates a smooth painting surface and improves paint adhesion. After sanding, the surface should be wiped with a clean cloth to remove dust particles.
Planning the design is another important preparation step. Sketching a simple design or selecting a color palette helps maintain a cohesive aesthetic. Some projects may involve layering multiple colors or adding decorative elements, so reviewing the step by step process before painting begins helps ensure efficient project execution.
With organized materials and careful preparation, painting birdhouses becomes a smooth and enjoyable DIY creative project.
Main Ideas
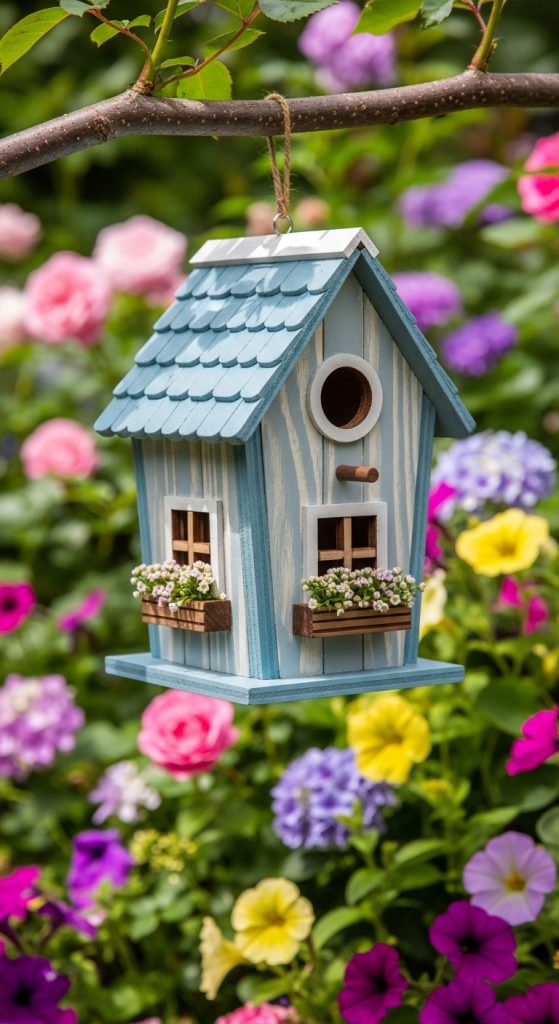
Idea 1: Classic Garden Cottage Birdhouse
How to Create
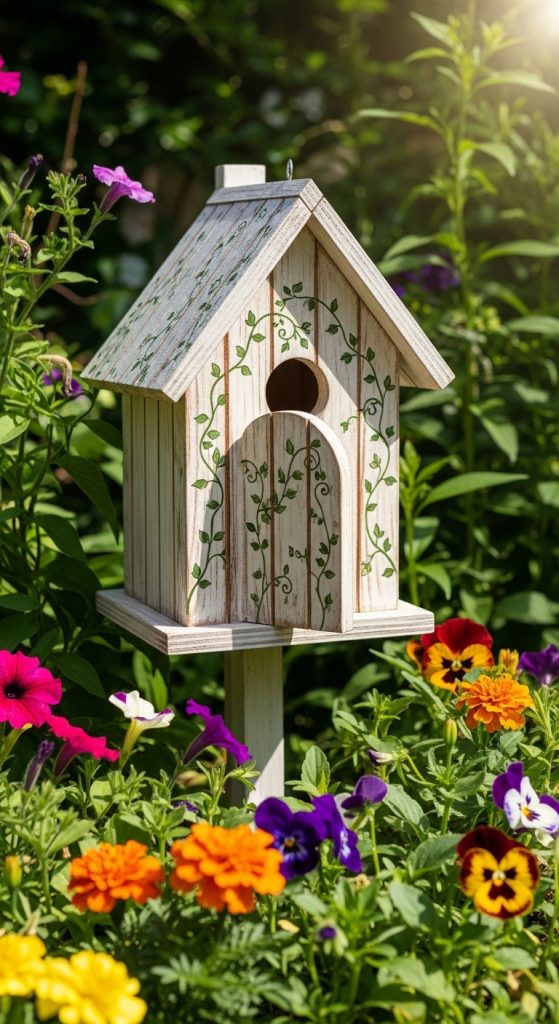
A garden cottage birdhouse design focuses on creating a charming miniature house appearance. This painted birdhouse style reflects traditional garden cottages often seen in countryside landscapes. The design typically includes soft color palettes, painted windows, and decorative trim that make the birdhouse resemble a small cottage structure.
The concept behind this creative project is to transform a simple birdhouse into a miniature architectural decoration. Soft pastel colors such as light blue, pale yellow, or mint green create a welcoming aesthetic. White trim around the entrance hole and roof edges adds contrast and enhances the cottage appearance. Additional painted details such as window shapes or flower boxes can further enhance the design.
This style works well for garden decor because it blends naturally with plants and flowers. The miniature cottage appearance creates visual charm while still serving its practical purpose as a bird shelter. The finished piece becomes both a functional birdhouse and an attractive outdoor decoration.
Because the design relies on simple shapes and color blocking, it remains beginner friendly while producing visually appealing results. It is one of the most commonly shared Pinterest ideas for painted birdhouses.
Step-by-Step Guide
Begin by sanding the wooden birdhouse to create a smooth surface. Remove dust using a dry cloth before applying any paint. Next, apply a base color such as pastel blue or soft yellow to the entire structure. Use a medium-sized brush to ensure even coverage across the walls and roof.
Allow the base paint layer to dry completely before adding decorative details. Using a smaller brush, paint white trim around the entrance hole and along the roof edges. These details help create the cottage appearance.
Next, add simple window shapes on the front or sides of the birdhouse using thin brush strokes. Small rectangles or square shapes can represent windows. Flower box details can also be painted below the windows using green and red colors.
Finally, apply a clear outdoor sealant to protect the painted surface from weather exposure. Once dry, the birdhouse can be mounted in a garden or hung from a tree branch as a charming cottage-style garden decoration.
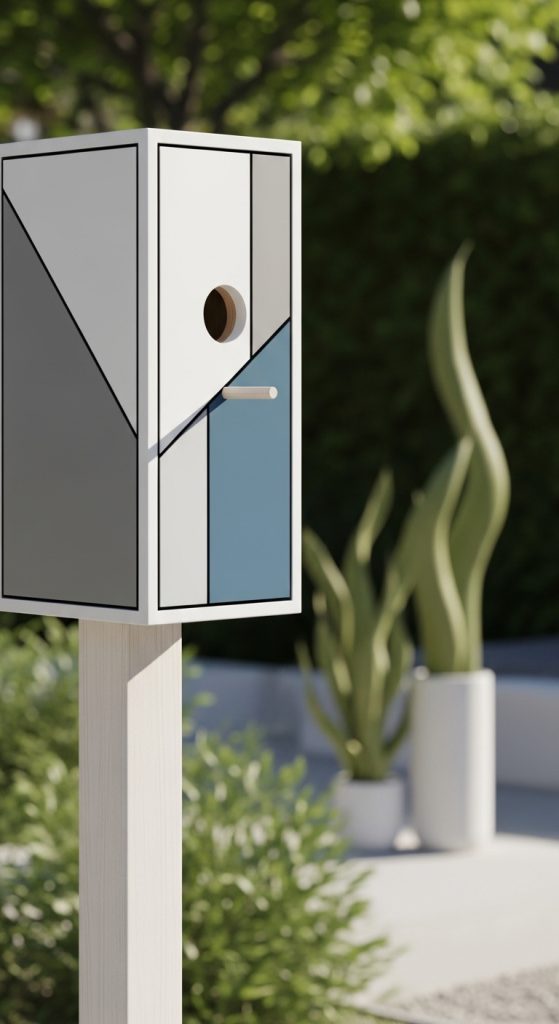
Idea 2: Minimalist Geometric Birdhouse
How to Make
A minimalist geometric birdhouse focuses on modern design principles that emphasize clean lines and simple patterns. This design style uses geometric shapes such as triangles, rectangles, or diagonal color blocks to create a structured visual appearance. Minimalist design avoids excessive decoration and instead relies on balanced color placement and precise shapes.
The concept of geometric birdhouse painting is based on dividing the birdhouse surface into sections. Each section is painted in a different color or pattern to create a structured layout. Neutral tones such as white, gray, or beige are often combined with one or two bold colors for contrast.
This design style fits well with modern garden aesthetics and contemporary home decor. A minimalist painted birdhouse can complement modern patio furniture, structured garden layouts, and clean outdoor design themes.
Because the design relies on simple shapes rather than detailed illustrations, it is beginner friendly and easy to execute. The project encourages careful planning and precise painting rather than complex artistic drawing. As a result, it remains a popular DIY creative project for those interested in modern design inspiration.
Step-by-Step Guide
Start by preparing the birdhouse surface with light sanding and cleaning. Once the wood surface is ready, apply a neutral base color such as white or light gray. This base layer creates a clean background for the geometric design.
After the paint dries, use painter’s tape to divide the birdhouse surface into geometric sections. Diagonal lines or triangular shapes can be created by placing tape across the walls of the birdhouse. These tape lines will act as boundaries for the paint colors.
Paint each section with a different color such as navy blue, charcoal gray, or muted green. Apply thin layers of paint to maintain smooth edges along the tape lines.
Once the paint dries slightly, carefully remove the tape to reveal the geometric design. Finish the project by applying a clear outdoor sealant to protect the painted surface. The completed birdhouse displays a modern minimalist aesthetic suitable for contemporary outdoor decoration.
Idea 3: Floral Garden Painted Birdhouse
How to Create
A floral garden painted birdhouse focuses on decorating the birdhouse with flower patterns that reflect natural garden environments. Floral designs are widely used in Pinterest ideas because they blend easily with outdoor spaces and create a soft, nature-inspired aesthetic. Painting flowers onto a birdhouse transforms a simple wooden structure into a decorative feature that visually connects with surrounding plants, shrubs, and seasonal blooms.
The design concept centers on using floral illustrations to cover selected areas of the birdhouse surface. Flowers can appear along the roof edges, around the entrance hole, or across the side panels. Simple flower shapes work best for beginner friendly projects. These shapes usually consist of circular centers surrounded by rounded petals. Colors such as red, pink, yellow, and lavender help represent common garden flowers.

Floral birdhouses also support a balanced decorative composition. Rather than covering the entire surface with patterns, small clusters of flowers placed in specific areas create visual harmony. Leaves and stems can be added to connect the flower shapes and enhance the natural look of the design.
This creative project allows individuals to experiment with color combinations and pattern placement while maintaining the practical function of the birdhouse. The finished piece becomes both a bird shelter and a seasonal garden decoration.
Step-by-Step Guide
Begin by sanding the wooden birdhouse and wiping the surface clean to remove dust. Apply a base color that will act as the background for the floral patterns. Soft colors such as light cream, pale blue, or mint green create a calm garden aesthetic.
Allow the base coat to dry completely before painting decorative details. Using a small round brush, begin painting flower centers across the birdhouse surface. These centers should appear as small circles spaced evenly across the design areas.
Next, add petals around each flower center using short brush strokes. Petals can be created using colors such as pink, yellow, or lavender. Paint simple leaf shapes using green paint to connect the flowers visually.
Once the floral design is complete, allow the paint to dry thoroughly. Apply a clear outdoor sealant to protect the decoration from weather exposure. The completed floral birdhouse can then be placed in a garden where it blends naturally with surrounding plants.
Idea 4: Bright Rainbow Painted Birdhouse
How to Make
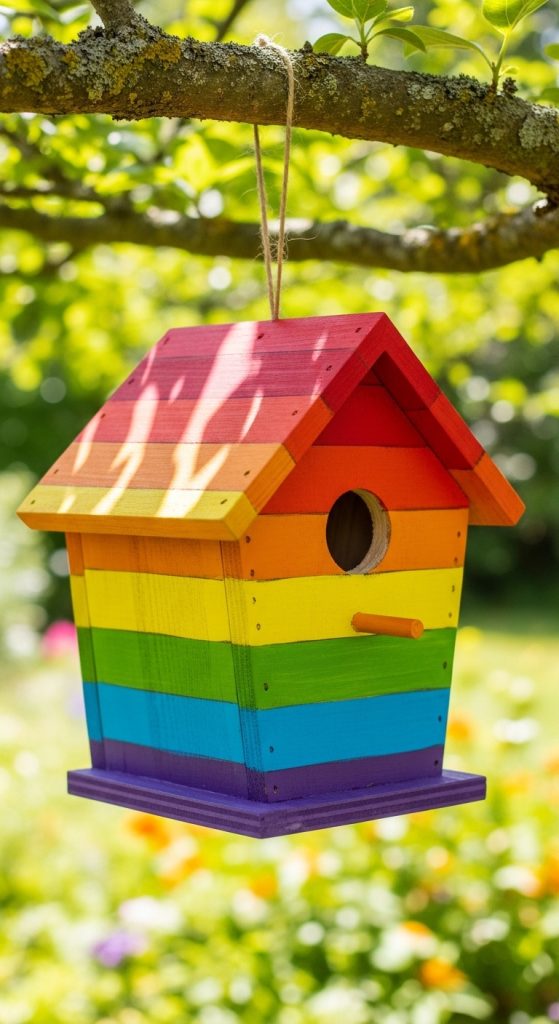
A rainbow painted birdhouse focuses on using multiple bright colors to create a vibrant outdoor decoration. Rainbow color patterns are commonly used in creative DIY projects because they introduce strong visual contrast and playful energy. This design style works particularly well in gardens with colorful flowers or playful outdoor themes.
The concept behind a rainbow birdhouse involves dividing the surface into several sections that represent different colors of the rainbow. These colors typically include red, orange, yellow, green, blue, and purple. Each color appears as a stripe or panel across the structure.
The bright color combination helps the birdhouse stand out visually in outdoor spaces. The design is particularly suitable for gardens that feature colorful plants or decorative elements. The rainbow style also works well for family-friendly spaces such as backyard play areas.
Because the design relies on simple color sections rather than detailed illustrations, it remains beginner friendly. The creative project focuses on color application and clean boundaries between sections. This makes it accessible for individuals who want an easy project with a strong visual impact.
Step-by-Step Guide
Start by preparing the birdhouse surface through sanding and cleaning. Apply a white base coat across the entire birdhouse. The white background helps rainbow colors appear brighter and more vibrant once applied.
After the base coat dries, use painter’s tape to divide the birdhouse walls into horizontal or vertical sections. Each section will represent a different rainbow color. Ensure the tape lines are straight to maintain clean color boundaries.
Paint each section using the appropriate rainbow color. Apply red first, followed by orange, yellow, green, blue, and purple. Thin paint layers help maintain smooth coverage and prevent uneven texture.
Once the paint dries slightly, carefully remove the painter’s tape to reveal the rainbow pattern. Finish the project by applying a protective sealant. The completed rainbow birdhouse becomes a colorful decorative element that adds energy and brightness to outdoor spaces.
Idea 5: Rustic Farmhouse Birdhouse
How to Create
A rustic farmhouse birdhouse reflects traditional countryside design using natural colors and textured finishes. Rustic decor focuses on natural materials and aged surfaces that create a warm, weathered appearance. This style is commonly used in outdoor decoration because it blends easily with wooden fences, garden paths, and natural landscapes.
The concept of a rustic birdhouse involves painting the wood in muted tones and lightly distressing the surface to create an aged effect. Colors such as soft gray, faded white, and earthy brown help achieve the farmhouse look. The distressed finish reveals small portions of the natural wood beneath the paint, adding character and texture.
Rustic birdhouses often feature minimal decorative patterns. Instead, the focus remains on the natural appearance of the wood and the subtle paint finish. This design style complements farmhouse-style gardens and cottage-inspired outdoor decor.
Because the project focuses on texture rather than detailed painting, it remains accessible for beginners. The creative process emphasizes layering paint and lightly sanding surfaces to achieve the rustic effect.
Step-by-Step Guide
Begin by sanding the birdhouse lightly to smooth the surface. Apply a base coat using a neutral color such as white or light gray. Use a wide brush to cover the entire structure evenly.
Once the base coat dries, apply a second color layer such as muted blue or beige. This layer should remain thin because some areas will be distressed later.
After the paint dries partially, use fine sandpaper to gently rub edges and raised surfaces. This step removes small amounts of paint, revealing the base color or natural wood beneath. Focus on corners and roof edges to create a natural worn effect.
Finally, apply a clear protective sealant to protect the finish. The completed rustic farmhouse birdhouse features a weathered aesthetic that blends naturally into outdoor environments.
Idea 6: Polka Dot Painted Birdhouse
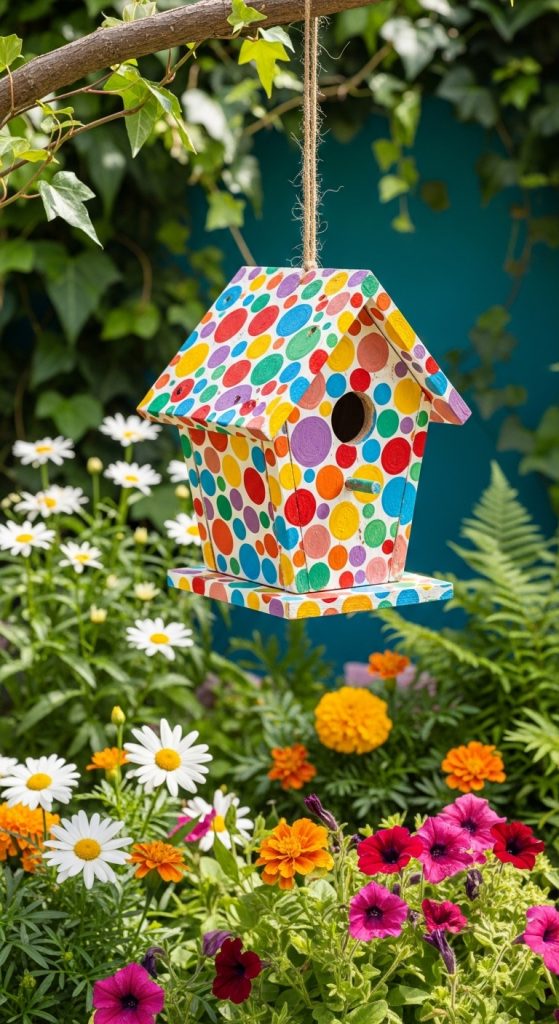
How to Create
A polka dot birdhouse design focuses on repeating circular patterns that create a playful decorative effect. Polka dots are simple shapes that can be applied easily using brushes or stamping tools. This makes the design ideal for beginner friendly DIY projects.
The concept behind polka dot decoration involves placing evenly spaced circular shapes across the birdhouse surface. The dots may appear in a single color or multiple contrasting colors depending on the desired aesthetic. Bright color combinations such as white dots on a red background create strong visual contrast.
Polka dot patterns introduce rhythm and repetition into the design. The repeated shapes help create a balanced composition that remains visually interesting without requiring complex artistic techniques.
This style works particularly well for gardens that feature playful decorative themes. It can also complement colorful outdoor furniture or flower beds. Because the shapes are simple, the project remains easy to execute while producing an attractive finished product.
Step-by-Step Guide
Prepare the birdhouse by sanding and cleaning the wooden surface. Apply a base color such as red, blue, or green across the entire structure. Allow the paint to dry fully before adding decorative elements.
To create the polka dots, dip the end of a round brush or sponge into white paint. Press the tool gently onto the birdhouse surface to create a circular dot. Continue placing dots evenly across the walls of the birdhouse.
Spacing the dots evenly helps maintain a balanced pattern. Larger dots can be combined with smaller dots to add visual variation if desired.
Allow the paint to dry completely before applying a protective sealant. The finished birdhouse displays a playful pattern that adds color and personality to garden decoration.
Idea 7: Nature Camouflage Birdhouse
How to Make
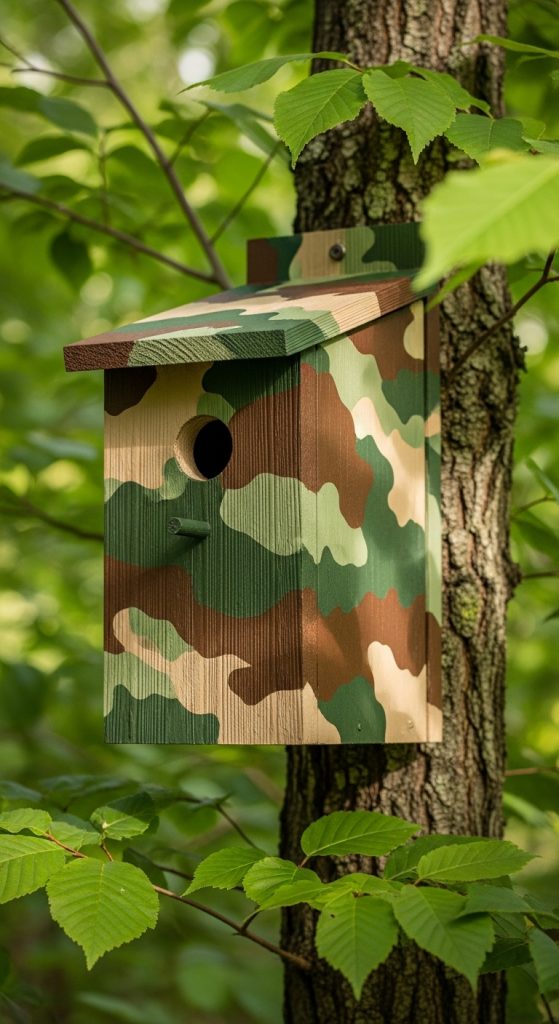
A nature camouflage birdhouse focuses on blending the birdhouse into natural surroundings using earthy colors and organic patterns. This design style is often used in wildlife-friendly garden spaces because it reduces visual disturbance for birds while maintaining decorative appeal.
The concept involves painting the birdhouse using colors found in natural landscapes. Shades of green, brown, and beige help the structure blend with trees, leaves, and garden environments. Small leaf patterns or irregular shapes can be added to create a camouflage effect.
This design approach supports the practical purpose of birdhouses. By blending into the environment, the birdhouse appears less noticeable to predators and becomes more comfortable for birds.
The aesthetic also complements natural garden landscapes. Rather than standing out brightly, the birdhouse integrates with plants and wooden structures in the outdoor environment.
Step-by-Step Guide
Begin by applying a base coat of soft green paint across the entire birdhouse surface. This color acts as the primary background representing foliage.
After the base layer dries, use a smaller brush to paint irregular patches of brown and beige across the birdhouse. These shapes should vary in size and placement to mimic natural camouflage patterns.
Add small leaf shapes using darker green paint to enhance the natural theme. These leaf details can appear along the roof edges or near the entrance hole.
Allow the design to dry completely before sealing the birdhouse with weather-resistant sealant. The finished camouflage birdhouse blends naturally with garden surroundings while maintaining its decorative quality.
Idea 8: Beach Inspired Coastal Birdhouse
How to Create
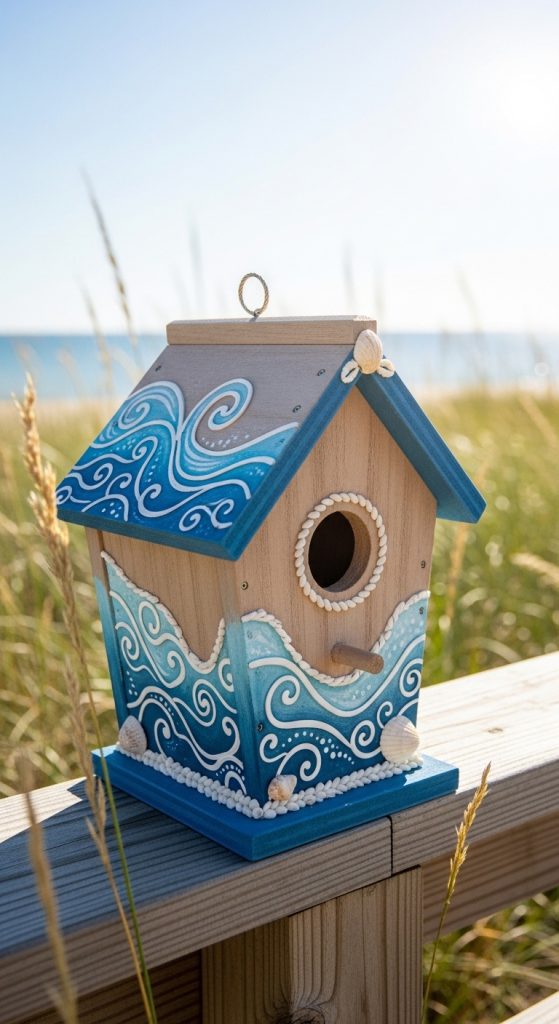
A coastal birdhouse design reflects beach environments using colors and patterns associated with seaside landscapes. Coastal decor often uses light blue, sandy beige, and white tones to represent ocean and shoreline elements. These colors create a calm aesthetic suitable for garden or patio decoration.
The concept behind this design involves painting the birdhouse in colors inspired by coastal scenery. Blue tones can represent ocean water, while beige tones mimic sandy beaches. White trim helps create a clean nautical appearance.
Decorative details such as wave patterns or small shell illustrations can enhance the seaside theme. These elements reinforce the connection between the birdhouse and coastal inspiration.
This style works well for outdoor spaces with relaxed decorative themes. It can complement beach-style patios, coastal garden decor, or nautical-inspired outdoor furniture.
Step-by-Step Guide
Begin by sanding and cleaning the birdhouse surface. Apply a light blue base coat to represent ocean colors. Allow the paint to dry completely before adding additional decorative elements.
Using white paint, create wave-shaped patterns across the lower portion of the birdhouse walls. These curved shapes represent ocean waves.
Next, paint the roof using sandy beige paint to represent beach tones. Small shell shapes or starfish patterns can be added using a thin brush.
Once the design is complete, apply a protective sealant to preserve the painted details. The finished coastal birdhouse creates a relaxing beach-inspired decoration for outdoor spaces.
Idea 9: Garden Fence Style Birdhouse
How to Create
A garden fence style birdhouse mimics the appearance of small wooden garden fences. This design style reflects traditional outdoor garden structures and complements landscaped environments. The visual theme focuses on vertical painted lines that resemble fence boards.
The concept involves painting vertical stripes across the birdhouse walls. These stripes simulate wooden fence panels and create the illusion of a miniature fence structure. Neutral colors such as white, gray, or soft brown enhance the fence-like appearance.
This decorative style blends easily with garden landscapes and backyard decor. The design remains simple while still providing a distinctive visual feature.
Step-by-Step Guide
Prepare the birdhouse surface with sanding and cleaning. Apply a light base coat such as beige or soft gray.
After the paint dries, use painter’s tape to create vertical sections across the birdhouse walls. Paint thin darker lines between the sections to represent fence boards.
Remove the tape once the paint dries slightly. Add small decorative details such as tiny vines or flowers climbing along the fence pattern.
Finish by applying outdoor sealant to protect the painted design. The completed birdhouse resembles a miniature garden fence decoration.
Idea 10: Color Block Modern Birdhouse
How to Make
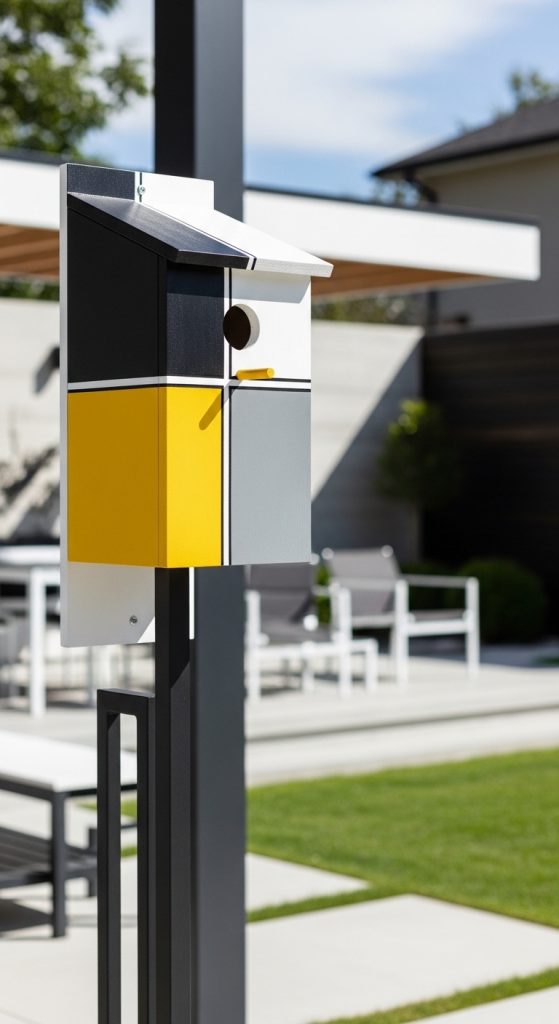
A color block birdhouse uses large blocks of color arranged in structured sections. This design style is inspired by modern art and contemporary home decor. The approach focuses on bold colors and simple shapes rather than detailed illustrations.
The concept involves dividing the birdhouse surface into large sections. Each section receives a different color, creating a striking visual contrast. Common combinations include black and white, navy and yellow, or gray and coral.
Color blocking allows individuals to experiment with strong color combinations while maintaining a clean design structure. This style works particularly well in modern outdoor environments.
Step-by-Step Guide
Begin by sanding the birdhouse surface and applying a neutral base coat such as white.
Use painter’s tape to divide the birdhouse walls into large rectangular sections. Each section will be painted with a different color.
Apply the selected colors carefully within the taped sections. Thin layers of paint help maintain smooth coverage and sharp edges.
After the paint dries, remove the tape to reveal the color block design. Apply a clear outdoor sealant to protect the finish. The completed birdhouse displays a modern design that enhances contemporary garden decor.

